Love this? Save it for later!
Share the inspiration with your friends
It was 10:47 PM on a random Wednesday in September, and I had a very specific, slightly ridiculous craving. I wanted something that tasted like fall, looked like Halloween, and felt like a warm hug—but I also didn’t want to undo the decent eating I’d done all day. I didn’t have the full box of cake mix or the stick-and-a-half of butter that most blondie recipes demand, but I had a bag of candy corn left over from a party, some white chocolate chips I’d stashed for “emergencies,” and the sudden, stubborn idea that I could make this work without all the sugar and fat.
I mean, let me tell you—I stood there in my kitchen, holding that bag of candy corn like it was a secret weapon. The thing about late-night cooking is that the usual rules kind of disappear. You stop second-guessing. You just go with it. I swapped half the butter for unsweetened applesauce, cut the sugar way back, and crossed my fingers that the candy corn would do the heavy lifting for sweetness. Honestly, I thought I was being a little nuts. But when I pulled that pan out of the oven 22 minutes later, the smell was pure magic. Butterscotch-y, warm, with that unmistakable vanilla note.
The first bite was a revelation. The edges were chewy, the center was soft, and those little candy corn pieces had melted into these sweet, almost caramel-like pockets. I may have stood at the counter eating three of them before I even thought about taking a picture. Maybe you’ve been there—that moment when a kitchen experiment actually works, and you feel like you’ve just discovered a little secret. That’s this recipe. It’s not the most traditional blondie you’ll ever make, and that’s exactly why I keep coming back to it. It’s lighter, it’s weirdly brilliant, and it tastes like the best kind of compromise between indulgence and feeling good.
Why You’ll Love This Recipe
Let me be real with you—I’ve tested this recipe six times to get it just right. The first batch was too dry. The second batch was too sweet. But by the third try, I knew I had something special. This isn’t just another blondie recipe pretending to be healthy. It’s the real deal, and here’s why it works:
- Quick & Easy: From start to finish, these blondies come together in about 30 minutes. Mix the batter in one bowl, pour it in the pan, and you’re done. No stand mixer needed, no complicated steps.
- Simple Ingredients: You probably have most of these in your pantry right now. Applesauce, flour, a little butter, eggs, and that bag of candy corn you bought on impulse. No weird health-food store finds.
- Perfect for Fall Gatherings: Halloween parties, Thanksgiving dessert tables, or just a cozy night in—these blondies fit right in. They’re festive without being over-the-top.
- Crowd-Pleaser: I brought these to a potluck last week, and I watched a guy who swore he “didn’t do healthy desserts” go back for thirds. Kids love them. Adults love them. They just work.
- Unbelievably Delicious: Here’s the thing—you won’t miss the extra butter or sugar. The applesauce keeps them incredibly moist, the candy corn adds natural sweetness, and the white chocolate chips bring that creamy richness. It’s comfort food that doesn’t weigh you down.
What makes this recipe different from the rest? It’s the balance. Most lighter blondies taste like cardboard or artificial sweetener. Not these. I use a technique of blending the applesauce with melted butter to create that rich, buttery texture without the full fat content. The candy corn isn’t just decoration—it melts into the batter and creates these little pockets of caramel-like goodness. And the white chocolate chips? They add just enough indulgence to make it feel like a real treat. This isn’t a sacrifice. It’s a smart upgrade.
This recipe is for those nights when you want something sweet but don’t want to hate yourself in the morning. It’s for the mom who needs a quick dessert for the school bake sale. It’s for the person trying to eat a little better but refusing to give up joy. Honestly, it’s for anyone who’s ever stood in their kitchen at 11 PM craving something good and wondering if they could make it work. You can. And you will.
What Ingredients You Will Need
This recipe uses simple, wholesome ingredients to deliver that classic blondie flavor without the heavy calorie load. Most of these are pantry staples, and I’ve tested several substitutions so you can adapt based on what you have. Here’s what you’ll need:
For the Blondie Batter
- Unsalted butter, melted (4 tablespoons / 57g) — This is just enough to give you that buttery flavor without overdoing it. I use Kerrygold for the best taste, but any good quality butter works.
- Unsweetened applesauce (1/3 cup / 80ml) — This is my secret weapon. It replaces the rest of the fat and adds incredible moisture. Make sure it’s unsweetened so you control the sugar level. I prefer Mott’s or homemade if I have it.
- Light brown sugar, packed (1/2 cup / 100g) — Brown sugar adds that molasses depth that makes blondies taste like blondies. Don’t swap this for white sugar—the texture won’t be the same.
- Granulated sugar (1/4 cup / 50g) — Just a little to help with structure and browning. You really don’t need more with the candy corn adding sweetness.
- Large egg (1, room temperature) — Room temperature eggs mix more evenly into the batter. If you forgot to take it out, place it in warm water for 5 minutes.
- Vanilla extract (1 teaspoon / 5ml) — Pure vanilla makes a difference here. Imitation works in a pinch, but pure gives that warm, rich flavor.
- All-purpose flour (1 cup + 2 tablespoons / 140g) — Spoon and level your flour. Scooping directly from the bag packs it down and makes blondies dry. Trust me, I learned this the hard way.
- Baking powder (1/2 teaspoon) — Not baking soda. Baking powder gives a softer, more tender crumb.
- Salt (1/4 teaspoon) — Salt balances the sweetness. Don’t skip it. I use fine sea salt.
For the Mix-Ins
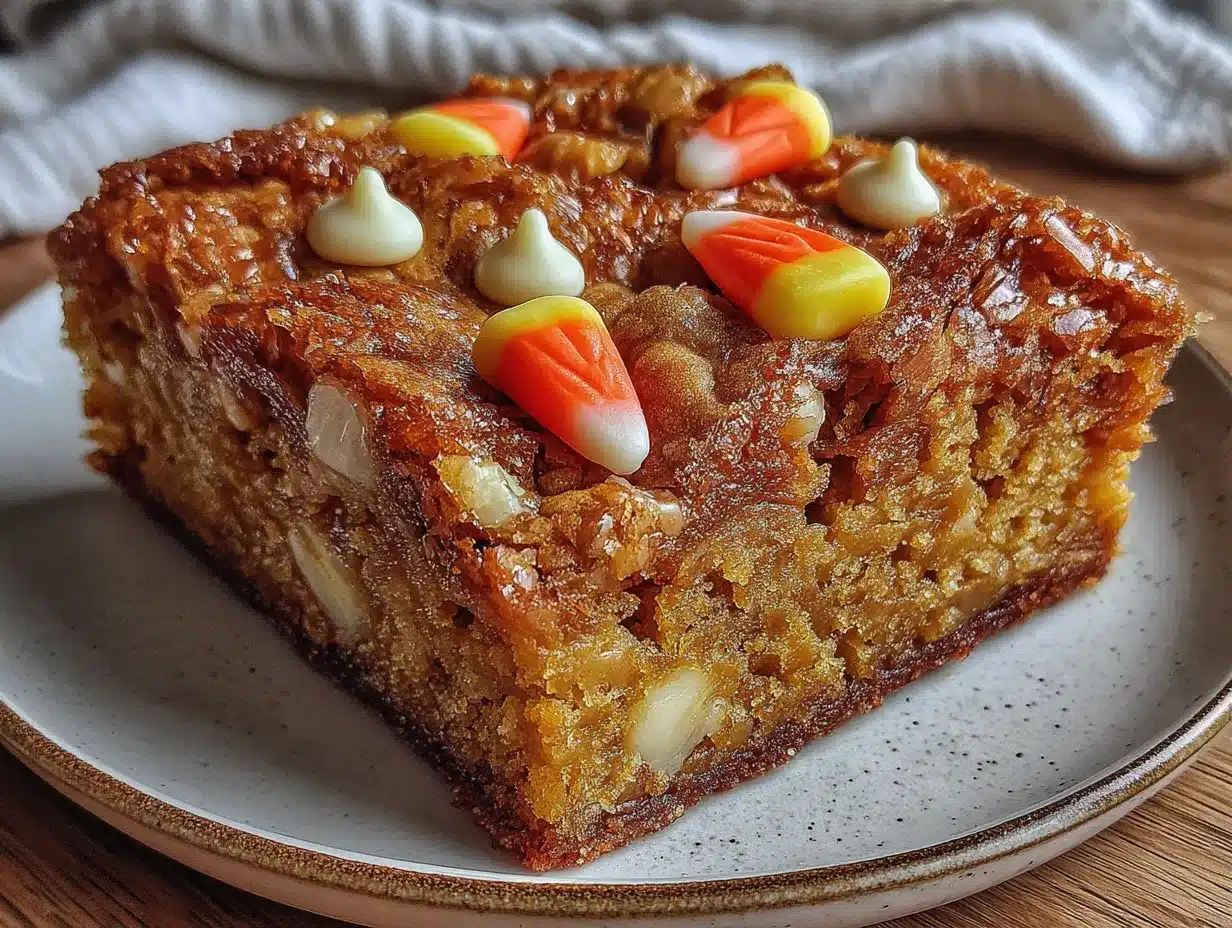
- Candy corn (1/2 cup / 100g) — The star of the show. Use fresh candy corn for best results—staleness makes them hard and chewy. Brach’s is my go-to.
- White chocolate chips (1/3 cup / 60g) — These add creamy pockets of sweetness. I prefer Ghirardelli white chocolate chips because they melt smoothly and don’t get grainy. For a dairy-free option, use Enjoy Life white chocolate chips.
Ingredient Selection Tips: When buying candy corn, give the bag a gentle squeeze. If the pieces feel hard and separate easily, they’re fresh. If they stick together in a clump, they’re old and will be tough in the blondies. For the white chocolate chips, check the ingredients—real white chocolate contains cocoa butter, not just palm oil. It makes a difference in how they melt.
Substitution Guidance: If you’re gluten-free, swap the all-purpose flour for a 1:1 gluten-free baking flour blend (I like Bob’s Red Mill). For a lower sugar option, reduce the granulated sugar to 2 tablespoons—the candy corn and white chocolate add plenty of sweetness. Need it dairy-free? Use coconut oil instead of butter and dairy-free white chocolate chips. The texture will be slightly different but still delicious.
Equipment Needed
You don’t need a fancy kitchen to make these blondies. Here’s what you’ll need:
- 8×8-inch baking pan — This is the perfect size for thick, chewy blondies. A 9×9-inch pan works too, but they’ll be thinner and bake faster (check at 18 minutes).
- Parchment paper — Line your pan with parchment, leaving overhang on two sides. This creates “handles” so you can lift the whole blondie slab out for easy cutting. I’ve made the mistake of not using parchment and spent 20 minutes scraping blondie bits out of the pan. Don’t be me.
- Large mixing bowl — Any medium-to-large bowl works. Glass or ceramic is fine.
- Whisk — For mixing the wet ingredients. A fork works in a pinch.
- Rubber spatula — For folding in the mix-ins and scraping every last bit of batter into the pan. I use a silicone spatula so nothing sticks.
- Measuring cups and spoons — Dry measuring cups for flour and sugar, liquid measuring cup for applesauce. It matters more than you think.
- Kitchen scale (optional but recommended) — Weighing your ingredients is the most accurate way to bake. If you have one, use it. If not, spoon and level your flour carefully.
Budget-Friendly Tip: Don’t have an 8×8 pan? Use a disposable aluminum pan from the grocery store—they’re cheap and work perfectly. Just watch the baking time since metal pans conduct heat differently. And if you don’t have parchment paper, grease the pan well with butter or cooking spray. Just be prepared for a little more cleanup.
Preparation Method
Let’s get baking. I’ve broken this down into clear steps with time estimates and sensory cues so you know exactly what to look for. Take your time—rushing is the enemy of good blondies.
- Preheat and Prep (5 minutes): Preheat your oven to 350°F (175°C). While it’s heating, line your 8×8 baking pan with parchment paper, leaving about 2 inches of overhang on two opposite sides. This is your lifting handle later. Lightly spray the parchment with non-stick spray for extra insurance.
- Melt the Butter (1 minute): Place 4 tablespoons of unsalted butter in a microwave-safe bowl and microwave in 20-second bursts until just melted. You want it melted but not hot—if it’s steaming, let it cool for a minute. Hot butter can cook the egg when you add it, and nobody wants scrambled egg blondies.
- Mix the Wet Ingredients (3 minutes): In your large mixing bowl, whisk together the melted butter and 1/3 cup unsweetened applesauce until smooth. Add 1/2 cup packed light brown sugar and 1/4 cup granulated sugar. Whisk vigorously for about 1 minute until the sugar starts to dissolve and the mixture looks glossy. Crack in 1 room-temperature egg and add 1 teaspoon vanilla extract. Whisk until everything is combined and smooth. The mixture should look like a thick, pale caramel sauce.
- Combine the Dry Ingredients (2 minutes): In a separate small bowl, whisk together 1 cup + 2 tablespoons all-purpose flour, 1/2 teaspoon baking powder, and 1/4 teaspoon salt. This ensures the baking powder is evenly distributed—no one wants a pocket of baking powder in their blondie.
- Fold It Together (2 minutes): Pour the dry ingredients into the wet ingredients. Use your rubber spatula to fold gently—just until you see no more streaks of flour. Overmixing develops gluten and makes blondies tough. You want to see a thick, slightly sticky batter. It should look like a soft cookie dough, not a runny cake batter.
- Add the Mix-Ins (2 minutes): Gently fold in 1/2 cup candy corn and 1/3 cup white chocolate chips. Reserve about a tablespoon of each for the top if you want a prettier presentation. Fold just until distributed—maybe 5 or 6 strokes. The candy corn might feel like it’s clumping, but that’s fine. It will melt and spread during baking.
- Transfer to Pan (1 minute): Scrape the batter into your prepared pan. It will be thick, so use your spatula to spread it evenly into all corners. Wet your spatula slightly if the batter is sticky. Sprinkle the reserved candy corn and white chocolate chips on top, pressing them in gently so they stick.
- Bake (20-23 minutes): Place the pan on the middle rack of your preheated oven. Bake for 20 minutes, then check. The edges should be golden brown and pulling away slightly from the pan. The center will look slightly underdone—puffy, a little jiggly, and pale. That’s exactly what you want. A toothpick inserted in the center should come out with a few moist crumbs, not wet batter. If it’s still very wet, bake for 2-3 more minutes and check again.
- Cool Completely (45 minutes to 1 hour): This is the hardest part. Place the pan on a wire rack and let the blondies cool completely in the pan. I know you want to dig in immediately, but warm blondies will fall apart. The structure needs time to set. After about 30 minutes, you can lift them out using the parchment handles and let them cool fully on the rack. Patience pays off here.
- Slice and Serve (5 minutes): Once completely cool, use a sharp knife to cut into 16 squares (4 rows by 4 rows). For clean cuts, wipe the knife clean between each slice. If you’re serving these for a party, you can cut them into 9 larger squares for a more generous portion.
Cooking Tips & Techniques
I’ve made plenty of mistakes with blondies over the years, so you don’t have to. Here are the things I wish someone had told me:
Don’t Overbake: This is the number one mistake. Blondies continue to cook from residual heat after they come out of the oven. If they look perfectly done in the oven, they’ll be overdone and dry by the time they cool. Pull them out when the center still looks slightly underdone. Trust the process.
Room Temperature Ingredients Matter: I once used a cold egg straight from the fridge, and the batter seized up. The butter solidified into little flecks, and the blondies turned out dense and uneven. Let your egg sit out for 30 minutes before starting. If you forgot, place it in a bowl of warm (not hot) water for 5 minutes.
The Candy Corn Factor: Fresh candy corn melts beautifully into the batter. Stale candy corn stays hard and chewy, even after baking. If your candy corn feels hard and sticks together, it’s old. Buy a fresh bag for best results. Also, don’t be tempted to add more than 1/2 cup—too much candy corn makes the blondies overly sweet and sticky.
Multitasking Strategy: While the oven preheats, melt your butter and mix your wet ingredients. While the blondies bake, clean up your dishes. By the time they’re done, your kitchen will be clean and you can focus on enjoying your creation. This is my favorite productivity hack for baking.
The Toothpick Test Trick: Insert your toothpick into the center, but also test a spot near the edge. The edge should be fully set, while the center should have a few moist crumbs. If both are wet, bake longer. If both are dry, you’ve overbaked. Learning this distinction changed my blondie game completely.
Variations & Adaptations
One of the best things about this recipe is how flexible it is. Here are some variations I’ve tried and loved:
Gluten-Free Version: I tested this with Bob’s Red Mill 1:1 Gluten-Free Baking Flour, and it worked beautifully. The texture was slightly more tender, but the flavor was spot on. Add 1 extra tablespoon of flour if your gluten-free blend doesn’t contain xanthan gum.
Vegan Adaptation: Swap the butter for coconut oil (use refined for no coconut flavor), replace the egg with a flax egg (1 tablespoon ground flaxseed + 3 tablespoons water, let sit for 5 minutes), and use dairy-free white chocolate chips. The blondies will be slightly more cake-like but still delicious. I made this version for a friend with dietary restrictions, and she couldn’t tell the difference.
Seasonal Twist: For Christmas, swap the candy corn for red and green M&Ms. For spring, use pastel candy melts. For a fall version without candy corn, try chopped pecans and butterscotch chips. Each variation brings its own personality to the blondies.
Lower Sugar Option: Reduce the granulated sugar to 2 tablespoons and use sugar-free white chocolate chips. The candy corn still adds sweetness, so you won’t miss it. I’ve made this version for my dad, who’s watching his sugar intake, and he asked for the recipe.
Extra Indulgent Version: If you’re not worried about the “lighter” aspect, add 1/4 cup of melted peanut butter to the wet ingredients and top with a drizzle of melted dark chocolate after baking. This turns them into a decadent dessert that’s still lighter than traditional blondies.
My personal favorite variation? I once added a teaspoon of pumpkin pie spice to the batter and used white chocolate chips with a swirl of caramel sauce. It tasted like fall in every bite. Don’t be afraid to experiment—that’s how the best recipes are born.
Serving & Storage Suggestions
These blondies are versatile enough for any occasion. Here’s how to serve and store them for the best experience:
Serving Temperature: Serve at room temperature for the best texture. The edges stay chewy, the center stays soft, and the white chocolate chips are perfectly set. If you want a warm treat, microwave a blondie for 10-15 seconds—the white chocolate gets slightly melty, and the candy corn softens into little caramel pockets.
Presentation Ideas: For Halloween parties, cut into small squares and arrange on a platter with other fall treats. Dust with a little powdered sugar for a bakery-style look. For a dessert board, pair with apple slices, caramel dip, and a drizzle of melted white chocolate. They also look gorgeous stacked in a mason jar tied with a ribbon for gift-giving.
Complementary Pairings: These blondies are amazing with a glass of cold milk or a warm cup of chai tea. For a dessert spread, serve alongside pumpkin spice latte cookies or a scoop of vanilla bean ice cream. The creamy, cool ice cream balances the sweet, chewy blondie perfectly.
Storage Instructions: Store blondies in an airtight container at room temperature for up to 5 days. Place a sheet of parchment paper between layers if stacking to prevent sticking. Do not refrigerate—the cold air dries them out and makes the candy corn hard. If you live in a humid climate, add a piece of bread to the container to absorb excess moisture.
Freezer Instructions: These blondies freeze beautifully. Wrap individual squares tightly in plastic wrap, then place in a freezer-safe bag or container. Freeze for up to 3 months. To thaw, let them sit at room temperature for about 30 minutes, or microwave for 15-20 seconds. The texture remains remarkably close to fresh-baked.
Flavor Development: Here’s a little secret—these blondies actually taste better the next day. The flavors meld together overnight, and the texture becomes even more chewy and cohesive. If you can resist eating them all on day one, wrap them up and save some for day two. You’ll thank me.
Nutritional Information & Benefits
I’m not a nutritionist, but I’ve calculated the approximate values based on the ingredients I use. Here’s what you’re looking at per blondie (based on 16 servings):
| Nutrient | Amount per Blondie |
|---|---|
| Calories | 145 |
| Total Fat | 5g |
| Saturated Fat | 3g |
| Cholesterol | 20mg |
| Sodium | 65mg |
| Total Carbohydrates | 24g |
| Dietary Fiber | 0.5g |
| Sugars | 16g |
| Protein | 2g |
Health Benefits: The applesauce adds fiber and natural sweetness without the fat, making these blondies a smarter choice than traditional versions. White chocolate contains calcium and a small amount of antioxidants from cocoa butter. And candy corn? Well, it’s mostly sugar, but a little treat now and then is good for the soul.
Dietary Considerations: This recipe is nut-free (if you use nut-free white chocolate chips) and can easily be made gluten-free or vegan. It’s lower in fat and calories than traditional blondies, making it a great option for anyone watching their intake without sacrificing flavor. Always check your ingredient labels for potential allergens if serving to others.
My Personal Take: I believe in balance. These blondies let me enjoy a sweet treat without the guilt or the sugar crash. They’re proof that you don’t have to choose between eating well and eating deliciously. One blondie satisfies my sweet tooth, and I don’t feel the need to go back for more. That’s a win in my book.
Conclusion
These Lighter Candy Corn Blondies with White Chocolate Chips are more than just a Halloween treat—they’re a testament to what happens when you trust your instincts in the kitchen. That late-night experiment turned into a recipe I genuinely love, and I think you will too. They’re chewy, sweet, festive, and light enough that you can enjoy them without a second thought.
I encourage you to make these your own. Add a pinch of cinnamon. Swap the white chocolate for dark. Use leftover Easter candy in the spring. The beauty of this recipe is its flexibility. It’s a starting point for your own creativity. And honestly, the best recipes are the ones that evolve with you.
I’d love to hear how yours turn out. Did you try a fun variation? Did your family devour them in record time? Drop a comment below and let me know—I read every single one, and your stories and ideas keep me inspired. If you share a photo on Pinterest or Instagram, tag me so I can see your beautiful blondies. Happy baking, friend. You’ve got this.
Frequently Asked Questions
Can I use salted butter instead of unsalted?
Yes, you can. Just reduce the added salt to 1/8 teaspoon. Salted butter has about 1/4 teaspoon of salt per stick, so you’ll need to adjust to avoid overly salty blondies. I prefer unsalted so I can control the salt level exactly.
Why did my blondies turn out dry?
Most likely, they were overbaked. Remember to pull them out when the center still looks slightly underdone. Also, make sure you’re measuring your flour correctly—scooping directly from the bag packs in too much flour. Spoon it into your measuring cup and level it off with a knife.
Can I use frozen candy corn?
I wouldn’t recommend it. Freezing candy corn changes its texture, making it hard and chewy. It won’t melt properly into the batter. Always use fresh candy corn from a new bag for the best results. If your candy corn is stale, it’s better to buy a fresh bag.
How do I know when the blondies are done?
The edges should be golden brown and pulling away from the pan. The center should look puffy, slightly jiggly, and pale. A toothpick inserted in the center should come out with a few moist crumbs, not wet batter. If it’s clean, you’ve overbaked. If it’s wet, bake for 2-3 more minutes.
Can I make these ahead of time for a party?
Absolutely. These blondies taste even better the next day. Bake them the day before, let them cool completely, and store them in an airtight container at room temperature. They’ll stay fresh for up to 5 days. You can also freeze them for up to 3 months—just thaw at room temperature before serving.
PrintLighter Candy Corn Blondies: Easy White Chocolate Chip Recipe
These lighter candy corn blondies are a quick and easy fall treat that combines the festive flavor of candy corn with creamy white chocolate chips, all in a healthier, one-bowl recipe that comes together in about 30 minutes.
- Prep Time: 15 minutes
- Cook Time: 22 minutes
- Total Time: 37 minutes
- Yield: 16 servings 1x
- Category: Dessert
- Cuisine: American
Ingredients
- 4 tablespoons (57g) unsalted butter, melted
- 1/3 cup (80ml) unsweetened applesauce
- 1/2 cup (100g) light brown sugar, packed
- 1/4 cup (50g) granulated sugar
- 1 large egg, room temperature
- 1 teaspoon (5ml) vanilla extract
- 1 cup + 2 tablespoons (140g) all-purpose flour
- 1/2 teaspoon baking powder
- 1/4 teaspoon salt
- 1/2 cup (100g) candy corn
- 1/3 cup (60g) white chocolate chips
Instructions
- Preheat oven to 350°F (175°C). Line an 8×8-inch baking pan with parchment paper, leaving overhang on two sides. Lightly spray with non-stick spray.
- Melt 4 tablespoons unsalted butter in a microwave-safe bowl in 20-second bursts until just melted. Let cool slightly if hot.
- In a large mixing bowl, whisk together melted butter and 1/3 cup unsweetened applesauce until smooth. Add 1/2 cup packed light brown sugar and 1/4 cup granulated sugar. Whisk vigorously for about 1 minute until glossy. Add 1 room-temperature egg and 1 teaspoon vanilla extract. Whisk until combined and smooth.
- In a separate small bowl, whisk together 1 cup + 2 tablespoons all-purpose flour, 1/2 teaspoon baking powder, and 1/4 teaspoon salt.
- Pour dry ingredients into wet ingredients. Fold gently with a rubber spatula until no streaks of flour remain. Batter should be thick and slightly sticky.
- Gently fold in 1/2 cup candy corn and 1/3 cup white chocolate chips. Reserve about 1 tablespoon of each for topping if desired.
- Scrape batter into prepared pan and spread evenly. Sprinkle reserved candy corn and white chocolate chips on top, pressing in gently.
- Bake on middle rack for 20-23 minutes. Edges should be golden brown and pulling away from pan; center should look slightly underdone (puffy, jiggly, pale). A toothpick inserted in center should come out with a few moist crumbs.
- Cool completely in pan on a wire rack for 45 minutes to 1 hour. Lift out using parchment handles and cool fully on rack if desired.
- Once completely cool, cut into 16 squares (4×4) or 9 larger squares. Wipe knife clean between cuts for neat slices.
Notes
Don’t overbake—blondies continue to cook from residual heat. Use room temperature ingredients for best results. Fresh candy corn melts better than stale. These blondies taste even better the next day.
Nutrition
- Serving Size: 1 blondie
- Calories: 145
- Sugar: 16
- Sodium: 65
- Fat: 5
- Saturated Fat: 3
- Carbohydrates: 24
- Fiber: 0.5
- Protein: 2
Keywords: candy corn blondies, lighter blondies, white chocolate chip blondies, fall dessert, Halloween dessert, easy blondie recipe, healthier blondies


