Love this? Save it for later!
Share the inspiration with your friends
My sister swore she hated Christmas cookies. For years. Every December, she’d roll her eyes at the tins of spritz and the mountains of powdered sugar snowballs I’d haul to family gatherings. “Too sweet,” she’d mutter. “Too much work for something that’s gone in two bites.” I’d just nod and keep baking, honestly, because what else are you supposed to do? Then last Christmas Eve, I caught her. I’d set a plate of these Easy Grinch Cookies with Red Hot Hearts on the counter, mostly because I thought the bright green was funny and I had a half-empty bag of red hots I needed to use up. I walked back into the kitchen to grab a glass of water, and there she was. Holding a cookie. Chewing. Reaching for another one. “These are… fine,” she said, with her mouth half-full. I didn’t say a word. I just smiled. That moment—the quiet satisfaction of watching someone prove themselves wrong—is exactly why this recipe has a permanent spot in my holiday rotation. Maybe you’ve got a Grinch at your table too. This one’s for them.
These aren’t your average sugar cookie. They’re soft, chewy, and that unmistakable Grinch-green color makes them impossible to ignore on a cookie tray. The little red hot heart pressed into the center? That’s the part that gets people every time. It’s not just cute—it’s a tiny burst of cinnamon heat that cuts through the sweetness. I mean, who knew a candy could do that much work? The first time I made them, I forgot to chill the dough and ended up with flat, sad-looking blobs. Not cute. Not Grinch-like at all. So trust me when I say the chill time matters. But once you get it right? These cookies disappear fast. And honestly, that’s the whole point.
Why You’ll Love This Recipe
Let’s be real for a second. The holidays are chaotic. You’ve got gifts to wrap, a tree that keeps dropping needles, and somehow you’re supposed to produce a tray of picture-perfect cookies too. These Easy Grinch Cookies with Red Hot Hearts were practically built for that exact scenario. Here’s why they work when nothing else does:
- Quick & Easy: From start to finish, you’re looking at about 30 minutes of active work. The dough comes together in one bowl with a hand mixer. No fuss, no stand mixer required.
- Simple Ingredients: You probably have most of this stuff already. Butter, sugar, eggs, flour. The only “special” thing is green food coloring, and honestly, if you don’t have that, you’re not making Grinch cookies anyway.
- Perfect for Holiday Parties: These things are conversation starters. People see the green and the red heart and they instantly light up. Kids go nuts for them. Adults pretend they’re above it, then eat three.
- Crowd-Pleaser: I’ve brought these to cookie swaps, office parties, and family dinners. They’re always the first plate to empty. Always.
- Unbelievably Delicious: The texture is where these shine. Soft centers, slightly crisp edges, and that pop of cinnamon from the red hot. It’s a flavor combo you didn’t know you needed.
What makes this version different from the hundreds of other Grinch cookie recipes out there? Two things. First, I use a touch of cream cheese in the dough. Sounds weird, I know. But it gives the cookies a tenderness that plain butter cookies just don’t have. Second, I press the red hot in at the halfway point of baking, not before. That way the candy stays intact and doesn’t melt into a puddle. Little tricks like that make all the difference. This recipe isn’t just good—it’s the kind that makes you close your eyes after the first bite. It’s comfort food reimagined for the holiday season, with the same soul-soothing satisfaction but way less stress.
What Ingredients You Will Need
This recipe uses simple, wholesome ingredients to deliver bold flavor and satisfying texture without the fuss. Most of these are pantry staples you probably already have on hand, which makes these Easy Grinch Cookies with Red Hot Hearts perfect for last-minute holiday baking emergencies.
- Unsalted butter, softened (1 cup / 226g) – I always use unsalted so I can control the salt level. Let it sit out for about an hour before you start.
- Cream cheese, softened (2 oz / 56g) – This is my secret weapon. It adds a subtle tang and makes the cookies incredibly soft. Use full-fat for best results.
- Granulated sugar (1 cup / 200g) – Regular white sugar. Nothing fancy here.
- Large egg (1) – Room temperature is best. If you forgot to set it out, place it in a bowl of warm water for 5 minutes.
- Vanilla extract (1 teaspoon) – Pure vanilla makes a difference, but imitation works fine in a pinch.
- All-purpose flour (2 cups / 250g) – Spoon and level it. Don’t scoop directly from the bag or you’ll end up with dense cookies.
- Baking powder (1/2 teaspoon) – Helps them puff up just a little.
- Salt (1/4 teaspoon) – Balances the sweetness. Don’t skip it.
- Green gel food coloring (about 1/2 teaspoon) – Gel is better than liquid. It gives you that vibrant Grinch green without thinning the dough. I prefer the Wilton brand for consistency.
- Red hot candies (about 48 pieces) – These are the hearts. You’ll need one per cookie. The cinnamon flavor is non-negotiable here—it’s what makes the whole thing work.
Substitution notes: If you’re dairy-free, you can swap the butter for a high-quality vegan butter stick (not the spreadable kind) and use a dairy-free cream cheese alternative. I’ve tested this with Kite Hill and it worked well. For a gluten-free version, use a 1:1 gluten-free flour blend that contains xanthan gum. Cup4Cup is my go-to for this recipe. And if you can’t find red hots? Try cinnamon imperials or even a cinnamon disk candy. The shape matters less than the flavor.
Equipment Needed
You don’t need a fancy kitchen to pull these off. Here’s what I use every time I make Easy Grinch Cookies with Red Hot Hearts:
- Electric hand mixer – A stand mixer works too, but honestly, a hand mixer is easier for a small batch like this. Less cleanup.
- Large mixing bowl – One bowl for everything. I use a glass bowl because it doesn’t absorb odors.
- Measuring cups and spoons – For accuracy. Baking is a science, even if it feels like art.
- Baking sheets – Two standard half-sheet pans. Line them with parchment paper for easy removal.
- Parchment paper – Non-stick and makes cleanup a breeze. Silpat mats work too.
- Cookie scoop – A 1.5-tablespoon scoop gives you uniform cookies. If you don’t have one, use two spoons to portion the dough.
- Plastic wrap – For chilling the dough. Don’t skip this step.
- Cooling rack – Wire racks help the cookies cool evenly. If you don’t have one, a clean cutting board works in a pinch.
I bought my cookie scoop at a dollar store three years ago and it’s still going strong. You don’t need expensive equipment. Just reliable basics.
Preparation Method
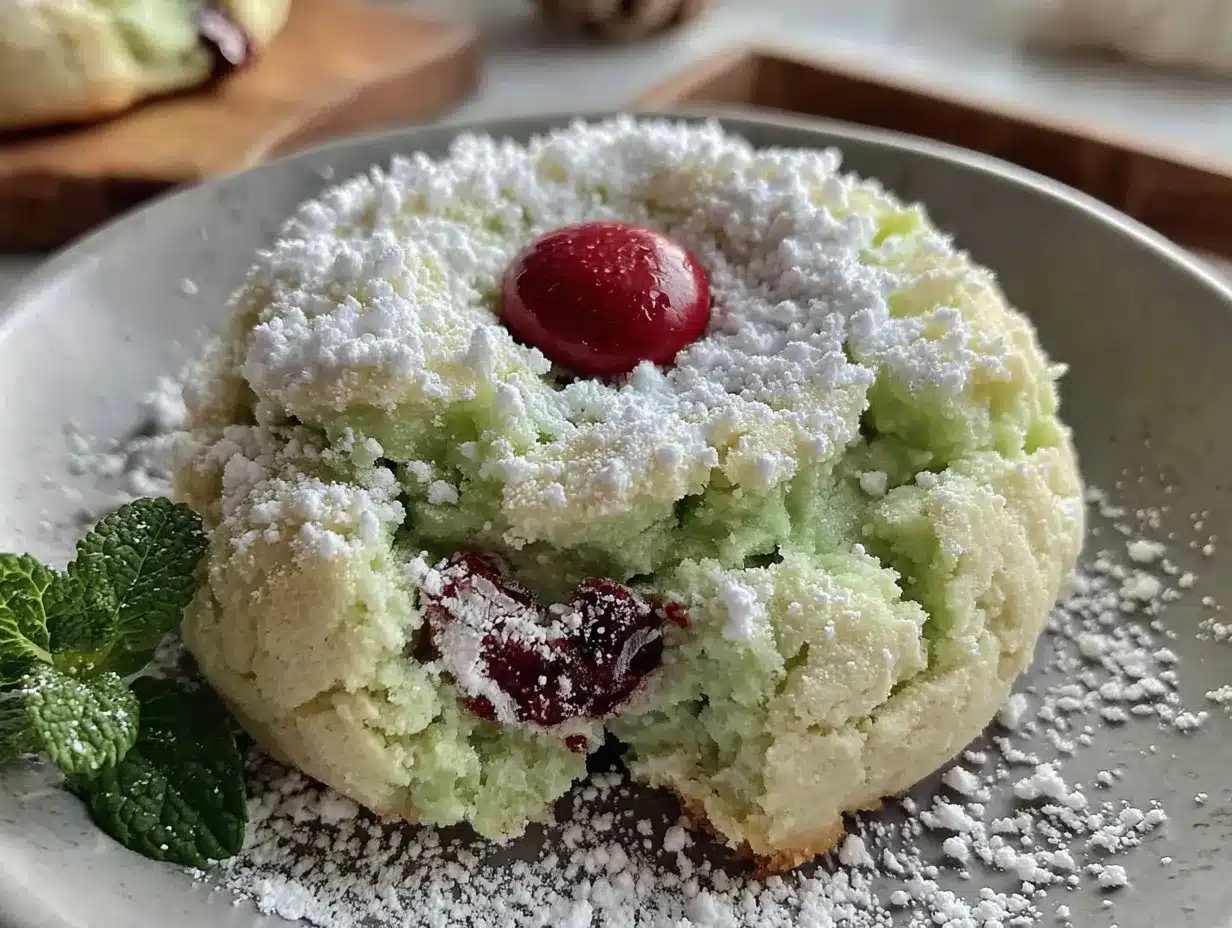
Alright, let’s get into it. I’ve made these Easy Grinch Cookies with Red Hot Hearts about a dozen times now, so I’ve worked out all the kinks. Follow these steps and you’ll have a batch that looks like it came from a bakery—but tastes way better because you made it yourself.
- Cream the butter and cream cheese. In your large mixing bowl, beat the softened butter and cream cheese together on medium speed until smooth and fluffy. About 2 minutes. Scrape down the sides of the bowl with a spatula halfway through. You’re looking for a pale, airy mixture with no lumps. If you see chunks of cream cheese, keep beating.
- Add the sugar. Pour in the granulated sugar and beat on medium-high for another 2 minutes. The mixture should look light and almost fluffy. This is where the texture starts to come together. Don’t rush it.
- Incorporate the egg and vanilla. Crack the egg into the bowl, add the vanilla extract, and beat on low until just combined. Overmixing here can make the cookies tough. You want it to look homogenous but not whipped to death.
- Add the food coloring. Squeeze in about 1/2 teaspoon of green gel food coloring. Beat on low until the color is evenly distributed. If it looks too pale, add a tiny bit more. I usually end up using about 3/4 teaspoon for that classic Grinch green. Remember, the color will fade slightly during baking, so go a shade darker than you think you want.
- Mix the dry ingredients. In a separate small bowl, whisk together the flour, baking powder, and salt. This ensures the baking powder is evenly distributed so you don’t get one cookie that puffs up like a balloon while the others stay flat.
- Combine wet and dry. Gradually add the flour mixture to the butter mixture, beating on low speed. Stop as soon as the flour disappears. A few streaks are fine. Overmixing develops gluten, which makes cookies tough. We want tender, not tough.
- Chill the dough. This is the most important step. Wrap the dough in plastic wrap and flatten it into a disk. Refrigerate for at least 30 minutes. One hour is better. I once skipped this step because I was in a hurry, and the cookies spread into green pancakes. Not ideal. Chilling solidifies the fat and prevents spreading.
- Preheat and prep. While the dough chills, preheat your oven to 350°F (175°C). Line two baking sheets with parchment paper. No greasing needed.
- Portion the dough. Use your cookie scoop to portion out 1.5-tablespoon balls of dough. Roll each one between your palms until smooth. Place them on the prepared baking sheets, spacing them about 2 inches apart. You should get about 24 cookies.
- Bake in batches. Bake one sheet at a time for 8 minutes. The cookies should look puffed and slightly cracked on top. They won’t look done—that’s okay. They’ll continue to set on the hot pan.
- Press in the hearts. Here’s the trick. Remove the cookies from the oven and immediately press one red hot candy into the center of each cookie. The residual heat will soften it just enough to stick, but it won’t melt into a puddle. Work quickly but gently. If the candy cracks, just press it in anyway—it’ll still look cute.
- Cool completely. Let the cookies cool on the baking sheet for 5 minutes, then transfer them to a wire rack to cool completely. The red hots will harden as they cool, creating that perfect little heart shape.
One more thing—if you’re making these with kids, let them press the red hots in. It’s a great job for little fingers and they get a kick out of seeing the “heart” appear. Just make sure the cookies aren’t too hot or they’ll burn themselves. Trust me on that one.
Cooking Tips & Techniques
I’ve made plenty of mistakes with these Easy Grinch Cookies with Red Hot Hearts so you don’t have to. Here’s what I’ve learned the hard way:
Don’t skip the chill. I cannot stress this enough. Warm dough spreads. Chilled dough holds its shape. If your kitchen is warm, pop the portioned dough balls in the fridge for 10 minutes before baking. It makes a noticeable difference.
Use gel food coloring, not liquid. Liquid coloring will throw off the dough’s moisture balance. You’ll end up adding more flour to compensate, and then the cookies get dry. Gel coloring gives you vibrant color without changing the texture. I keep a bottle of Wilton “Leaf Green” in my baking drawer year-round.
Bake one sheet at a time. I know it’s tempting to cram both sheets in the oven to save time. Don’t. The heat circulates unevenly and you’ll end up with some cookies overdone and others underdone. Your patience will be rewarded with evenly baked cookies.
Watch the edges. The cookies are done when the edges are just barely set and the centers still look soft. If the edges are brown, you’ve gone too far. Pull them out at the first sign of color.
Press the red hots gently. If you push too hard, the cookie will crack around the edges. Just a light press so the candy sits flush with the surface. It’ll look like a little heart-shaped button.
I once forgot to take the cream cheese out of the fridge ahead of time. I tried to soften it in the microwave and ended up with melted butter and lumpy cream cheese. The cookies still tasted fine, but the texture was off. Lesson learned: plan ahead. Set your butter and cream cheese on the counter an hour before you start baking.
Variations & Adaptations
One of the best things about these Easy Grinch Cookies with Red Hot Hearts is how easily they adapt. Here are a few ways I’ve tweaked the recipe over the years:
Peppermint Grinch Cookies: Swap the red hot for a crushed peppermint candy piece. The minty flavor pairs beautifully with the vanilla base. Just press a small piece into the center instead of a whole red hot. I made these for a Christmas party last year and they were gone in 20 minutes.
Gluten-Free Version: Use a 1:1 gluten-free flour blend. I’ve tested this with Bob’s Red Mill and King Arthur Measure for Measure. Both worked well. Add an extra tablespoon of flour if the dough feels too sticky. The texture will be slightly more crumbly, but the flavor is spot-on.
Vegan Grinch Cookies: Substitute the butter with vegan butter (I like Miyoko’s), use a flax egg (1 tablespoon ground flaxseed + 3 tablespoons water), and swap the cream cheese for a vegan version. The cookies will be a bit less tender, but they’re still delicious. My vegan friend couldn’t tell the difference.
Lemon Grinch Cookies: Add 1 tablespoon of lemon zest to the dough and skip the red hot. Instead, press a small lemon drop candy into the center. The tangy citrus cuts through the sweetness and gives the cookies a completely different personality. This is my personal favorite variation for spring.
Chocolate-Dipped Grinch Cookies: Once the cookies are completely cool, dip half of each cookie into melted white chocolate. The white chocolate against the green is stunning. Sprinkle with red and green sprinkles before the chocolate sets. These look fancy enough for a cookie exchange but they’re just as easy to make.
Serving & Storage Suggestions
These Easy Grinch Cookies with Red Hot Hearts are best served at room temperature. The texture is soft and chewy, and the red hot is firm but not rock-hard. I like to arrange them on a white platter so the green really pops. A dusting of powdered sugar makes them look snowy and festive, but it’s totally optional.
For a cookie platter, pair them with classic sugar cookies, gingerbread men, and peppermint bark. The bright green stands out against the browns and reds of traditional holiday cookies. They also look great stacked in a clear gift bag tied with a red ribbon—perfect for neighbor gifts or teacher appreciation.
Storage: Keep the cookies in an airtight container at room temperature for up to 5 days. Place a piece of bread in the container to keep them soft—the cookies will absorb the moisture from the bread. Replace the bread every other day if they last that long.
Freezer instructions: These cookies freeze beautifully. Place them in a single layer in a freezer-safe container with parchment paper between layers. Freeze for up to 3 months. To thaw, let them sit at room temperature for about 30 minutes. The red hots might soften slightly, but the flavor is still perfect.
Reheating: If you want that just-baked warmth, pop a cookie in the microwave for 8-10 seconds. Don’t go longer or the red hot will melt. I do this when I’m craving that soft, gooey texture straight from the oven.
The flavors actually improve after a day or two. The cinnamon from the red hots mellows out and blends with the vanilla base. I’ve eaten these on day four and they were still fantastic. Not that they usually last that long around here.
Nutritional Information & Benefits
Let’s be honest—these are cookies. They’re a treat, not a health food. But here’s the estimated nutritional breakdown per cookie (based on 24 cookies):
- Calories: 145
- Fat: 7g
- Carbohydrates: 19g
- Sugar: 11g
- Protein: 2g
That said, there are a couple of silver linings. The cream cheese adds a small amount of protein and calcium. The red hots are mostly sugar, but they do contain a tiny bit of cinnamon, which has antioxidant properties. I mean, it’s a stretch, but it’s something.
If you’re watching your sugar intake, you can reduce the granulated sugar to 3/4 cup. The cookies will be slightly less sweet but still plenty flavorful. For a lower-fat option, use reduced-fat cream cheese, though the texture won’t be quite as tender.
These cookies are not gluten-free, dairy-free, or vegan in their standard form, but as I mentioned earlier, they adapt well to dietary restrictions. Just be aware that substitutions will change the nutritional profile.
My personal take? The holidays are about joy and connection. A cookie now and then isn’t going to derail your health goals. Enjoy one with a cup of coffee or a glass of milk. Savor it. That’s the whole point.
Conclusion
These Easy Grinch Cookies with Red Hot Hearts are more than just a cute holiday treat. They’re the kind of recipe that brings people together. That moment when someone takes a bite and their eyes light up? That’s what keeps me baking year after year. My sister still claims she “doesn’t really like cookies,” but I caught her sneaking one from the freezer last week. Some things never change.
I hope you give these a try. Customize them however you like—swap the red hot for a peppermint, add some lemon zest, or go wild with the white chocolate dip. The base recipe is forgiving and fun. And if you make a mess? That’s part of the experience. Baking is supposed to be a little chaotic. That’s where the best memories come from.
I’d love to hear how yours turn out. Leave a comment below and tell me about your Grinch cookies. Did you add your own twist? Did your family love them? Share a photo if you’ve got one. And if you know someone who claims to hate Christmas cookies, make a batch for them. You might just change their mind.
Happy baking, friends. May your cookies be green and your hearts be full.
Frequently Asked Questions
Can I use liquid food coloring instead of gel?
You can, but I don’t recommend it. Liquid food coloring will add extra moisture to the dough, which can make the cookies spread more. You’ll also need a lot more liquid coloring to achieve the same vibrant green, which can affect the texture. Gel coloring is concentrated and doesn’t add moisture. It’s worth picking up a bottle.
Why did my cookies spread into flat discs?
This usually happens for one of three reasons: the dough wasn’t chilled long enough, the butter was too soft, or the baking sheet was too warm. Make sure you chill the dough for at least 30 minutes. If your kitchen is warm, chill the portioned dough balls on the baking sheet for 10 minutes before putting them in the oven. Also, always use a cool baking sheet for each batch.
Can I make the dough ahead of time?
Absolutely. The dough can be refrigerated for up to 3 days. Just wrap it tightly in plastic wrap so it doesn’t dry out. You can also freeze the dough for up to 3 months. Thaw it in the refrigerator overnight before baking. The cookies might need an extra minute in the oven if the dough is still cold.
My red hots melted into puddles. What went wrong?
You either pressed them in too early or baked them too long. The red hots should be pressed in immediately after the cookies come out of the oven, not before baking. If you bake them with the candy on top, it will melt into a flat puddle. Also, make sure your oven temperature is accurate. An oven that runs hot can cause the candy to melt even after baking.
How do I get the perfect heart shape with the red hot?
This takes a little practice. Press the red hot gently into the center of the cookie so it sits flush with the surface. Don’t push too hard or it will crack. If the candy does crack, just press it in anyway—the cracked lines can look like little veins in the heart, which is actually kind of charming. The cookies will still taste great.
Pin This Recipe!

Easy Grinch Cookies with Red Hot Hearts – Best Holiday Treat

Soft, chewy Grinch-green sugar cookies with a cinnamon red hot heart pressed into the center. A quick and easy holiday treat that’s perfect for cookie swaps, parties, and winning over even the biggest Grinch.
- Prep Time: 30 minutes
- Cook Time: 8 minutes per batch
- Total Time: 1 hour 15 minutes (includes chilling)
- Yield: 24 cookies 1x
- Category: Dessert
- Cuisine: American
Ingredients
- 1 cup (226g) unsalted butter, softened
- 2 oz (56g) cream cheese, softened
- 1 cup (200g) granulated sugar
- 1 large egg, room temperature
- 1 teaspoon vanilla extract
- 2 cups (250g) all-purpose flour, spooned and leveled
- 1/2 teaspoon baking powder
- 1/4 teaspoon salt
- 1/2 teaspoon green gel food coloring (or more as needed)
- About 48 red hot candies
Instructions
- In a large mixing bowl, beat the softened butter and cream cheese together on medium speed until smooth and fluffy, about 2 minutes. Scrape down the sides halfway through.
- Add the granulated sugar and beat on medium-high for another 2 minutes until light and fluffy.
- Add the egg and vanilla extract, beating on low until just combined. Do not overmix.
- Add the green gel food coloring and beat on low until evenly distributed. The color should be slightly darker than desired as it will fade during baking.
- In a separate small bowl, whisk together the flour, baking powder, and salt.
- Gradually add the flour mixture to the butter mixture, beating on low speed until just combined. A few streaks of flour are fine.
- Wrap the dough in plastic wrap and flatten into a disk. Refrigerate for at least 30 minutes (1 hour is better).
- Preheat oven to 350°F (175°C). Line two baking sheets with parchment paper.
- Using a 1.5-tablespoon cookie scoop, portion the dough into balls and roll smooth. Place 2 inches apart on prepared baking sheets.
- Bake one sheet at a time for 8 minutes. Cookies should look puffed and slightly cracked on top, not browned.
- Immediately after removing from the oven, gently press one red hot candy into the center of each cookie.
- Let cookies cool on the baking sheet for 5 minutes, then transfer to a wire rack to cool completely.
Notes
Chilling the dough is essential to prevent spreading. Use gel food coloring for best color without adding moisture. Press red hots in immediately after baking, not before, to keep them intact. For dairy-free, use vegan butter and dairy-free cream cheese. For gluten-free, use a 1:1 gluten-free flour blend with xanthan gum.
Nutrition
- Serving Size: 1 cookie
- Calories: 145
- Sugar: 11
- Sodium: 55
- Fat: 7
- Saturated Fat: 4
- Carbohydrates: 19
- Protein: 2
Keywords: Grinch cookies, Christmas cookies, red hot cookies, holiday cookies, easy cookies, green cookies, cinnamon cookies


