Love this? Save it for later!
Share the inspiration with your friends
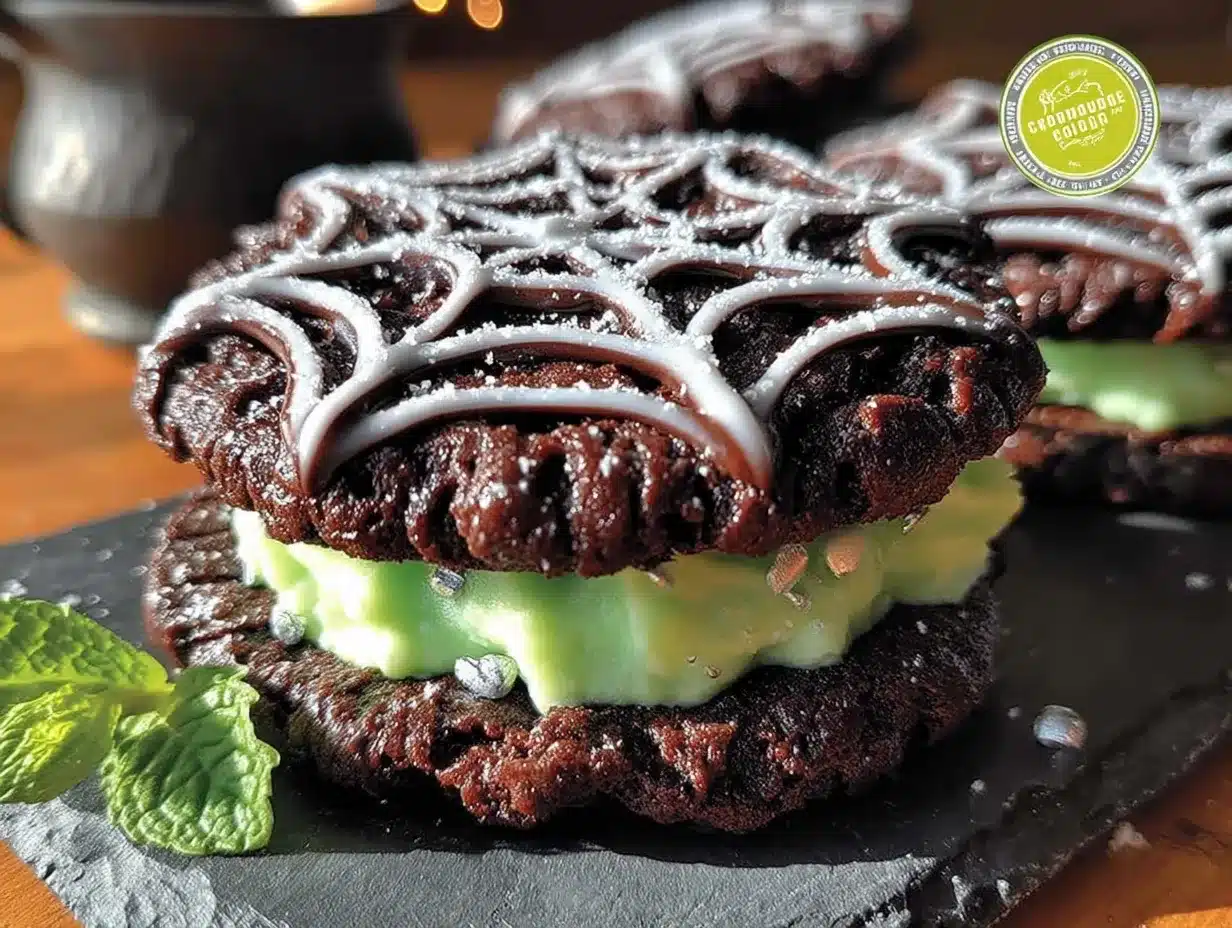
My neighbor Kate wasn’t trying to impress anyone. I’d stopped by to grab a book she was lending me, and the smell of chocolate and mint hit me before I even made it through her front door. It was late October, and she had three kids running around in various states of costume chaos. Kate was standing at her kitchen counter, completely unfazed, slapping together these little chocolate cookies with a green filling that looked like something out of a bakery window.
“Oh, these,” she said when I asked, not even looking up. “They’re just the Halloween cookies I throw together every year. Nothing fancy.” Nothing fancy. I took one bite while she hunted for the book, and honestly, I almost asked if I could just stay for the rest of the afternoon. The cookies were soft and rich, and that mint filling was so cool and creamy it felt like a trick. I mean, how does someone make something this good look like it’s no big deal?
Maybe you’ve been there—standing in someone’s kitchen, watching them whip up something incredible while acting like it’s the most ordinary thing in the world. That’s exactly what this recipe is. It’s the kind of cookie that shows up at a Halloween party and disappears before the punch bowl gets touched. And the best part? Kate later texted me the recipe, and I realized she wasn’t being modest. These cookies are genuinely easy. They come together fast, they use stuff you probably already have, and they look way more impressive than the effort they actually take.
I’ve been making them every October since, and they’ve never let me down. They’re the cookie I bring when I need to show up with something good but don’t have time to fuss. And every time I make them, I think about Kate’s messy kitchen, those half-dressed kids, and how she acted like she was doing absolutely nothing special. That’s the magic of this recipe—it tastes like you spent hours, but you didn’t. And honestly, that’s my favorite kind of magic.
Why You’ll Love This Recipe
These Easy Chocolate Mint Halloween Sandwich Cookies aren’t just another cookie recipe. They’re the result of several Halloweens of trial and error, a few too many dry cookies, and one very memorable batch where the filling ran right off the sides. I’ve tested this version until it’s practically foolproof, and here’s why it works so well for busy weeknights and last-minute Halloween treats.
- Quick & Easy: From start to finish, these cookies take about 30 minutes. That’s mixing, baking, and assembling. No chilling dough, no complicated steps, no waiting around. Perfect for those evenings when the kids announce they need treats for the school party tomorrow.
- Simple Ingredients: You probably have most of these in your pantry right now. Butter, sugar, flour, cocoa powder, and eggs. The mint extract is the only specialty item, and it’s available at any grocery store year-round.
- Perfect for Halloween: These cookies look festive without requiring any decorating skills. The green filling gives them that spooky, fun vibe, and you can add orange sprinkles or candy eyes to make them even more themed.
- Crowd-Pleaser: Kids love the minty chocolate combo, and adults appreciate that they’re not overly sweet. I’ve brought these to three different Halloween parties now, and they always get the same reaction—people asking for the recipe before they’ve even finished their first cookie.
- Unbelievably Delicious: The texture is what sets these apart. The cookies are soft and fudgy, and the filling is light and creamy. Together, they create that perfect sandwich cookie experience where every bite has both chocolate and mint in equal measure.
What makes this recipe different from all the other chocolate mint cookies out there is the technique. Instead of a complicated buttercream, this filling uses cream cheese and powdered sugar, which gives it a tangy sweetness that balances the rich chocolate perfectly. It’s not just another version—it’s the version I keep coming back to year after year.
This recipe is the kind that makes you close your eyes after the first bite. It’s comfort food dressed up in Halloween colors—faster and easier than you’d expect, but with the same soul-soothing satisfaction. Perfect for impressing the classroom parents without stressing yourself out.
What Ingredients You Will Need
This recipe uses simple, everyday ingredients to create cookies that taste anything but ordinary. The magic is in how they come together—nothing complicated, just good ingredients working in harmony. Here’s what you’ll need to gather before you start.
For the Chocolate Cookies
- 1 cup unsalted butter, softened (I prefer using butter over margarine here—it gives the cookies a richer flavor and better texture)
- 1 cup granulated sugar (adds sweetness and helps create that soft, tender crumb)
- 1 large egg, room temperature (cold eggs can make the batter seize up, so let it sit out for 15 minutes first)
- 1 teaspoon vanilla extract (pure vanilla extract makes a noticeable difference, but imitation works fine too)
- 1 ½ cups all-purpose flour (spoon and level it—don’t scoop directly from the bag or you’ll end up with dry cookies)
- ½ cup unsweetened cocoa powder (I like using Dutch-process cocoa for a darker, more intense chocolate flavor, but regular cocoa works great too)
- ½ teaspoon baking soda (helps the cookies spread just enough without turning into pancakes)
- ¼ teaspoon salt (don’t skip this—it balances the sweetness and makes the chocolate taste more chocolatey)
For the Mint Filling
- 4 ounces cream cheese, softened (full-fat cream cheese gives the creamiest texture, but reduced-fat works in a pinch)
- ¼ cup unsalted butter, softened (this adds richness and helps the filling hold its shape)
- 2 cups powdered sugar (sift it if you have time—it prevents lumps and makes the filling silky smooth)
- ½ teaspoon peppermint extract (start with this amount and taste—you can always add more, but you can’t take it out)
- 2-3 drops green food coloring (gel food coloring works best for a vibrant color without thinning the filling)
For the peppermint extract, I recommend McCormick or Simply Organic—they have a clean, natural mint flavor without any artificial aftertaste. If you’re using a store brand, just be aware that strengths can vary, so add it slowly and taste as you go.
Substitution Guidance: If you’re dairy-free, you can use plant-based butter and vegan cream cheese. The texture will be slightly different, but it still works. For a gluten-free version, swap the all-purpose flour with a 1:1 gluten-free baking blend. I’ve tested this with King Arthur Measure for Measure, and the cookies came out soft and chewy.
Equipment Needed
You don’t need any fancy equipment for these cookies, which is part of why I love them so much. Here’s what you’ll need to have on hand.
- Mixing bowls: One large bowl for the cookie dough and one medium bowl for the filling. I use glass or stainless steel—they’re easy to clean and don’t hold onto odors.
- Electric hand mixer or stand mixer: You can technically mix the dough by hand, but a mixer makes it much faster and gives you a smoother filling. I’ve made these with both, and the hand mixer is my go-to for quick cleanup.
- Baking sheets: Two standard half-sheet pans work perfectly. If you only have one, that’s fine—just let it cool completely between batches.
- Parchment paper or silicone baking mats: Parchment paper is my preference because it’s disposable and makes cleanup a breeze. Silicone mats work great too, just make sure they’re properly greased.
- Cooling rack: A wire rack helps the cookies cool evenly so the filling doesn’t melt when you assemble them. If you don’t have one, a clean kitchen towel works in a pinch.
- Spatula: A rubber spatula for scraping the bowls clean and a small offset spatula for spreading the filling if you want to get fancy.
- Measuring cups and spoons: For accurate measurements. I cannot stress this enough—baking is chemistry, and guessing measurements leads to sad cookies.
If you’re looking for budget-friendly options, most of these items are available at dollar stores or discount retailers. I bought my first set of mixing bowls at a thrift store for three dollars, and they lasted me years.
Preparation Method
Alright, let’s make some cookies. This whole process moves fast, so I like to have everything measured and ready before I start. It makes the whole thing feel less chaotic, especially if you’re doing this after a long day.
- Preheat your oven to 350°F (175°C). Line two baking sheets with parchment paper. Do this first so the oven is ready when you are.
- Cream the butter and sugar together. In a large mixing bowl, beat the softened butter and granulated sugar together until light and fluffy. This takes about 2-3 minutes with an electric mixer on medium speed. You’ll know it’s ready when it looks pale and slightly increased in volume. Don’t rush this step—proper creaming is what gives the cookies their tender texture.
- Add the egg and vanilla. Crack the egg into the butter mixture, add the vanilla extract, and beat until fully combined. Scrape down the sides of the bowl with a spatula to make sure everything is incorporated evenly. The mixture might look a little separated at this point, but that’s normal.
- Mix the dry ingredients separately. In a separate bowl, whisk together the flour, cocoa powder, baking soda, and salt. This ensures the baking soda and salt are evenly distributed throughout the flour. I learned this the hard way after biting into a cookie that had a pocket of salt—not pleasant.
- Combine the wet and dry ingredients. Gradually add the dry ingredients to the wet mixture, mixing on low speed until just combined. Stop as soon as you don’t see any more streaks of flour. Overmixing at this stage develops gluten and makes the cookies tough. The dough should be soft and slightly sticky but hold together when pressed.
- Portion the dough. Scoop rounded tablespoons of dough (about 1.5 inches in diameter) and place them on the prepared baking sheets, spacing them about 2 inches apart. I use a small cookie scoop for this—it keeps the cookies uniform in size, which means they bake evenly. If you don’t have a scoop, just use two spoons to portion the dough.
- Bake the cookies. Place the baking sheets in the preheated oven and bake for 8-10 minutes. The cookies are done when the edges are set and the tops look slightly cracked. The centers will look soft and underdone—that’s exactly what you want. Overbaking is the number one mistake people make with these cookies. They continue to set as they cool on the baking sheet.
- Cool the cookies. Let the cookies rest on the baking sheet for 5 minutes. This allows them to firm up enough to transfer without breaking. Then, use a spatula to move them to a wire cooling rack to cool completely. This is important—if the cookies are even slightly warm when you add the filling, it will melt and slide right off.
- Make the mint filling. While the cookies are cooling, make the filling. In a medium bowl, beat the softened cream cheese and butter together until smooth and creamy. This takes about 2 minutes. Gradually add the powdered sugar, beating on low speed to prevent a sugar cloud from exploding all over your kitchen. Trust me on this one.
- Add the mint and color. Add the peppermint extract and green food coloring. Beat until the filling is smooth and the color is evenly distributed. Taste it at this point. Want more mint? Add another ¼ teaspoon. Want it greener? Add another drop of coloring. This is your filling—make it how you like it.
- Assemble the sandwich cookies. Once the cookies are completely cool, spread about 1 tablespoon of filling onto the flat side of one cookie. Top with another cookie, flat side down, and gently press until the filling spreads to the edges. Repeat with the remaining cookies and filling. You should get about 12-14 sandwich cookies, depending on how generous you are with the filling.
- Let them set. Place the assembled cookies on a plate or baking sheet and let them sit at room temperature for about 15 minutes. This gives the filling time to firm up slightly, making the cookies easier to handle. If you can wait that long, that is.
Sensory Cues: When the cookies are done, your kitchen should smell like a chocolate factory. The cookies should look slightly cracked on top, like little chocolate craters. When you press one gently, it should feel soft but not doughy. The filling should be thick enough to hold its shape when you spread it, but soft enough to spread easily. If it’s too stiff, add a teaspoon of milk. If it’s too runny, add a tablespoon of powdered sugar.
Troubleshooting: If your cookies spread too much and turn into flat discs, your butter was too soft or your baking soda was too old. If they’re puffy and cake-like, you overmixed the dough. If the filling tastes like toothpaste, you added too much peppermint extract—balance it with a pinch of salt or a splash of vanilla.
Cooking Tips & Techniques
After making these cookies more times than I care to count, I’ve picked up a few tricks that make the process smoother and the results more consistent. Here are the lessons I learned the hard way so you don’t have to.
Room temperature ingredients matter. I know, I know—every recipe says this, and it feels like a hassle. But here’s the thing: cold butter doesn’t cream properly, and cold cream cheese makes lumpy filling. If you forgot to take them out of the fridge, here’s a shortcut: cut the butter into small cubes and microwave it for 5-10 seconds, just until it’s soft but not melted. For the cream cheese, submerge the sealed package in warm water for 5 minutes. It works every time.
Don’t overbake. I cannot say this enough. The cookies will look underdone when you pull them out of the oven. That’s the goal. If you wait until they look fully baked, they’ll be dry and crumbly once they cool. The residual heat from the baking sheet finishes the cooking process. Trust the process.
Use a cookie scoop for even sizing. Uniform cookies mean uniform baking. If some cookies are bigger than others, the small ones will burn while the big ones are still raw. A cookie scoop is a cheap investment that pays for itself in consistent results. I use a #40 scoop, which holds about 1.5 tablespoons of dough.
Chill the dough if you have time. This step is optional, but if you can pop the portioned dough into the fridge for 15-20 minutes before baking, the cookies will spread less and have a thicker, chewier texture. I do this when I’m making them ahead of time, but on busy weeknights, I skip it and they still turn out great.
Let the cookies cool completely. I made the mistake of rushing this step once, and the filling turned into a green puddle. The cookies need to be completely cool—like, no warmth at all—before you add the filling. If you’re in a hurry, you can pop them in the fridge for 10 minutes to speed up the cooling process.
Double the batch if you’re smart. These cookies disappear fast. I’ve never once regretted making a double batch, but I’ve definitely regretted only making a single batch when the party was still going and the cookie plate was empty. The dough freezes beautifully, so you can bake half now and save half for later.
My biggest failure: The first time I made these, I used peppermint extract that was way too strong, and the filling tasted like I was eating a candy cane dipped in toothpaste. I learned to always start with less extract than I think I need. You can always add more, but you can’t take it out. That batch went straight in the trash, and I’ve been careful ever since.
Variations & Adaptations
One of the best things about this recipe is how easy it is to adapt. I’ve played around with it quite a bit, and here are some of my favorite variations.
Halloween Fun: Before baking, press a few orange or black sprinkles onto the tops of the cookies. You can also add a drop of orange food coloring to the filling instead of green for a different Halloween look. One year, I added candy eyes to the filling before sandwiching the cookies together, and they looked like little monsters. The kids went crazy for them.
Chocolate Mint Thins: For a thinner, crunchier cookie, roll the dough out to about ¼-inch thickness between two sheets of parchment paper, then use a round cookie cutter to cut out circles. Bake for 6-8 minutes instead of 8-10. These are perfect for dipping in milk.
Gluten-Free Version: As I mentioned earlier, a 1:1 gluten-free flour blend works perfectly here. I’ve tested this with King Arthur Measure for Measure and Bob’s Red Mill 1-to-1, and both produced soft, chewy cookies that didn’t taste gluten-free at all. Just make sure your blend contains xanthan gum for structure.
Vegan Option: Use plant-based butter and vegan cream cheese. For the egg, use a flax egg (1 tablespoon ground flaxseed mixed with 3 tablespoons water, let sit for 5 minutes). The cookies will be slightly denser but still delicious. I made a vegan batch for a friend’s Halloween party, and no one could tell the difference.
Different Flavors: Swap the peppermint extract for orange extract and use orange food coloring for a chocolate orange version. Or use raspberry extract and pink food coloring for a chocolate raspberry sandwich cookie. The possibilities are endless, and they’re all good.
Double Chocolate: Add ½ cup of mini chocolate chips to the cookie dough before baking. This gives you little pockets of melted chocolate throughout the cookie, which pairs beautifully with the mint filling. I did this on a whim one night, and it’s been my go-to version ever since.
Serving & Storage Suggestions
These cookies are versatile when it comes to serving. Here’s how to make the most of them.
Serving Temperature: These cookies are best served at room temperature. The filling is creamy and the cookies are soft, and together they create the perfect texture. If you’ve stored them in the fridge, let them sit out for about 15 minutes before serving. They’re also delicious slightly chilled, especially on a warm day.
Presentation Ideas: Arrange the cookies on a Halloween-themed platter or cake stand. You can dust them with a little powdered sugar for a snow-capped look, or drizzle melted white chocolate over the tops for an extra festive touch. For Halloween parties, I like to place them on a black plate with orange napkins—it makes the green filling pop.
Complementary Dishes: These cookies pair beautifully with a cold glass of milk, a hot cup of coffee, or a mug of hot chocolate. For a Halloween dessert spread, serve them alongside pumpkin cupcakes, caramel apples, or a bowl of candy corn. They also work great as part of a cookie platter with sugar cookies and peanut butter blossoms.
Storage Instructions: Store the assembled cookies in an airtight container at room temperature for up to 3 days. If you need to keep them longer, store them in the refrigerator for up to a week. The cookies will stay soft and the filling will remain creamy. Just make sure the container is sealed tightly to prevent the cookies from drying out or absorbing other odors from the fridge.
Freezer Instructions: These cookies freeze beautifully. You can freeze the baked, unfilled cookies for up to 3 months. Just place them in a single layer in a freezer-safe bag or container, with parchment paper between layers to prevent sticking. When you’re ready to serve, thaw the cookies at room temperature, make the filling fresh, and assemble. Alternatively, you can freeze the assembled cookies for up to 2 months. Thaw them in the refrigerator overnight, then let them sit at room temperature for 15 minutes before serving.
Flavor Development: These cookies actually taste better the next day. The flavors meld together as they sit, and the cookies soften slightly, creating a more cohesive texture. If you can resist eating them all on day one, you’ll be rewarded on day two.
Nutritional Information & Benefits
Let’s be real—these are cookies, not health food. But here’s what you should know about what’s in them.
Estimated Nutritional Values (per sandwich cookie):
- Calories: 220
- Total Fat: 12g
- Saturated Fat: 7g
- Cholesterol: 45mg
- Sodium: 95mg
- Total Carbohydrates: 28g
- Dietary Fiber: 1g
- Sugars: 18g
- Protein: 3g
Health Benefits: While these cookies are definitely a treat, they do have a few redeeming qualities. The cocoa powder is rich in antioxidants called flavonoids, which can help reduce inflammation and support heart health. The cream cheese in the filling provides a small amount of calcium and protein. And the peppermint extract has been shown to aid digestion and freshen breath—so consider these a two-in-one dessert and breath mint.
Dietary Considerations: These cookies are not gluten-free, dairy-free, or vegan in their standard form, but as I mentioned in the variations section, they can be adapted to fit those dietary needs. They are nut-free, which makes them a safe option for school parties and events where nut allergies are a concern.
Potential Allergens: These cookies contain wheat (gluten), dairy (butter, cream cheese), and eggs. If you’re serving them at a party where allergies might be a concern, I recommend labeling them clearly or providing an allergen-free alternative.
My Personal Perspective: I believe in balance. These cookies are a treat, and there’s nothing wrong with that. Life is too short to skip dessert, especially during Halloween. I make these cookies because they bring joy to my family and friends, and that’s a benefit no nutrition label can measure. Enjoy them in moderation, savor every bite, and don’t feel guilty about it.
Conclusion
These Easy Chocolate Mint Halloween Sandwich Cookies are proof that you don’t need to spend hours in the kitchen to create something truly special. They come together in about 30 minutes, use ingredients you probably already have, and taste like something you’d buy at a fancy bakery. But the best part? They’re yours. You made them. And you made them look easy.
I hope you’ll take this recipe and make it your own. Add sprinkles, change the color of the filling, double the batch, or freeze some for later. The beauty of this recipe is that it’s forgiving and flexible. It works for beginners and experienced bakers alike, and it always delivers.
Every time I make these cookies, I think about Kate’s messy kitchen and how she acted like she was doing nothing special. But she was doing something special—she was making a memory, one cookie at a time. That’s what I love most about this recipe. It’s not just about the cookies. It’s about the people you share them with, the smiles they bring, and the little moments of joy that come from something as simple as a chocolate mint sandwich cookie.
So go ahead—preheat that oven, get your ingredients out, and make some magic. And when you do, I’d love to hear about it. Leave a comment below and tell me how your cookies turned out. Did you try a variation? Did your kids help you make them? Did they disappear before the party even started? Share your stories, your photos, and your questions. I read every comment, and I can’t wait to hear from you.
Happy Halloween, and happy baking!
Frequently Asked Questions
Can I use mint extract instead of peppermint extract?
Yes, you can, but there’s a difference. Peppermint extract is made from peppermint leaves and has a stronger, cleaner mint flavor. Mint extract is usually a blend of different mint varieties and can sometimes taste a bit more like spearmint. For these cookies, peppermint extract is my preference, but mint extract will work in a pinch. Just taste as you go and adjust accordingly.
Why did my cookies spread too much?
This usually happens for one of three reasons: your butter was too soft or melted, your baking soda was too old, or your dough wasn’t chilled before baking. If your kitchen is warm, the butter can soften too quickly and cause the cookies to spread. Next time, chill the portioned dough for 15-20 minutes before baking, and make sure your butter is softened but not greasy.
Can I make the dough ahead of time?
Absolutely. The cookie dough can be made up to 3 days in advance and stored in the refrigerator. Just wrap it tightly in plastic wrap or store it in an airtight container. When you’re ready to bake, let the dough sit at room temperature for about 10 minutes to soften slightly, then scoop and bake as directed. You can also freeze the dough for up to 3 months.
How do I get the filling to be perfectly green?
Use gel food coloring instead of liquid drops. Gel coloring is more concentrated, so you need less of it, and it won’t thin out your filling. Start with one drop, mix it in, and add more until you reach your desired shade. For a vibrant Halloween green, I usually use about 2-3 drops of gel coloring. If you want a more natural look, you can skip the coloring altogether—the filling will be white, and the cookies will still taste amazing.
Can I use a different type of chocolate?
Yes, you can experiment with different cocoa powders. Dutch-process cocoa will give you a darker, more intense chocolate flavor and a deeper color. Natural cocoa powder will give you a lighter, more traditional chocolate taste. You can also try using black cocoa powder for an extra-dark, Oreo-like cookie. Just keep in mind that different cocoa powders absorb moisture differently, so you may need to adjust the flour slightly if the dough feels too dry or too wet.
Pin This Recipe!

Easy Homemade Chocolate Mint Halloween Cookies

These Easy Chocolate Mint Halloween Sandwich Cookies are soft, fudgy chocolate cookies with a cool and creamy mint filling. They come together in about 30 minutes, use simple ingredients, and look way more impressive than the effort they actually take.
- Prep Time: 15 minutes
- Cook Time: 10 minutes
- Total Time: 30 minutes
- Yield: 12-14 sandwich cookies 1x
- Category: Dessert
- Cuisine: American
Ingredients
- 1 cup unsalted butter, softened
- 1 cup granulated sugar
- 1 large egg, room temperature
- 1 teaspoon vanilla extract
- 1 ½ cups all-purpose flour
- ½ cup unsweetened cocoa powder
- ½ teaspoon baking soda
- ¼ teaspoon salt
- 4 ounces cream cheese, softened
- ¼ cup unsalted butter, softened
- 2 cups powdered sugar
- ½ teaspoon peppermint extract
- 2–3 drops green food coloring
Instructions
- Preheat your oven to 350°F (175°C). Line two baking sheets with parchment paper.
- In a large mixing bowl, beat the softened butter and granulated sugar together until light and fluffy, about 2-3 minutes on medium speed.
- Add the egg and vanilla extract, and beat until fully combined. Scrape down the sides of the bowl.
- In a separate bowl, whisk together the flour, cocoa powder, baking soda, and salt.
- Gradually add the dry ingredients to the wet mixture, mixing on low speed until just combined. Do not overmix.
- Scoop rounded tablespoons of dough (about 1.5 inches in diameter) and place them on the prepared baking sheets, spacing them about 2 inches apart.
- Bake for 8-10 minutes. The cookies are done when the edges are set and the tops look slightly cracked. The centers will look soft.
- Let the cookies rest on the baking sheet for 5 minutes, then transfer to a wire cooling rack to cool completely.
- While the cookies are cooling, make the filling. In a medium bowl, beat the softened cream cheese and butter together until smooth and creamy, about 2 minutes.
- Gradually add the powdered sugar, beating on low speed to prevent a sugar cloud.
- Add the peppermint extract and green food coloring. Beat until smooth and the color is evenly distributed. Taste and adjust if needed.
- Once the cookies are completely cool, spread about 1 tablespoon of filling onto the flat side of one cookie. Top with another cookie, flat side down, and gently press until the filling spreads to the edges.
- Repeat with the remaining cookies and filling. Let the assembled cookies sit at room temperature for about 15 minutes to firm up.
Notes
For best results, use room temperature ingredients. Do not overbake; cookies should look slightly underdone when removed from the oven. Let cookies cool completely before adding filling to prevent melting. Start with less peppermint extract and add more to taste. Cookies taste even better the next day.
Nutrition
- Serving Size: 1 sandwich cookie
- Calories: 220
- Sugar: 18
- Sodium: 95
- Fat: 12
- Saturated Fat: 7
- Carbohydrates: 28
- Fiber: 1
- Protein: 3
Keywords: Halloween cookies, chocolate mint cookies, sandwich cookies, easy cookies, mint cookies, chocolate cookies, Halloween dessert


