Love this? Save it for later!
Share the inspiration with your friends
I was standing in the baking aisle last October, staring at a bag of black gel food coloring, when a woman next to me sighed and said, “I just want them to look cute, not terrifying.” She was holding a cat-shaped cookie cutter and looked completely defeated. And honestly? I knew exactly how she felt. I had been there before—standing in that same aisle three years ago, convinced my cookies would end up looking like gremlins instead of sweet little black cats.
That moment stuck with me. I mean, Halloween treats can be tricky. You want them spooky but adorable, festive but not frightening. And black cats? They’re the perfect middle ground—mysterious but lovable. So I went home, pulled out my favorite sugar cookie recipe, and started experimenting. The first batch looked like blobs. The second batch had crooked ears. But the third batch? Let me tell you, those cookies actually made me smile. They had little faces, perky ears, and just the right amount of whimsy.
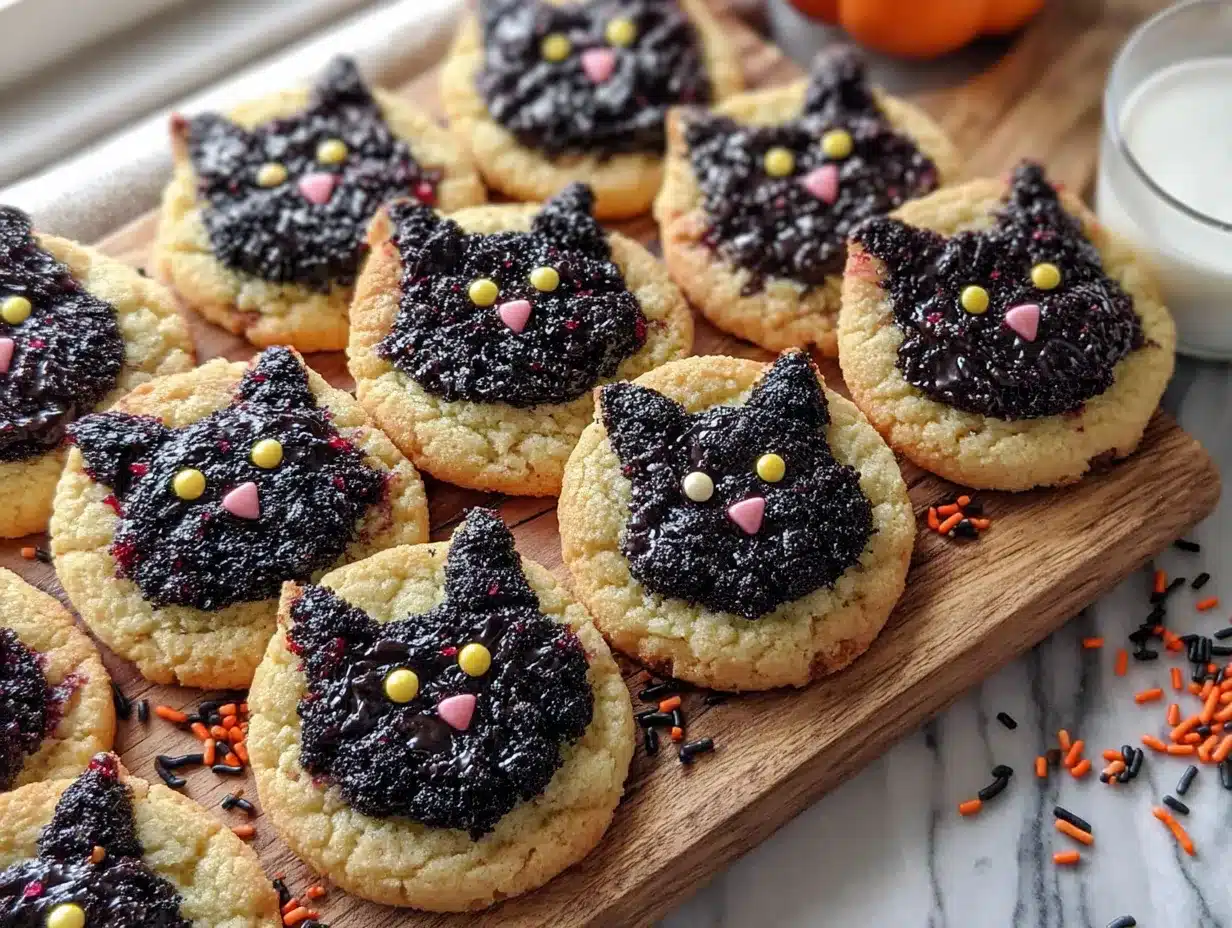
These Halloween Black Cat Sugar Cookies are the result of that afternoon of trial and error. They’re buttery, soft, and perfectly sweet—with a royal icing design that’s simple enough for beginners but impressive enough to steal the show at any Halloween party. Maybe you’ve been there too, standing in a store wondering if you’ll ever get it right. Well, you’re in the right place. These cookies are about to become your new Halloween tradition.
Why You’ll Love This Recipe
Let me be real with you—I’ve tested a lot of sugar cookie recipes over the years. Some are too stiff, some spread too much, and others just don’t taste like anything special. But this one? It’s the one I keep coming back to. Here’s why I think you’ll feel the same way:
- Quick & Easy: The dough comes together in about 15 minutes, and the chilling time is just 30 minutes. You can have cookies on the table in under two hours, start to finish.
- Simple Ingredients: You probably have most of these in your pantry right now. No fancy extracts or hard-to-find specialty flours—just butter, sugar, eggs, and a few pantry staples.
- Perfect for Halloween: These little black cats are the star of any Halloween party, classroom treat, or spooky movie night. They’re cute enough for kids and elegant enough for adult gatherings.
- Crowd-Pleaser: I’ve brought these to three different Halloween parties, and they disappear every single time. Kids love the design, and adults love the buttery flavor.
- Unbelievably Delicious: The texture is soft in the center with slightly crisp edges—exactly what a sugar cookie should be. And the royal icing sets up firm but still gives that satisfying snap when you bite into it.
What makes these different from the other black cat cookie recipes out there? It’s the technique. I use a small amount of cocoa powder in the dough to deepen the color naturally, so you don’t need to drown the dough in artificial coloring. Plus, the royal icing recipe I’m sharing is foolproof—no runny mess, no stiff peaks that are impossible to pipe. It’s the kind of recipe that makes you look like a pro, even if you’ve never decorated a cookie in your life.
Honestly, this recipe isn’t just good—it’s the kind that makes you close your eyes after the first bite. It’s comfort food with a spooky twist, perfect for creating Halloween memories without the stress.
What Ingredients You Will Need
This recipe uses simple, wholesome ingredients to deliver that classic sugar cookie flavor and soft, tender texture. Everything is easy to find, and I’ve included notes on substitutions where they work well.
For the Sugar Cookie Dough
- 2 ¾ cups all-purpose flour (spooned and leveled) — I prefer Gold Medal or King Arthur for consistent results. Don’t scoop directly from the bag, or you’ll end up with dry dough.
- 1 cup unsalted butter, softened to room temperature — If you only have salted butter, reduce the added salt to ¼ teaspoon.
- 1 cup granulated sugar — Regular white sugar gives the cookies that perfect crisp edge.
- 1 large egg, room temperature — Cold eggs can make the dough seize up. Let yours sit out for 30 minutes before starting.
- 1 teaspoon vanilla extract — Pure vanilla makes a difference here. Imitation works, but the flavor won’t be as rich.
- ½ teaspoon salt — Fine sea salt or table salt both work.
- ½ teaspoon baking powder — Make sure yours isn’t expired; it loses potency over time.
- 2 tablespoons unsweetened cocoa powder — This deepens the black color naturally. I use Hershey’s or Ghirardelli.
- Black gel food coloring — Americolor Super Black is my go-to. Liquid food coloring won’t give you that deep, dark shade without making the dough sticky.
For the Royal Icing
- 3 cups powdered sugar, sifted — Sifting prevents lumps that can clog your piping tip.
- 2 tablespoons meringue powder — This stabilizes the icing and helps it dry hard. Wilton brand is widely available.
- 4-5 tablespoons water, at room temperature — Add slowly; you might not need all of it.
- 1 teaspoon vanilla extract — Or clear vanilla if you want the icing to stay pure white under the black coloring.
- Black gel food coloring — Same brand as above for consistency.
- Orange and green gel food coloring — For decorating the eyes and details.
One thing I learned the hard way—don’t skip the cocoa powder in the dough. Without it, you’ll need so much black food coloring that the dough becomes bitter and sticky. The cocoa adds a subtle richness that actually complements the vanilla, and you won’t taste it as chocolate. It’s just a background note that makes the color work.
Equipment Needed
You don’t need a fancy bakery setup for these cookies, but a few specific tools will make your life easier.
- Cat-shaped cookie cutter — I found mine on Amazon for under $10. Look for one that’s about 3 inches wide with defined ears.
- Baking sheets — Heavy-duty aluminum sheets work best. Thin ones can cause uneven browning.
- Parchment paper or silicone baking mats — Silpat mats are my favorite; they help cookies bake evenly and release easily.
- Rolling pin with thickness rings — A regular rolling pin works, but the rings ensure your dough is perfectly even. I use a wooden one with ¼-inch rings.
- Stand mixer or hand mixer — A stand mixer with the paddle attachment is ideal, but a hand mixer works too. You just need to cream the butter and sugar well.
- Piping bags or squeeze bottles — For the royal icing. Disposable piping bags are cheap and easy to use. If you’re decorating with kids, squeeze bottles are less messy.
- Small round piping tip (size 2 or 3) — For outlining and flooding the cookies.
- Toothpicks or scribe tool — For popping air bubbles and spreading icing into tight corners.
If you don’t have a cat-shaped cutter, you can use a round cutter and add ears by shaping them with a knife. I’ve done that before, and while it takes a bit more time, the cookies still turn out adorable. Just be patient and chill the dough well before cutting.
Preparation Method
Step 1: Make the Dough
In a medium bowl, whisk together the flour, salt, baking powder, and cocoa powder. Set aside. In the bowl of your stand mixer, beat the softened butter and granulated sugar on medium speed until light and fluffy—about 3 minutes. You want the mixture to look pale and airy. Scrape down the sides of the bowl, then add the egg and vanilla extract. Beat until combined, about 30 seconds.
With the mixer on low, gradually add the dry ingredients. Mix until just combined—don’t overmix, or your cookies will be tough. The dough will look crumbly at first, but it should come together when you press it with your fingers. If it’s too dry, add a teaspoon of milk. If it’s too sticky, add a tablespoon of flour.
Step 2: Color the Dough
Add the black gel food coloring a little at a time. Start with ¼ teaspoon and knead it into the dough with your hands. Add more until you reach your desired shade. I usually end up using about ½ teaspoon total. The cocoa powder helps, so you won’t need as much coloring as you think. Wrap the dough in plastic wrap and flatten it into a disc. Refrigerate for at least 30 minutes, or up to 3 days.
Step 3: Roll and Cut
Preheat your oven to 350°F (175°C). Line two baking sheets with parchment paper. On a lightly floured surface, roll the dough to ¼-inch thickness. Use your cat-shaped cutter to cut out the cookies, dipping the cutter in flour between cuts to prevent sticking. Place them on the prepared baking sheets about 2 inches apart. Gather the scraps, re-roll, and cut again. You should get about 24 cookies, depending on the size of your cutter.
Step 4: Bake
Bake for 8-10 minutes, rotating the pans halfway through. The cookies are done when the edges are just barely set and the centers look slightly puffed but not browned. Black cookies are tricky to judge by color, so watch the edges—they should look matte, not shiny. Let the cookies cool on the baking sheet for 5 minutes, then transfer to a wire rack to cool completely. Do not decorate until they are fully cool, or the icing will melt.
Step 5: Make the Royal Icing
In a large bowl, combine the sifted powdered sugar and meringue powder. Add 4 tablespoons of water and the vanilla extract. Beat on low speed until combined, then increase to medium-high and beat for 5-7 minutes, until the icing is thick and glossy. It should hold a stiff peak when you lift the beater. Add more water, one teaspoon at a time, until the icing reaches a “15-second consistency”—when you drizzle a ribbon of icing back into the bowl, it should disappear into the surface in about 15 seconds.
Step 6: Color and Decorate
Divide the icing into three bowls. Color one portion black, one orange, and one green. Keep the bowls covered with a damp paper towel to prevent the icing from drying out. Transfer each color to a piping bag fitted with a small round tip.
Outline each cookie with the black icing, then flood the inside by piping in a zigzag pattern. Use a toothpick to spread the icing into the ears and corners. Tap the cookie gently on the counter to smooth the surface. Let the black icing dry for 30 minutes, then pipe on the eyes and nose with black icing, and add orange or green eyes if you want them to look extra festive. Let the cookies dry completely, about 4-6 hours, or overnight.
Cooking Tips & Techniques
I’ve made plenty of mistakes with sugar cookies, and I’m sharing them so you don’t have to. Here are the things I wish someone had told me:
- Chill the dough. I know it’s tempting to skip this step, but warm dough spreads in the oven. Those cute cat ears will disappear into blobs. Trust me—I learned this the hard way during a midnight baking session.
- Don’t overbake. Black cookies hide the golden-brown edges we usually look for. Set a timer for 8 minutes and check. The cookies will continue to set as they cool on the sheet.
- Use a light touch with flour. Too much flour on your rolling surface will dry out the dough. Use just a light dusting, and brush off excess from the cut cookies before baking.
- Keep icing covered. Royal icing dries out fast. If you see crust forming on the surface, it will clog your piping tip. Keep a damp paper towel over the bowl, and work quickly.
- Test your icing consistency. Before you start decorating, test the icing on a piece of parchment. If it spreads too much, add more powdered sugar. If it’s too thick to spread, add water a drop at a time.
One more thing—if your cookies come out looking more like gremlins than cats, don’t panic. I once had a batch where the ears completely melted, and I turned them into “ghost cats” by piping little ghost faces on them. Sometimes mistakes turn into happy accidents!
Variations & Adaptations
These cookies are incredibly versatile. Here are some ways to switch them up:
- Gluten-Free Version: Substitute the all-purpose flour with a 1:1 gluten-free baking flour blend. I’ve used Bob’s Red Mill with great results. Add an extra tablespoon of milk to compensate for the drier texture.
- Vegan Option: Use vegan butter sticks (not spreadable margarine) and a flax egg (1 tablespoon ground flaxseed mixed with 3 tablespoons water, let sit for 10 minutes). The texture will be slightly softer, but still delicious.
- Spooky Season Variations: Use the same dough and icing technique to make pumpkin-shaped cookies, ghost shapes, or bat silhouettes. Just swap the cookie cutter and adjust the icing colors.
- Flavor Twists: Add ½ teaspoon of almond extract along with the vanilla for a subtle nutty flavor. Or add 1 teaspoon of orange zest to the dough for a citrusy Halloween twist.
- No-Icing Version: If you’re short on time, skip the royal icing entirely. Sprinkle the unbaked cookies with black sanding sugar or edible glitter before baking. They’ll still look festive and taste amazing.
I once tried making these with a cream cheese sugar cookie base, and honestly, they were delicious but too soft for detailed decorating. Stick with this classic butter-based dough if you want clean lines and defined shapes.
Serving & Storage Suggestions
These cookies are best served at room temperature. Arrange them on a platter with some orange and purple napkins, maybe a few fake spiderwebs, and watch them disappear. They pair beautifully with a glass of cold milk, a warm cup of spiced apple cider, or even a pumpkin spice latte.
For storage, place the decorated cookies in a single layer in an airtight container. Separate layers with parchment paper. They’ll stay fresh at room temperature for up to 1 week. Do not refrigerate them—the moisture in the fridge can make the icing sticky and cause the cookies to soften.
To freeze, place undecorated baked cookies in a freezer-safe bag with parchment between layers. They’ll keep for up to 3 months. When you’re ready to decorate, thaw them at room temperature for 1 hour, then ice as directed. The flavors actually develop a bit during freezing, so they might taste even better!
One thing I love about these cookies—they actually get better after a day. The flavors meld together, and the royal icing sets up perfectly. So don’t stress if you need to make them a day ahead. They’ll be even more delicious.
Nutritional Information & Benefits
Per cookie (based on 24 cookies): approximately 165 calories, 8g fat, 22g carbohydrates, 2g protein, 12g sugar, 0.5g fiber. These are estimates and will vary based on specific ingredients and decorating choices.
While these are definitely a treat, there are a few bright spots. The butter provides a small amount of vitamin A, and the cocoa powder adds a touch of antioxidants. If you use a gluten-free flour blend, you can boost the fiber content slightly. And honestly, the joy of decorating and sharing these cookies with loved ones is good for the soul—that counts for something, right?
For dietary considerations: this recipe contains dairy, eggs, and gluten. The royal icing contains egg whites (from the meringue powder). If you have allergies, the vegan and gluten-free variations above work well, just double-check your meringue powder for egg content or use a vegan alternative.
Conclusion
These Halloween Black Cat Sugar Cookies are more than just a pretty treat—they’re a chance to slow down, get a little messy, and create something that makes people smile. Whether you’re baking with your kids, surprising your coworkers, or just treating yourself to a cozy afternoon in the kitchen, this recipe delivers every time.
I love how forgiving this recipe is. Even if your cats end up a little lopsided or your icing gets a bit wonky, they’ll still be adorable and delicious. That’s the beauty of homemade treats—they don’t have to be perfect to be perfect. So go ahead, grab that cat-shaped cutter, and give these a try. I promise you’ll be glad you did.
I’d love to see your creations! Leave a comment below and tell me how your cookies turned out. Did you add your own twist? Did your kids come up with a funny face design? Share your photos and stories—I read every single one. And if you loved this recipe, don’t forget to pin it for later or share it with a friend who needs a little Halloween magic in their life.
Happy baking, and may your cookies always have perfect little ears!
Frequently Asked Questions
Can I make the dough ahead of time?
Absolutely! The dough can be refrigerated for up to 3 days, or frozen for up to 3 months. Just wrap it tightly in plastic wrap and place it in a freezer bag. Thaw overnight in the refrigerator before rolling and cutting.
Why did my cookies spread in the oven?
This usually happens if the dough wasn’t chilled enough. Make sure you refrigerate for at least 30 minutes, and if your kitchen is warm, pop the cut cookies back in the fridge for 10 minutes before baking. Also, check that your butter wasn’t too soft when you started.
Can I use a different type of icing?
Yes! While royal icing gives the cleanest look for detailed decorating, you can use a simple glaze made from powdered sugar and milk. Just know that it won’t dry as hard, so stacked cookies might smudge. Buttercream also works, but it won’t set firm.
How do I get the black color really dark?
The key is using both cocoa powder in the dough and gel food coloring. Start with a small amount of coloring and add more gradually. Let the dough rest for 10 minutes after adding the color—it will darken slightly as it sits. If you need it darker, add a tiny bit more coloring and knead again.
My royal icing is too thick/thin. How do I fix it?
If it’s too thick, add water one drop at a time and stir well. If it’s too thin, add more sifted powdered sugar a tablespoon at a time. The perfect consistency should slowly drip off a spoon and smooth out within 15 seconds. Always test on a piece of parchment before decorating your cookies.
Pin This Recipe!

Easy Halloween Black Cat Sugar Cookies: Perfect Treat

These buttery, soft sugar cookies are shaped like adorable black cats and decorated with royal icing. Perfect for Halloween parties, classroom treats, or spooky movie nights, they’re simple enough for beginners but impressive enough to steal the show.
- Prep Time: 15 minutes
- Cook Time: 10 minutes
- Total Time: 1 hour 55 minutes (including 30 minutes chilling and 1 hour decorating/drying)
- Yield: 24 servings 1x
- Category: Dessert
- Cuisine: American
Ingredients
- 2 ¾ cups all-purpose flour (spooned and leveled)
- 1 cup unsalted butter, softened to room temperature
- 1 cup granulated sugar
- 1 large egg, room temperature
- 1 teaspoon vanilla extract
- ½ teaspoon salt
- ½ teaspoon baking powder
- 2 tablespoons unsweetened cocoa powder
- Black gel food coloring (e.g., Americolor Super Black)
- 3 cups powdered sugar, sifted
- 2 tablespoons meringue powder
- 4–5 tablespoons water, at room temperature
- 1 teaspoon vanilla extract (or clear vanilla)
- Black gel food coloring (for icing)
- Orange and green gel food coloring (for decorating)
Instructions
- In a medium bowl, whisk together the flour, salt, baking powder, and cocoa powder. Set aside.
- In the bowl of a stand mixer, beat the softened butter and granulated sugar on medium speed until light and fluffy, about 3 minutes. Scrape down the sides, then add the egg and vanilla extract. Beat until combined, about 30 seconds.
- With the mixer on low, gradually add the dry ingredients. Mix until just combined. The dough will look crumbly but should come together when pressed. If too dry, add a teaspoon of milk; if too sticky, add a tablespoon of flour.
- Add black gel food coloring a little at a time, starting with ¼ teaspoon, and knead into the dough with your hands until desired shade is reached (about ½ teaspoon total). Wrap dough in plastic wrap, flatten into a disc, and refrigerate for at least 30 minutes (up to 3 days).
- Preheat oven to 350°F (175°C). Line two baking sheets with parchment paper.
- On a lightly floured surface, roll the dough to ¼-inch thickness. Use a cat-shaped cookie cutter to cut out cookies, dipping cutter in flour between cuts. Place on prepared baking sheets about 2 inches apart. Gather scraps, re-roll, and cut again (yields about 24 cookies).
- Bake for 8-10 minutes, rotating pans halfway through. Cookies are done when edges are just set and centers look slightly puffed but not browned. Cool on baking sheet for 5 minutes, then transfer to a wire rack to cool completely.
- For royal icing: In a large bowl, combine sifted powdered sugar and meringue powder. Add 4 tablespoons water and vanilla extract. Beat on low until combined, then increase to medium-high and beat for 5-7 minutes until thick and glossy (stiff peak consistency). Add more water, one teaspoon at a time, until icing reaches ’15-second consistency’ (a ribbon of icing disappears into the surface in about 15 seconds).
- Divide icing into three bowls. Color one portion black, one orange, and one green. Keep bowls covered with a damp paper towel. Transfer each color to a piping bag fitted with a small round tip.
- Outline each cookie with black icing, then flood the inside by piping in a zigzag pattern. Use a toothpick to spread icing into ears and corners. Tap cookie gently on counter to smooth surface. Let black icing dry for 30 minutes.
- Pipe on eyes and nose with black icing, and add orange or green eyes if desired. Let cookies dry completely, about 4-6 hours or overnight.
Notes
Chill the dough thoroughly to prevent spreading. Don’t overbake; black cookies hide golden edges. Use a light touch with flour when rolling. Keep royal icing covered with a damp paper towel to prevent drying. Test icing consistency on parchment before decorating. Cookies can be stored in an airtight container at room temperature for up to 1 week. Undecorated cookies can be frozen for up to 3 months.
Nutrition
- Serving Size: 1 cookie
- Calories: 165
- Sugar: 12
- Sodium: 75
- Fat: 8
- Saturated Fat: 5
- Carbohydrates: 22
- Fiber: 0.5
- Protein: 2
Keywords: Halloween cookies, black cat cookies, sugar cookies, royal icing cookies, Halloween treats, easy sugar cookies, decorated cookies


