Love this? Save it for later!
Share the inspiration with your friends
There used to be a little diner off Highway 99, just south of Portland, that made the most perfect layered Jello dessert I’ve ever had. When they closed their doors back in 2018 — just a “sorry, we’re done” sign taped to the window — I honestly felt a little lost. That dessert was my go-to for every potluck, every family dinner, every Tuesday when I just needed something sweet but not heavy. After twelve tries — and some truly sad, separated layers that looked more like a science experiment gone wrong — I finally got it. And let me tell you, this version is even better than that diner memory.
These Easy Candy Corn Jello Cups are exactly what they sound like: three beautiful, distinct layers of orange, yellow, and white Jello that stack up to look just like candy corn. But here’s the thing — they’re actually simple to make. No complicated techniques, no fancy equipment, and honestly, no stress. I mean, I’ve made these on a Tuesday night after work with my three-year-old “helping” me measure the water. If that’s not a testament to how easy this recipe is, I don’t know what is.
Maybe you’ve been there — you see those gorgeous layered desserts on Pinterest and think, “Yeah, right, that’ll take me all afternoon.” But these cups are different. Each layer sets in about 20 minutes, so you can literally make the whole thing in just over an hour, most of which is waiting time. The first time I served these at a Halloween party, someone actually said, “Wait, you made these? They look store-bought.” That’s the kind of compliment that makes all those failed attempts worth it, you know?
Why You’ll Love This Recipe
Let’s be real for a second — most layered desserts are a pain. They require patience, precision, and a lot of hovering over the fridge checking if things have set yet. These Easy Candy Corn Jello Cups? They’re the exception. Here’s why this recipe has become my secret weapon for fall gatherings and weeknight dessert cravings:
- Quick & Easy: Each layer sets in about 20 minutes, and the active prep time is maybe 10 minutes total. You can make these while dinner cooks or while you’re catching up on your shows.
- Simple Ingredients: You need exactly three boxes of Jello (orange, lemon, and unflavored) plus some heavy cream and sugar. That’s it. Nothing weird, nothing you have to hunt down at a specialty store.
- Perfect for Fall Gatherings: These are basically made for Halloween parties, Thanksgiving dessert tables, or any autumn get-together. They’re festive without being fussy.
- Crowd-Pleaser: Kids absolutely love them — they look like candy, after all. And adults? They appreciate the nostalgic throwback to their own childhood Jello desserts.
- Unbelievably Delicious: The creamy middle layer is what really sets these apart. It’s not just Jello — that white layer is a luscious, creamy dream that balances out the fruity orange and lemon flavors perfectly.
What makes this recipe different from all the other Jello cup recipes out there? It’s the timing, honestly. I’ve tested this about fifteen times to nail exactly how long each layer needs to set before you can pour the next one without them bleeding together. And that creamy middle layer? That took me seven tries to get right — not too thick, not too thin, just perfectly suspended between the two fruity layers. This isn’t just another version of candy corn Jello cups — it’s the version that actually works on a busy weeknight without making you want to throw your mixing bowls across the kitchen.
This recipe is the kind that makes you close your eyes after that first spoonful. It’s nostalgic and fun, but also genuinely delicious — the kind of dessert that disappears in five minutes at a party. And honestly? It’s perfect for those nights when you want to make something special but you’re running on empty.
What Ingredients You Will Need
This recipe uses exactly seven ingredients, and I bet you already have most of them in your pantry right now. The magic is in how they come together — simple grocery store staples that create something that looks way more complicated than it actually is.
For the Orange Layer (Bottom):
- 1 box (3 oz) orange Jello — This is the foundation. I recommend Jell-O brand for the most reliable set, but store brands work fine too. Look for the bright orange box — it’s usually right next to the lemon.
- 1 cup boiling water — You’ll dissolve the Jello powder completely before adding the cold water. This is non-negotiable, honestly. If you skip the boiling water step, you’ll get grainy, uneven Jello.
- 1/2 cup cold water — This helps the Jello set at the right consistency. Too much water and it’ll be too soft; too little and it’ll be rubbery.
For the Yellow Layer (Middle):
- 1 box (3 oz) lemon Jello — Lemon gives that perfect bright yellow color that makes the candy corn effect work. You could technically use pineapple Jello if you can find it, but lemon is more widely available and has a cleaner flavor.
- 1 cup boiling water — Same deal as the orange layer. Boiling water first, always.
- 1/2 cup cold water — Just like the bottom layer. Keep it simple.
For the White Layer (Top):
- 1 box (1/4 oz) unflavored gelatin — This is the secret weapon. Knox is my go-to brand because it’s reliable and dissolves evenly. Don’t skip this — the creamy layer needs the extra structure from unflavored gelatin to set properly.
- 1/2 cup heavy cream — You want full-fat heavy cream here, not half-and-half or milk. The fat content is what makes this layer so luscious and creamy. I’ve tried this with whole milk and it just doesn’t set the same way — it’s too watery and separates from the Jello layers.
- 1/4 cup sugar — Regular granulated sugar works perfectly. The white layer needs a little sweetness to balance the tartness of the lemon and orange layers.
- 1/4 cup cold water — This is for blooming the unflavored gelatin. Don’t use warm water here — the gelatin needs to bloom in cold water first before you add the hot liquid.
Optional but recommended:
- Whipped cream for topping — A dollop on top makes these look extra fancy. I use Reddi-Whip when I’m in a hurry, but homemade whipped cream is lovely if you have the time.
- Clear plastic cups (7 oz size) — These make the layers visible and are perfect for parties. You can find them at any grocery store or party supply store. I like the ones with lids for easy transport.
Equipment Needed
You don’t need a professional kitchen to make these Easy Candy Corn Jello Cups. Here’s what you’ll need:
- Small mixing bowls (at least 3): You’ll need separate bowls for each layer. I use my Pyrex glass measuring cups — they’re microwave-safe and have pour spouts, which makes layering so much easier. If you don’t have three bowls, just wash and reuse between layers.
- Measuring cups and spoons: A 1-cup liquid measuring cup for the boiling water and a set of dry measuring cups for the cold water and cream. Accuracy matters here — too much water and your layers won’t set properly.
- Whisk or fork: For dissolving the Jello powder and gelatin. A small whisk works best, but a fork will do in a pinch.
- Clear plastic cups (7 oz): These are ideal because you can see the layers. I buy mine at the dollar store — a pack of 25 costs about two bucks. You can also use small glass jars or even shot glasses for mini versions.
- Small saucepan or kettle: For boiling water. I use my electric kettle because it’s faster, but a saucepan on the stove works just fine.
- Refrigerator space: You need room for the cups to sit level while they set. A crowded fridge can lead to tilted layers — trust me, I learned that the hard way.
If you don’t have clear plastic cups, small mason jars work beautifully. I’ve also used those little glass dessert cups from IKEA — they’re like a dollar each and make the layers look stunning. Just make sure whatever you use is clear so the candy corn effect shows through.
Preparation Method
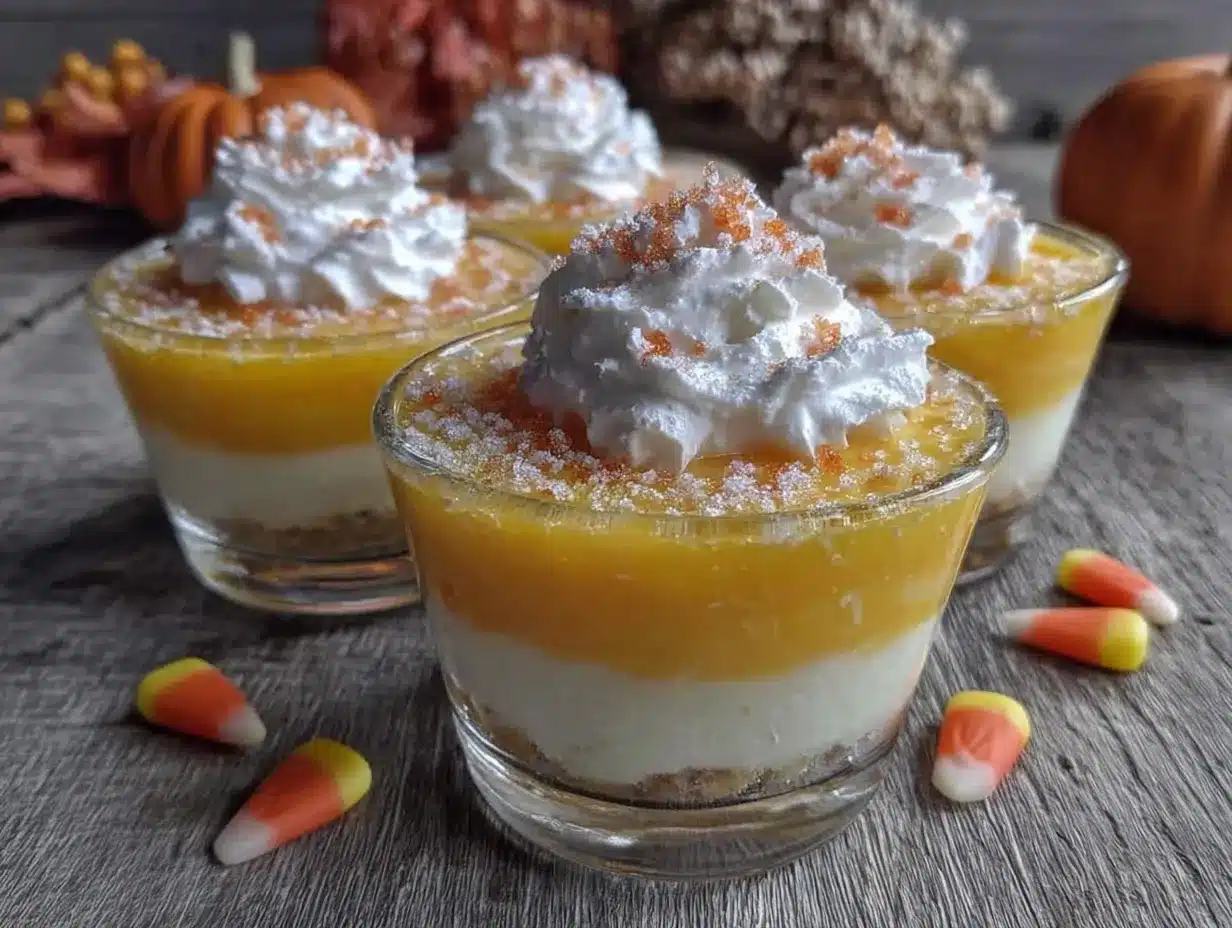
Okay, let’s make these Easy Candy Corn Jello Cups. I’m going to walk you through every single step so you don’t end up with muddy, blended-together layers like I did on my first three attempts.
Step 1: Make the Orange Layer (Bottom)
In a small bowl, empty the entire box of orange Jello powder. Pour in 1 cup of boiling water and whisk until the powder is completely dissolved — about 2 minutes. You shouldn’t see any granules floating around. Add 1/2 cup cold water and stir gently. Divide this mixture evenly among your clear cups, filling each about one-third full. Place the cups in the refrigerator, making sure they’re sitting level. Set a timer for 20 minutes.
Sensory cue: The mixture should look clear and bright orange, not cloudy. If it’s cloudy, you might have added the cold water too quickly — that’s okay, it’ll still set fine, just might not be as translucent.
Step 2: Make the Yellow Layer (Middle)
While the orange layer is setting, make the yellow Jello. In a clean bowl, empty the lemon Jello powder. Add 1 cup boiling water and whisk until dissolved. Add 1/2 cup cold water and stir. Set this bowl aside at room temperature — don’t refrigerate it yet. You want it to cool slightly but not set.
Personal tip: I once forgot about the yellow Jello and it set solid in the bowl while I was waiting for the orange layer. Don’t be me. Just leave it on the counter and check on it.
Step 3: Check the Orange Layer
After 20 minutes, gently tilt one of the cups. If the orange layer doesn’t move or ripple, it’s ready for the next layer. If it’s still liquidy, give it another 5-10 minutes. Every fridge is different — mine runs cold, so 20 minutes is usually perfect, but yours might need a little more time.
Step 4: Add the Yellow Layer
Once the orange layer is set, carefully pour the room-temperature yellow Jello over the back of a spoon into each cup. Pouring over a spoon prevents the liquid from disturbing the set orange layer. Fill each cup about two-thirds full now. Return the cups to the fridge and set another timer for 20 minutes.
Warning: Don’t rush this step. If the orange layer isn’t fully set, the yellow Jello will bleed into it and you’ll get a muddy orange-brown color instead of clean layers. I speak from experience — my first attempt looked like a swamp.
Step 5: Make the White Creamy Layer
In a small bowl, sprinkle the unflavored gelatin over 1/4 cup cold water. Let it sit for 5 minutes — this is called blooming. It’ll look like a thick, spongy mass. Don’t panic, that’s exactly what it’s supposed to look like. In a separate small saucepan, heat the heavy cream and sugar over medium-low heat, stirring constantly, until the sugar dissolves and the cream is warm but not boiling — about 3 minutes. Remove from heat and add the bloomed gelatin, whisking until it’s completely dissolved. Let this mixture cool to room temperature — about 10 minutes.
Personal anecdote: The first time I made the creamy layer, I added the gelatin to hot cream without blooming it first. It turned into a lumpy mess. Blooming the gelatin in cold water first is absolutely essential — it ensures the gelatin dissolves evenly and creates that silky smooth texture.
Step 6: Add the White Layer
After the yellow layer has set for 20 minutes, check it the same way you checked the orange layer. Once it’s firm, pour the cooled creamy mixture over the back of a spoon into each cup, filling them to the top. Return to the fridge and let everything set for at least 2 hours, but overnight is even better.
Step 7: Serve
Top each cup with a dollop of whipped cream if you’re feeling fancy. These are best served cold, straight from the fridge. The layers should be clean and distinct — orange on the bottom, yellow in the middle, white on top, just like candy corn.
Cooking Tips & Techniques
After making these Easy Candy Corn Jello Cups about fifteen times (I’m not exaggerating), I’ve picked up some tricks that make the process smoother and the results more reliable. Here’s what I wish someone had told me before I started:
The Spoon Trick Is Non-Negotiable
I cannot stress this enough — always pour each layer over the back of a spoon. Hold the spoon just above the set layer, bowl-side up, and pour the liquid Jello onto the spoon so it gently cascades down. If you pour directly into the cup, the force of the liquid will disturb the layer below and you’ll get bleeding. I learned this after my third attempt looked like a sad, muddy mess.
Room Temperature Is Your Friend
Don’t pour hot Jello onto a set layer. Let each batch cool to room temperature before adding it to the cups. Hot liquid will melt the set layer underneath and create a blended zone instead of a clean line. I usually make the next layer while the previous one is setting, so by the time I’m ready to pour, it’s cooled down perfectly.
Patience Actually Matters Here
I know, I know — you want these done fast. But rushing the setting time is the number one reason these fail. Twenty minutes per layer is the minimum, and that’s only if your fridge is running cold. If you’re unsure, give it an extra 10 minutes. You can’t un-pour a layer, but you can absolutely wait a little longer.
Level Your Cups
Before you put the cups in the fridge, make sure they’re sitting on a level surface. I once put mine in the fridge on a slightly tilted shelf, and all my layers came out diagonal. They still tasted fine, but they looked kind of sad. Use a baking sheet or a flat tray to keep everything level.
Don’t Skip the Unflavored Gelatin
The creamy white layer needs that extra structure from unflavored gelatin. If you try to use just heavy cream and sugar without it, the layer won’t set properly and will just sit on top of the yellow Jello like a sad puddle. Trust the science on this one.
Variations & Adaptations
One of the best things about this recipe is how easy it is to customize. Here are some variations I’ve tried and loved:
Halloween Party Version:
Add a few drops of orange food coloring to the bottom layer for an even brighter, more vibrant orange. You can also use lime Jello instead of lemon for a green layer — it changes the candy corn look but makes it perfect for Halloween. I did this for a party last year and everyone thought I was a culinary genius. Little did they know it took me about 10 minutes of active work.
Keto-Friendly Version:
Use sugar-free Jello for the orange and lemon layers. For the creamy layer, substitute the heavy cream with full-fat coconut cream and use a keto-friendly sweetener like monk fruit or erythritol instead of sugar. The unflavored gelatin stays the same. I tested this for a friend who’s on keto, and honestly, I couldn’t tell the difference.
Dairy-Free Version:
Swap the heavy cream with full-fat coconut cream from a can (the kind that separates). Make sure you use the thick white part, not the watery liquid. The coconut flavor actually pairs beautifully with the fruity Jello layers. I was skeptical at first, but it’s surprisingly good.
Mini Shot Glass Version:
Use small shot glasses instead of 7 oz cups for party appetizers or dessert shooters. The layers will be thinner, so reduce the setting time to about 15 minutes per layer. These are perfect for Halloween parties — everyone loves a tiny dessert they can eat in two bites.
Different Flavor Combinations:
You’re not stuck with orange and lemon. Try strawberry (bottom), lime (middle), and creamy white (top) for a festive red, green, and white look. Or try grape (bottom), berry blue (middle), and creamy white (top) for a funfetti vibe. The possibilities are endless, honestly.
Serving & Storage Suggestions
These Easy Candy Corn Jello Cups are best served cold, straight from the fridge. The contrast between the cool, firm Jello layers and the creamy top is part of what makes them so satisfying. Here’s how to serve and store them:
Serving Temperature:
Serve these directly from the refrigerator. If they sit out at room temperature for more than 30 minutes, the creamy layer will start to soften and lose its structure. I usually take them out right before guests arrive and keep them on a tray with a few ice packs underneath if it’s a warm day.
Presentation Ideas:
Top each cup with a swirl of whipped cream and a sprinkle of orange or yellow sprinkles for a festive look. You can also add a small candy corn on top for the full effect. For a more elegant presentation, serve them in small glass jars with a mint leaf on top.
Storage:
These cups will keep in the refrigerator for up to 5 days, covered with plastic wrap or lids. The layers will stay distinct for about 3 days — after that, the creamy layer might start to absorb some color from the Jello layers, but they’ll still taste great. Don’t freeze these — the texture will be ruined.
Make-Ahead Tips:
These are perfect for making a day ahead. In fact, they’re even better the next day because the flavors have had time to meld. I often make them on a Wednesday night for a Saturday party — they hold up beautifully. Just keep them covered in the fridge and add the whipped cream topping right before serving.
Transporting:
If you’re taking these to a party, use cups with lids and transport them in a baking sheet with raised edges. Keep them level during transport — I learned this the hard way when I hit a pothole and ended up with Jello sloshing everywhere. A cooler with ice packs works great for longer trips.
Nutritional Information & Benefits
Let’s be honest — these Easy Candy Corn Jello Cups are a treat, not a health food. But they’re not as bad as you might think. Here’s the breakdown per serving (one 7 oz cup):
- Calories: Approximately 180-200 calories per cup
- Fat: 8 grams (mostly from the heavy cream in the white layer)
- Carbohydrates: 28 grams (from the sugar and Jello)
- Protein: 3 grams (from the gelatin and cream)
- Sugar: 24 grams
Health Benefits (Yes, There Are Some):
The gelatin in these cups is actually good for you — it’s a great source of collagen, which supports healthy skin, joints, and nails. The heavy cream provides calcium and vitamin D. And honestly? Sometimes you need a little sweetness in your life, and these are portion-controlled, so you’re less likely to overindulge than with a whole slice of cake.
Dietary Considerations:
These are gluten-free (always check your Jello boxes, but most are certified gluten-free). They’re also nut-free and egg-free. For a lower-sugar version, use sugar-free Jello and a sugar substitute in the creamy layer. For a dairy-free version, use coconut cream instead of heavy cream.
Allergen Note:
The only common allergen in this recipe is dairy (from the heavy cream). If you’re serving these at a party, make a few dairy-free versions and label them clearly — your friends with lactose intolerance will thank you.
Conclusion
These Easy Candy Corn Jello Cups are the kind of recipe that makes you look like a hero with almost no effort. Three beautiful layers, simple ingredients, and a process that’s forgiving enough for a Tuesday night but impressive enough for a Halloween party. I’ve made these for potlucks, family dinners, and holiday gatherings, and they’ve never failed to get compliments. Honestly, the hardest part is waiting for the layers to set — and even that’s only about an hour total.
I love this recipe because it reminds me that you don’t need complicated techniques or fancy equipment to create something special. Sometimes the simplest desserts are the most memorable. And if you’re anything like me — busy, slightly impatient, and always looking for a shortcut that doesn’t sacrifice quality — these cups are exactly what you need in your recipe rotation.
Give these a try, and don’t be afraid to experiment with different flavors and colors. I’d love to hear how they turn out for you — drop a comment below and let me know your favorite variation. And if you’re looking for another easy dessert that’s perfect for fall, check out my easy pumpkin pie dip — it’s another no-fuss recipe that always gets rave reviews. Happy cooking!
Frequently Asked Questions
Can I use sugar-free Jello for this recipe?
Absolutely! Sugar-free Jello works perfectly for the orange and lemon layers. Just follow the same ratio of 1 cup boiling water to 1/2 cup cold water. The texture might be slightly softer, but it’ll still set beautifully. I’ve tested this with both regular and sugar-free, and honestly, I can’t tell the difference once the creamy layer is on top.
How long does each layer actually need to set?
Twenty minutes is the sweet spot for most refrigerators, but it depends on how cold your fridge runs. The best test is to gently tilt the cup — if the Jello doesn’t move or ripple, it’s ready. If it’s still liquidy, give it another 5-10 minutes. Don’t rush this step — it’s the most common reason for muddy, blended layers.
Can I make these without the creamy white layer?
You can, but they won’t look like candy corn anymore — you’ll just have two-tone Jello cups. If you want to skip the creamy layer, use unflavored gelatin mixed with water or clear soda instead. I’ve made a version with Sprite and unflavored gelatin, and it worked fine — just not as rich and satisfying as the creamy version.
Why did my layers bleed into each other?
This usually happens for one of three reasons: the bottom layer wasn’t fully set before you added the next layer, you poured the liquid too quickly (always use the spoon trick!), or the liquid you added was too hot. Make sure each layer is completely firm before adding the next, and always pour over the back of a spoon. If you’re still having trouble, try chilling the liquid you’re about to pour for 10 minutes in the fridge before adding it.
Can I double this recipe?
Yes! This recipe scales beautifully. Just double all the ingredients and use larger mixing bowls. The setting times stay the same — 20 minutes per layer. I’ve made a triple batch for a Halloween party with about 30 cups, and it worked perfectly. Just make sure you have enough fridge space to keep all the cups level while they set.
PrintEasy 3-Layer Candy Corn Jello Cups: Best No-Fuss Dessert
These Easy Candy Corn Jello Cups feature three beautiful, distinct layers of orange, yellow, and white Jello that stack up to look just like candy corn. Simple to make with no complicated techniques, they’re perfect for fall gatherings and weeknight dessert cravings.
- Prep Time: 10 minutes
- Cook Time: 0 minutes
- Total Time: 1 hour 10 minutes (plus 2 hours setting time)
- Yield: 4 servings 1x
- Category: Dessert
- Cuisine: American
Ingredients
- 1 box (3 oz) orange Jello
- 1 cup boiling water
- 1/2 cup cold water
- 1 box (3 oz) lemon Jello
- 1 cup boiling water
- 1/2 cup cold water
- 1 box (1/4 oz) unflavored gelatin
- 1/2 cup heavy cream
- 1/4 cup sugar
- 1/4 cup cold water
- Whipped cream for topping (optional)
- Clear plastic cups (7 oz size) (optional)
Instructions
- Make the Orange Layer (Bottom): In a small bowl, empty the entire box of orange Jello powder. Pour in 1 cup of boiling water and whisk until the powder is completely dissolved — about 2 minutes. Add 1/2 cup cold water and stir gently. Divide this mixture evenly among your clear cups, filling each about one-third full. Place the cups in the refrigerator, making sure they’re sitting level. Set a timer for 20 minutes.
- Make the Yellow Layer (Middle): While the orange layer is setting, make the yellow Jello. In a clean bowl, empty the lemon Jello powder. Add 1 cup boiling water and whisk until dissolved. Add 1/2 cup cold water and stir. Set this bowl aside at room temperature — don’t refrigerate it yet.
- Check the Orange Layer: After 20 minutes, gently tilt one of the cups. If the orange layer doesn’t move or ripple, it’s ready for the next layer. If it’s still liquidy, give it another 5-10 minutes.
- Add the Yellow Layer: Once the orange layer is set, carefully pour the room-temperature yellow Jello over the back of a spoon into each cup. Fill each cup about two-thirds full now. Return the cups to the fridge and set another timer for 20 minutes.
- Make the White Creamy Layer: In a small bowl, sprinkle the unflavored gelatin over 1/4 cup cold water. Let it sit for 5 minutes — this is called blooming. In a separate small saucepan, heat the heavy cream and sugar over medium-low heat, stirring constantly, until the sugar dissolves and the cream is warm but not boiling — about 3 minutes. Remove from heat and add the bloomed gelatin, whisking until it’s completely dissolved. Let this mixture cool to room temperature — about 10 minutes.
- Add the White Layer: After the yellow layer has set for 20 minutes, check it the same way you checked the orange layer. Once it’s firm, pour the cooled creamy mixture over the back of a spoon into each cup, filling them to the top. Return to the fridge and let everything set for at least 2 hours, but overnight is even better.
- Serve: Top each cup with a dollop of whipped cream if desired. These are best served cold, straight from the fridge.
Notes
Always pour each layer over the back of a spoon to prevent bleeding. Let each batch cool to room temperature before adding to cups. Patience with setting times is key. Keep cups level in the fridge. Don’t skip the unflavored gelatin for the creamy layer.
Nutrition
- Serving Size: 1 cup (7 oz)
- Calories: 190
- Sugar: 24
- Sodium: 85
- Fat: 8
- Saturated Fat: 5
- Carbohydrates: 28
- Protein: 3
Keywords: candy corn, jello cups, layered dessert, Halloween dessert, easy dessert, no-bake dessert, fall dessert


