Love this? Save it for later!
Share the inspiration with your friends
I was standing in the frozen foods aisle last November, just staring at a box of pre-made pie crusts, when the smell of a gourd-shaped candle from the next aisle over hit me. It was that fake pumpkin spice scent, cloying and sweet, and suddenly I was eight years old in my Aunt Jo’s kitchen, watching her pull a sheet pan of pumpkin bars from the oven. She always made them the day before Thanksgiving, not for the big meal, but for us—the kids who were too impatient for pie and too fidgety to sit still. The bars were messy, the topping always slid off, and she’d sneak us a warm piece on a paper towel while the adults argued about football. I haven’t thought about that kitchen in years—Aunt Jo passed a decade ago, and I honestly don’t think I ever got her recipe. So last November, I stood in that aisle, box in hand, and felt a little lost. I didn’t want a box. I wanted her bars. The ones with the nutty, almost savory edge that cut through all that sweetness. It took me three tries and a lot of burnt butter (let me tell you, the smoke alarm is not a fan of brown butter), but I finally cracked it. These Kid-Approved Brown Butter Sage Pumpkin Pie Bars are my best attempt at chasing that memory—a little fancier, a little more grown-up, but still messy and perfect for the kids who can’t wait for dessert. Maybe you’ve been there, trying to recreate a taste you can almost but not quite hold onto. This is that recipe.
Why You’ll Love This Recipe
Honestly, I didn’t set out to make a “kid-approved” bar. I was just trying to make Aunt Jo proud. But after testing this on my own crew—and my neighbor’s kids, and a few skeptical coworkers—I realized these bars have a magic that goes beyond the typical pumpkin pie. They’re not just good; they’re the kind of thing that makes people close their eyes after the first bite, even the little ones.
- Quick & Easy: Forget the fuss of a traditional pie crust. These bars come together in about 15 minutes of active prep, and the press-in crust is practically foolproof. Perfect for a busy weeknight or a last-minute holiday potluck.
- Simple Ingredients: You likely have most of these in your pantry already. No weird extracts or hard-to-find spices. The “fancy” part—the brown butter and sage—uses things you probably have on hand.
- Perfect for Fall Gatherings: Whether it’s a cozy family dinner, a Friendsgiving, or the big day itself, these bars travel well and disappear fast. They’re the crowd-pleaser that doesn’t require a plate and fork.
- Crowd-Pleaser: Kids love the portable bar shape and the sweet, spiced filling. Adults go crazy for that nutty brown butter and the surprising whisper of sage. It’s a win-win.
- Unbelievably Delicious: The combo of a buttery shortbread crust, a silky pumpkin filling, and that savory-sweet topping is next-level comfort food. It’s the pie you didn’t know you needed.
What makes this recipe different from the rest is the technique. Browning the butter with fresh sage leaves isn’t just a gimmick—it adds a deep, toasty, almost caramelized flavor that makes the pumpkin filling taste richer. It’s a chef-tested trick that feels fancy but is incredibly easy. This isn’t just another version of pumpkin pie bars. It’s the one that will become your new holiday tradition, the one that makes you the hero of the dessert table without breaking a sweat.
What Ingredients You Will Need
This recipe uses simple, wholesome ingredients to deliver bold flavor and satisfying texture without the fuss. Most of these are pantry staples, especially as we head into fall. I’ve included a few notes on substitutions and my personal preferences, so you can get the best results the first time.
- For the Crust:
- 1 ½ cups (190g) all-purpose flour (spooned and leveled)
- ½ cup (100g) granulated sugar
- ½ teaspoon kosher salt
- ½ cup (1 stick, 113g) unsalted butter, cold and cut into small cubes (I prefer Kerrygold for its rich flavor)
- For the Brown Butter Sage:
- 6 tablespoons (85g) unsalted butter
- 10-12 fresh sage leaves (plus a few more for garnish, if you like)
- For the Pumpkin Filling:
- 1 can (15 oz, 425g) pure pumpkin puree (not pumpkin pie filling—Libby’s is my go-to for consistent texture)
- ¾ cup (150g) packed light brown sugar
- 2 large eggs, room temperature
- 1 cup (240ml) heavy cream (or full-fat coconut milk for a dairy-free option)
- 1 ½ teaspoons pumpkin pie spice (or ½ tsp cinnamon, ½ tsp ginger, ¼ tsp nutmeg, ¼ tsp cloves)
- ¼ teaspoon kosher salt
- 1 teaspoon vanilla extract
- For the Topping (Optional but Highly Recommended):
- ½ cup (120ml) heavy cream, cold
- 2 tablespoons powdered sugar
- ½ teaspoon vanilla extract
- Crumbled candied pecans or a light dusting of cinnamon (for garnish)
Ingredient Selection Tips: For the best texture, make sure your butter is very cold when making the crust. For the filling, room-temperature eggs will blend more smoothly, giving you a silkier bar. If you can’t find fresh sage, you can use ½ teaspoon of dried rubbed sage, but the flavor will be milder. I really recommend using fresh sage here—it’s the secret to that “what is that amazing flavor?” moment.
Equipment Needed
You don’t need a lot of fancy gadgets for this recipe, which is part of its charm. Here’s what you’ll need to get the job done without any fuss.
- 9×13-inch Baking Pan: This is the perfect size for a generous batch of bars. A light-colored metal pan works best for even baking. If you use a glass or dark pan, you may need to reduce the oven temperature by 25°F to prevent over-browning.
- Parchment Paper: Absolute must for easy removal. You’ll want a long sheet that hangs over the sides of the pan to create “handles.”
- Food Processor or Pastry Cutter: For the crust. A food processor makes it lightning fast, but a pastry cutter or even two forks work perfectly. I’ve used both, and honestly, the processor is just easier for getting that sandy texture.
- Small Saucepan: For browning the butter. A light-colored pan is ideal so you can see the butter solids turn golden brown.
- Large Mixing Bowls: One for the crust, one for the filling.
- Whisk: For combining the filling ingredients smoothly.
- Stand Mixer or Hand Mixer: If you’re making the whipped cream topping, this will save your arm. A whisk and some elbow grease also works.
- Measuring Cups and Spoons: For accuracy, especially with the flour and spices.
Budget-Friendly Tip: Don’t have a food processor? No problem. You can make the crust by hand. Just rub the cold butter into the flour and sugar mixture with your fingertips until it looks like coarse meal. It’s a little more work, but it’s also a great way to get the kids involved—they love squishing the butter into the flour!
Preparation Method
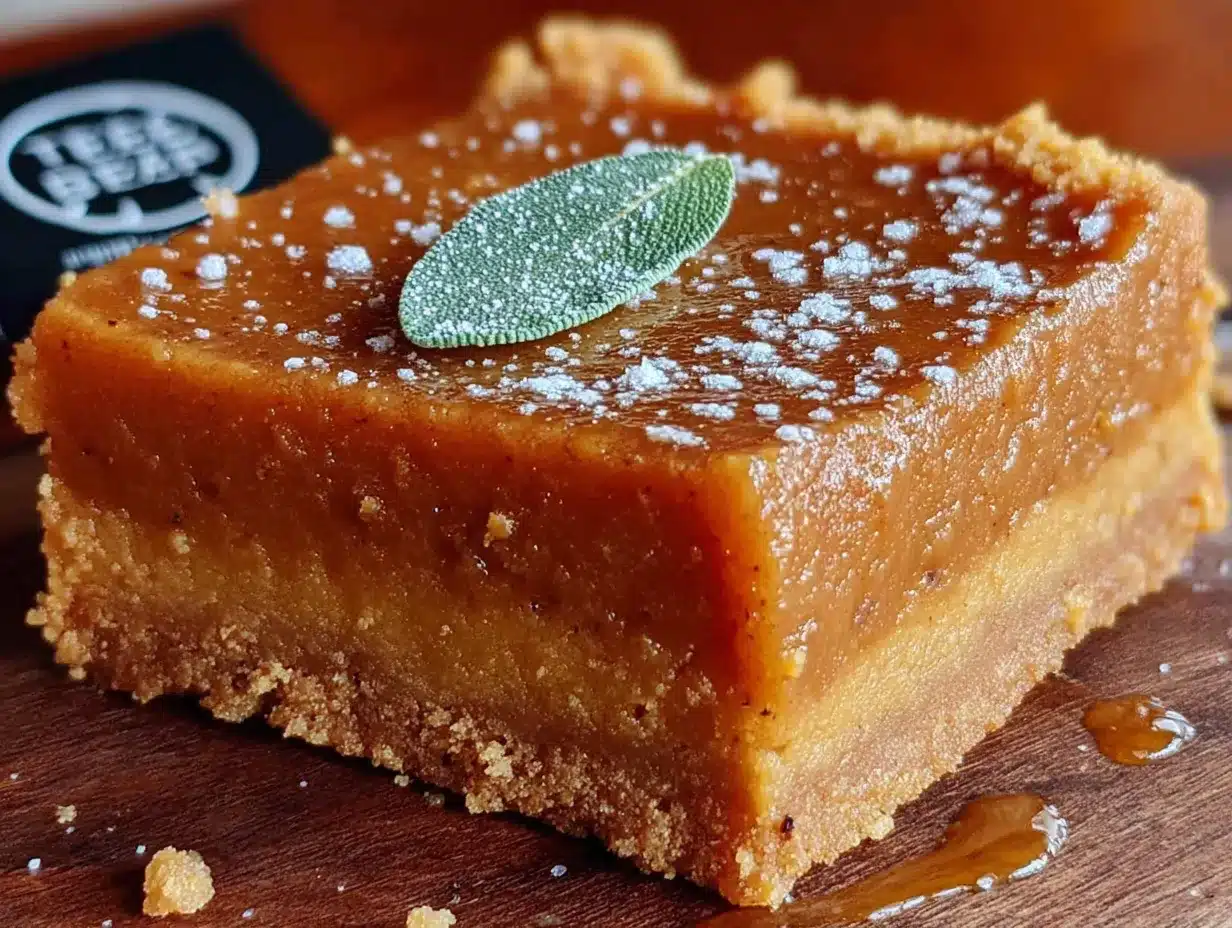
Let’s get baking! Follow these steps, and you’ll have a pan of the best pumpkin bars you’ve ever tasted. Take your time with the brown butter—it’s the star of the show.
- Preheat and Prep: Preheat your oven to 350°F (175°C). Line your 9×13-inch baking pan with a long sheet of parchment paper, leaving about 2 inches of overhang on the two long sides. This will be your “sling” to lift the bars out later.
- Make the Crust: In a food processor, pulse together the flour, ½ cup sugar, and ½ teaspoon salt. Add the cold butter cubes and pulse until the mixture looks like coarse sand with a few pea-sized butter pieces remaining. Don’t over-process—you want some texture. If doing by hand, whisk the dry ingredients, then cut in the butter with a pastry cutter until you reach the same sandy consistency. Press the mixture firmly and evenly into the bottom of your prepared pan. I use the bottom of a flat measuring cup to get it really even. Bake for 18-20 minutes, until the edges are just barely golden. Set aside to cool slightly while you make the filling.
- Brown the Butter with Sage: Place the 6 tablespoons of butter in a small, light-colored saucepan over medium heat. Add the fresh sage leaves. Swirl the pan occasionally as the butter melts. It will foam up, then the foam will subside, and you’ll see little brown specks forming on the bottom of the pan. The sage leaves will crisp up. This takes about 5-7 minutes. As soon as the butter smells nutty and the specks are a warm amber color, remove the pan from the heat. Pour the butter and sage leaves into a small heatproof bowl to stop the cooking process. Let it cool for a few minutes. Don’t walk away from the stove—brown butter can go from perfect to burnt in seconds!
- Make the Pumpkin Filling: In a large bowl, whisk together the pumpkin puree and brown sugar until smooth. Add the eggs one at a time, whisking well after each. Then whisk in the heavy cream, pumpkin pie spice, ¼ teaspoon salt, and vanilla extract. Now, here’s the key: slowly drizzle in the warm brown butter (discard the sage leaves or save them for garnish) while whisking constantly. This emulsifies the butter into the filling, making it incredibly rich and smooth. Whisk until everything is fully combined and glossy.
- Assemble and Bake: Pour the pumpkin filling over the pre-baked crust. Gently tilt the pan to spread it evenly. Bake for 40-45 minutes, or until the edges are set and the center is just slightly jiggly (like a firm custard). A knife inserted 1 inch from the edge should come out clean. The center will continue to set as it cools. If the top is browning too quickly, tent the pan loosely with foil after 30 minutes.
- Cool Completely: This is the hardest part! Place the pan on a wire rack and let the bars cool to room temperature, about 2 hours. Then, cover the pan with plastic wrap and refrigerate for at least 4 hours, or overnight. Chilling them is essential for clean, sharp slices. I know it’s tempting, but don’t rush this step.
- Slice and Serve: Once fully chilled and set, use the parchment sling to lift the entire block of bars out of the pan. Place on a cutting board. Use a sharp knife to cut into squares or rectangles. Wipe the knife clean between cuts for the neatest edges. Serve cold or at room temperature.
Cooking Tips & Techniques
I learned a few things the hard way so you don’t have to. Here are my best tips for perfect bars every time.
- Don’t skip the chill. I know, I know. But if you cut into these bars while they’re even slightly warm, the filling will be soft and messy. The overnight chill allows the custard to fully set, giving you that perfect, clean slice. It’s the same principle as a good cheesecake.
- Watch the brown butter like a hawk. I’ve burned more batches than I care to admit. The butter will go from a light golden to a deep amber very quickly. As soon as you smell that nutty aroma and see the brown specks, pull it off the heat. Swirl the pan constantly.
- Use room temperature ingredients. This is a small thing that makes a big difference. Cold eggs can seize the filling, making it lumpy. Let your eggs sit on the counter for 30 minutes before you start, or place them in a bowl of warm water for 5 minutes.
- Press the crust firmly. A loose crust will crumble when you try to cut the bars. Use the bottom of a glass or a measuring cup to really pack it down into the pan. The pre-bake also helps set it.
- Multitasking tip: While the crust is pre-baking, you can brown the butter and whisk together the dry ingredients for the filling. This makes the whole process feel much faster and keeps you from standing around.
Variations & Adaptations
One of the best things about this recipe is how easy it is to tweak. Here are a few ways I’ve played with it over the years.
- Gluten-Free Version: Swap the all-purpose flour in the crust for a 1:1 gluten-free baking flour blend (I like Bob’s Red Mill). No other changes needed! It works perfectly.
- Dairy-Free Version: Use a high-quality vegan butter stick (like Miyoko’s) for both the crust and the brown butter. Replace the heavy cream in the filling with full-fat coconut cream (the solid part from a can of coconut milk). The flavor will be slightly different, but still incredibly delicious.
- Spice It Up: Add a pinch of black pepper or a tiny pinch of cayenne pepper to the pumpkin filling. It won’t make it spicy, but it will deepen the warm spice flavors and add a lovely complexity. I did this by accident once and it was a happy mistake.
- Nutty Crust: Add ¼ cup of finely chopped pecans or walnuts to the crust mixture before pressing it into the pan. Toast them first for extra flavor. This adds a wonderful crunch and pairs beautifully with the brown butter.
- No-Sage Version for Picky Kids: If you’re worried the sage might be too “out there” for your kids, you can leave the sage out of the brown butter. Just brown the butter on its own. You’ll still get that incredible nutty flavor without the herbal note. My own kids actually love the sage, but I know every family is different!
Serving & Storage Suggestions
These bars are incredibly versatile. Here’s how to serve them up and keep them fresh.
- Serving Temperature: I prefer them cold, straight from the fridge. The filling is firm and the flavors are clean. They are also excellent at room temperature, especially if you’re serving them at a gathering. I wouldn’t recommend serving them warm.
- Presentation: For a pretty presentation, top each bar with a dollop of the vanilla whipped cream and a crispy sage leaf (reserved from the browning process). A light dusting of cinnamon or a sprinkle of candied pecans also looks beautiful.
- What to Serve With: A cup of hot coffee or a spiced chai latte is the perfect pairing. If you’re serving these as a dessert after a big meal, keep the sides simple—a scoop of vanilla ice cream is never a bad idea.
- Storage: Store leftover bars in an airtight container in the refrigerator for up to 5 days. They actually get better after a day or two as the flavors meld together. Place a sheet of parchment paper between layers to prevent sticking.
- Freezing: These bars freeze beautifully! Once they are fully chilled and set, cut them into squares. Place them on a baking sheet and freeze until solid (about 2 hours). Then transfer the frozen bars to a freezer-safe bag or container. They will keep for up to 3 months. Thaw in the refrigerator overnight before serving.
- Reheating: I don’t recommend reheating these bars. They are meant to be served cold or at room temperature. The texture of the custard changes when reheated.
Nutritional Information & Benefits
Let’s be real—these are a treat. But there’s some good stuff in there too! Here’s a rough estimate per bar (based on 16 servings, without the optional whipped cream topping).
- Estimated Calories: 280-320
- Fat: 18g
- Carbohydrates: 32g
- Protein: 4g
- Fiber: 2g
- Sugar: 20g
Health Benefits: Pumpkin is a fantastic source of Vitamin A, which is great for your eyes and immune system. It’s also packed with fiber, which helps you feel full and satisfied. The brown butter and sage add a touch of healthy fats and antioxidants. While this is definitely a dessert, it’s made from real, whole ingredients—no artificial flavors or preservatives here. It’s a treat you can feel good about sharing with your family.
Dietary Considerations: This recipe is vegetarian. For gluten-free and dairy-free adaptations, see the Variations section above. It contains dairy and gluten in its standard form.
Conclusion
So there you have it—my best attempt at chasing a childhood memory, and the recipe that has become a new tradition in my own home. These Kid-Approved Brown Butter Sage Pumpkin Pie Bars are more than just a dessert. They’re a little bit of nostalgia, a whole lot of flavor, and the perfect way to bring the family together around the table. I love that they’re simple enough for a Tuesday night but special enough for a holiday feast. They’re forgiving, adaptable, and honestly, they make you look like a rockstar.
I really hope you give these a try. Don’t be afraid to make them your own—add a little extra spice, swap in some pecans, or skip the sage if you have to. The most important thing is that they bring a smile to your family’s faces, just like Aunt Jo’s did for mine. When you make them, come back and let me know how they turned out! Leave a comment below, share a photo, or tell me how you customized them. I can’t wait to hear about your own kitchen memories in the making. Happy baking, friends!
Frequently Asked Questions
Can I use pumpkin pie filling instead of pure pumpkin puree?
I wouldn’t recommend it. Pumpkin pie filling is already sweetened and spiced, which will throw off the balance of this recipe. Using pure pumpkin puree gives you control over the sweetness and spice level, resulting in a much better final bar.
My crust is too crumbly. What did I do wrong?
This usually happens if the butter wasn’t cold enough or wasn’t worked in properly. Make sure your butter is very cold and cut into small cubes. When you press it into the pan, really pack it down firmly. The pre-bake is also crucial for setting the crust.
Can I make these bars a day ahead of time?
Absolutely! In fact, I highly recommend it. Making them a day ahead allows the filling to set completely, making for much cleaner slices. The flavors also meld and deepen overnight. They are the perfect make-ahead dessert for a busy holiday.
My filling is watery or cracked. How can I prevent this?
A watery filling can happen if the eggs and cream weren’t properly emulsified or if the bars were under-baked. Make sure you whisk the filling well. Cracking is usually a sign of over-baking. The bars are done when the edges are set but the center still has a slight jiggle. They will continue to set as they cool.
Can I use dried sage instead of fresh?
You can, but the flavor will be different. Fresh sage has a delicate, peppery flavor that infuses the butter beautifully. Dried sage is more intense and can be a bit musty. If you have to use dried, use about ½ teaspoon and add it to the butter after you’ve removed it from the heat, letting it steep for a minute.
Best Easy Kid-Approved Brown Butter Sage Pumpkin Pie Bars
These pumpkin pie bars feature a buttery shortbread crust, a silky pumpkin filling with nutty brown butter and sage, and a creamy topping. They’re a crowd-pleasing, portable dessert perfect for fall gatherings.
- Prep Time: 15 minutes
- Cook Time: 40-45 minutes
- Total Time: 5 hours (includes chilling)
- Yield: 16 servings 1x
- Category: Dessert
- Cuisine: American
Ingredients
- 1 ½ cups (190g) all-purpose flour (spooned and leveled)
- ½ cup (100g) granulated sugar
- ½ teaspoon kosher salt
- ½ cup (1 stick, 113g) unsalted butter, cold and cut into small cubes
- 6 tablespoons (85g) unsalted butter
- 10–12 fresh sage leaves
- 1 can (15 oz, 425g) pure pumpkin puree
- ¾ cup (150g) packed light brown sugar
- 2 large eggs, room temperature
- 1 cup (240ml) heavy cream
- 1 ½ teaspoons pumpkin pie spice
- ¼ teaspoon kosher salt
- 1 teaspoon vanilla extract
- ½ cup (120ml) heavy cream, cold (for topping)
- 2 tablespoons powdered sugar (for topping)
- ½ teaspoon vanilla extract (for topping)
- Crumbled candied pecans or cinnamon (for garnish, optional)
Instructions
- Preheat oven to 350°F (175°C). Line a 9×13-inch baking pan with parchment paper, leaving overhang on two sides.
- Make the crust: In a food processor, pulse flour, ½ cup sugar, and ½ teaspoon salt. Add cold butter cubes and pulse until mixture resembles coarse sand with a few pea-sized butter pieces. Press firmly into the bottom of the prepared pan. Bake for 18-20 minutes until edges are lightly golden. Set aside to cool slightly.
- Brown the butter with sage: In a small light-colored saucepan over medium heat, melt 6 tablespoons butter with fresh sage leaves. Swirl occasionally until butter foams, then subsides, and brown specks form (about 5-7 minutes). Remove from heat and pour into a heatproof bowl to stop cooking. Let cool.
- Make the pumpkin filling: In a large bowl, whisk together pumpkin puree and brown sugar until smooth. Add eggs one at a time, whisking well. Whisk in heavy cream, pumpkin pie spice, ¼ teaspoon salt, and vanilla extract. Slowly drizzle in warm brown butter (discard sage leaves or reserve for garnish) while whisking constantly until combined and glossy.
- Pour filling over pre-baked crust. Bake for 40-45 minutes until edges are set and center is slightly jiggly. If browning too quickly, tent with foil after 30 minutes.
- Cool completely on a wire rack (about 2 hours), then cover and refrigerate for at least 4 hours or overnight.
- Use parchment sling to lift bars out of pan. Cut into squares with a sharp knife, wiping clean between cuts. Serve cold or at room temperature.
- For topping: Whip cold heavy cream, powdered sugar, and vanilla extract until soft peaks form. Dollop on bars and garnish with candied pecans or cinnamon if desired.
Notes
Chilling is essential for clean slices. Watch brown butter carefully to avoid burning. Use room temperature ingredients for best texture. For gluten-free, use 1:1 gluten-free flour blend. For dairy-free, use vegan butter and coconut cream.
Nutrition
- Serving Size: 1 bar (without toppi
- Calories: 300
- Sugar: 20
- Sodium: 180
- Fat: 18
- Saturated Fat: 11
- Carbohydrates: 32
- Fiber: 2
- Protein: 4
Keywords: pumpkin pie bars, brown butter sage, fall dessert, kid-friendly, Thanksgiving bars, easy pumpkin dessert


