Love this? Save it for later!
Share the inspiration with your friends
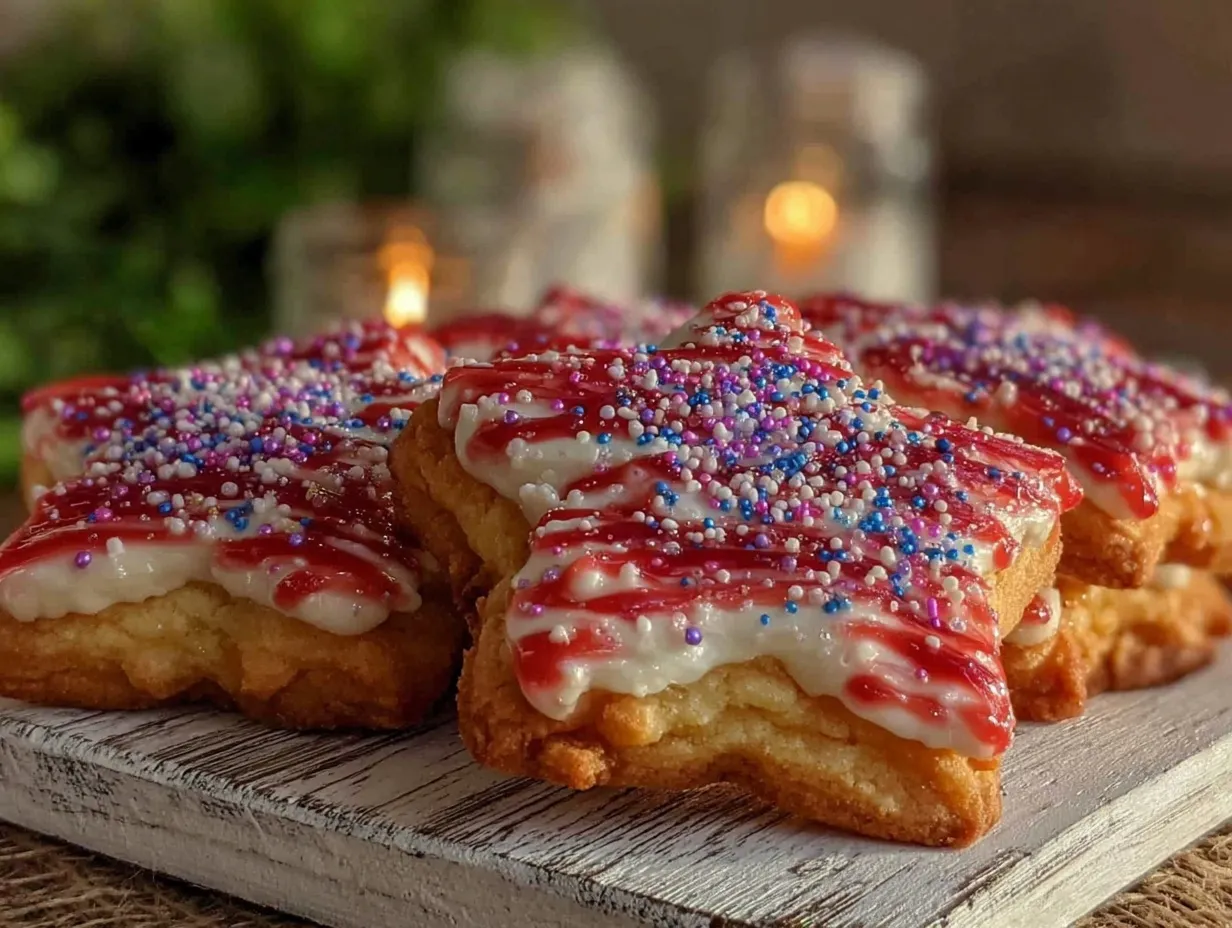
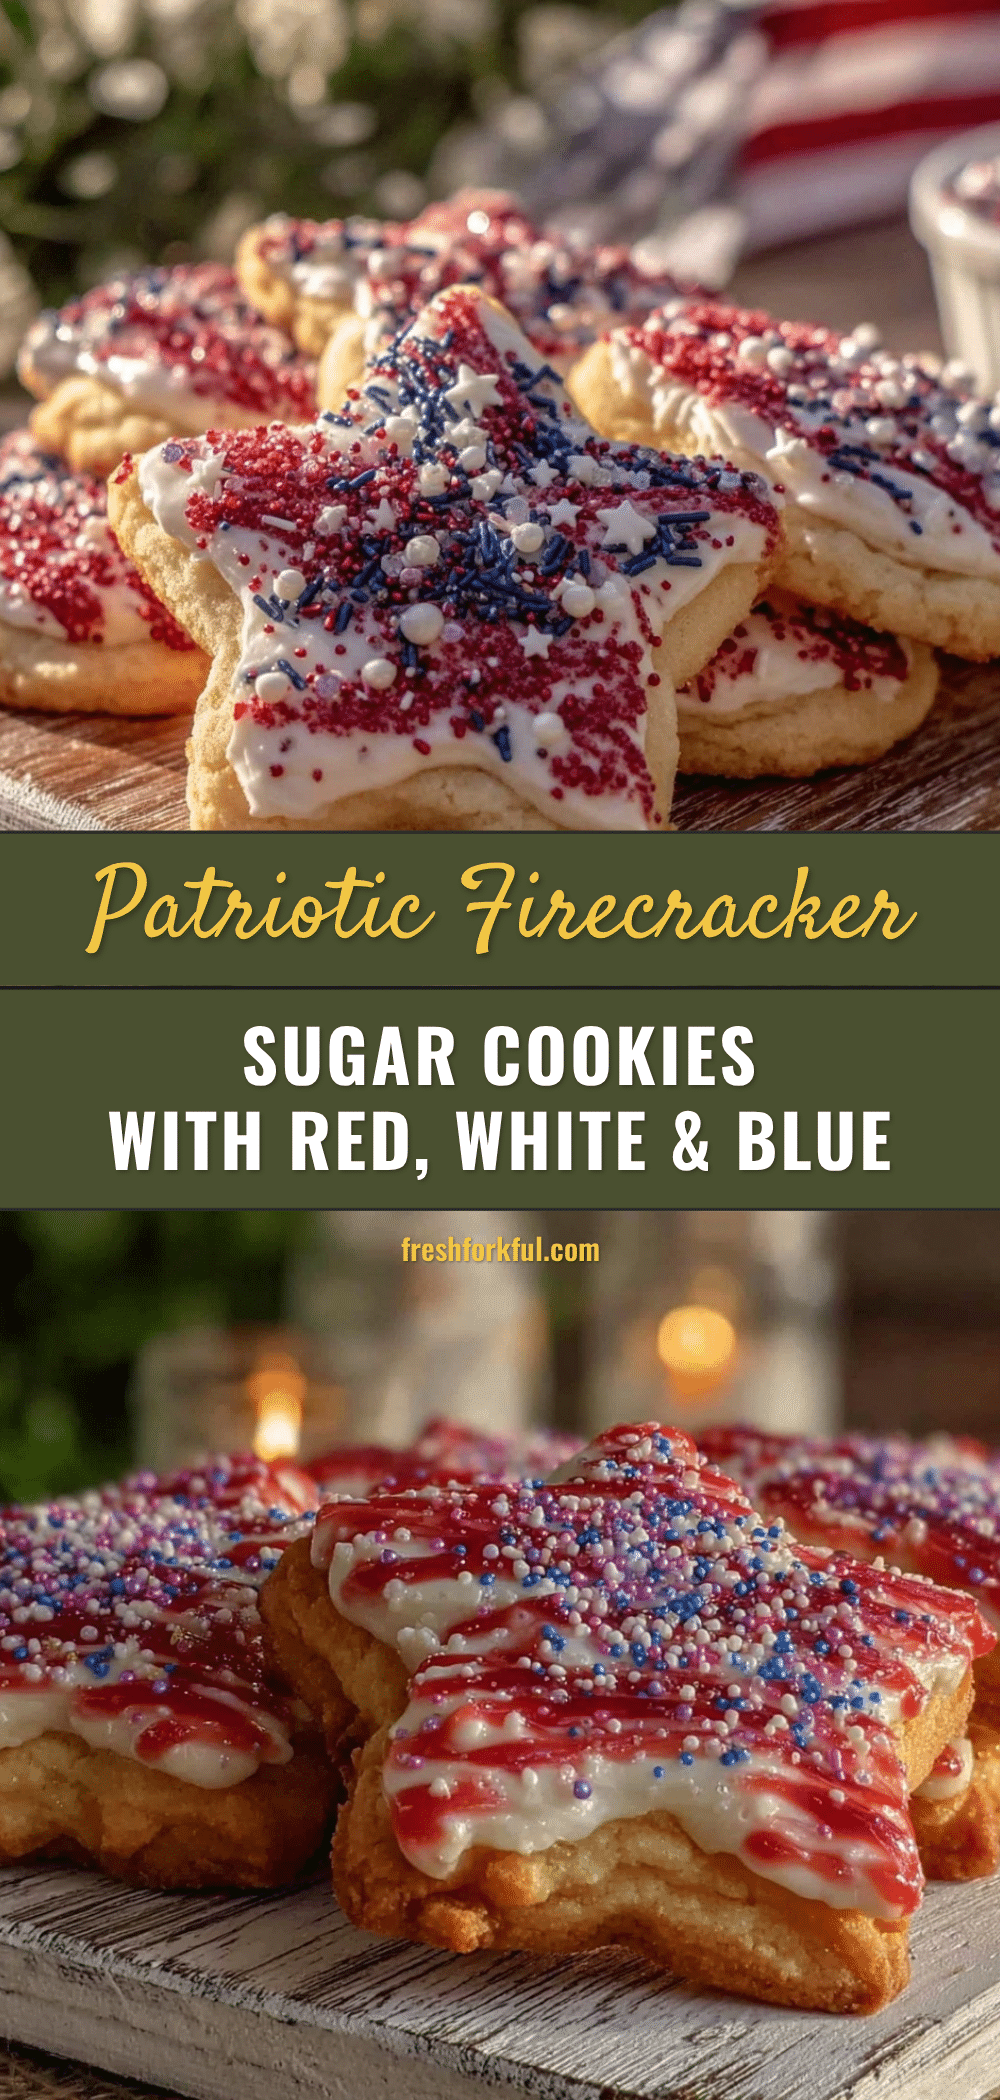
“I wasn’t even planning to bake that day,” I confessed to my neighbor as I pulled out the mixing bowl. It was the afternoon before the 4th of July, and honestly, I was supposed to be setting up decorations, not wrestling with frosting. But you know that feeling when you catch a whiff of something sweet and irresistible wafting through the air? That’s exactly what happened when my friend Rachel walked by, holding a plate of these firecracker sugar cookies. The red, white, and blue icing was like a little celebration on a cookie—and it pulled me right into the kitchen.
These cookies aren’t just festive; they carry a story. Rachel mentioned she’d found the recipe scribbled inside an old community cookbook at the local library—hardly the kind of place you’d expect to find your new favorite 4th of July treat. We ended up swapping baking tips over lemonade, and before I knew it, I had my own batch cooling on the rack, the icing glistening like tiny sparks of summer fireworks. Maybe you’ve been there—caught off guard by a simple recipe that turns out to be a total winner. That’s why these Perfect 4th of July Firecracker Sugar Cookies with Red White Blue Icing have become my go-to for holiday parties and backyard barbecues. Honestly, they’re the kind of treat that makes you want to close your eyes and savor each bite, full of that nostalgic, sweet summer magic.
Why You’ll Love This Recipe
After testing dozens of sugar cookie recipes (no kidding, I’ve got flour on my hands and frosting on my sleeves from all those trials), this one stands out as the best for your 4th of July celebrations. Here’s why it’s a winner in my book:
- Quick & Easy: The dough comes together in about 15 minutes, and you can whip up the icing while the cookies bake. Perfect for last-minute dessert cravings or busy holiday prep.
- Simple Ingredients: You probably already have everything in your pantry—no need for fancy imports or specialty stores.
- Perfect for Summer Parties: Whether it’s a backyard barbecue, a picnic, or a neighborhood potluck, these cookies add that festive flair everyone loves.
- Crowd-Pleaser: Kids and adults alike rave about the crisp edges and soft centers, not to mention the patriotic icing that makes every bite feel special.
- Unbelievably Delicious: The secret is in the balance—just the right amount of vanilla and butter, plus a touch of lemon zest to brighten things up.
What really sets this recipe apart is the icing technique. Instead of the usual thick, gloopy frosting, this red, white, and blue icing dries with a smooth, slightly glossy finish—perfect for stacking or gifting. Plus, the colors don’t bleed into each other, so your cookies look picture-perfect every time. Honestly, it’s the kind of recipe that’ll have you volunteering to bring dessert every year. And if you’re curious, I once tried making a similar sugar cookie with cream cheese frosting—it was a fun experiment but didn’t hold up in the summer heat like this one does. So yeah, this version is my tried-and-true.
What Ingredients You Will Need
This recipe uses simple, wholesome ingredients to deliver bold flavor and that classic sugar cookie texture. Most of these are pantry staples, and if you’re looking to tweak things a bit, I’ve got substitution tips right here.
- For the Sugar Cookies:
- 2 ¾ cups (345g) all-purpose flour (I recommend King Arthur Flour for consistent texture)
- 1 teaspoon baking powder
- ½ teaspoon salt
- 1 cup (226g) unsalted butter, softened (use European-style butter if you want extra richness)
- 1 ½ cups (300g) granulated sugar
- 1 large egg, room temperature
- 2 teaspoons pure vanilla extract
- ½ teaspoon lemon zest (adds a subtle brightness, but optional)
- For the Red White Blue Icing:
- 3 cups (360g) powdered sugar, sifted
- 2 tablespoons whole milk (use almond milk for dairy-free)
- 2 tablespoons light corn syrup (for that glossy finish)
- 1 teaspoon vanilla extract
- Gel food coloring in red and blue (avoid liquid colors to keep icing consistency)
If you want a gluten-free version, swap the all-purpose flour for a 1:1 gluten-free baking flour blend. And if you’re out of corn syrup, you can substitute with light honey, but the finish will be slightly less shiny. For a dairy-free option, just use a plant-based butter and unsweetened almond or oat milk. I’ve tried this recipe with those swaps, and it still turns out great—though the texture is a bit different.
Equipment Needed
- Mixing bowls (preferably medium and large sizes)
- Electric mixer or stand mixer with paddle attachment (you can hand mix, but it takes longer and requires some elbow grease)
- Measuring cups and spoons (accuracy matters, especially with flour)
- Rolling pin (a smooth one works best; I keep a silicone mat beneath the dough to prevent sticking)
- Cookie cutters – star shapes or any patriotic shapes you like (if you don’t have cookie cutters, a sharp knife or a small glass rim works fine)
- Baking sheets lined with parchment paper or silicone mats (prevents sticking and helps with even baking)
- Cooling racks (important for letting cookies cool completely before icing)
- Small bowls or piping bags for icing (I find squeezing from a zip-top bag with a tiny corner snipped is an easy budget-friendly method)
If you don’t have a stand mixer, a hand mixer will do just fine. Just don’t rush the creaming of butter and sugar—it’s key to light, tender cookies. Also, I recommend cleaning your rolling pin and work surface with a little flour between batches to avoid sticky dough disasters (trust me, I’ve been there).
Preparation Method
- Preheat and prep: Set your oven to 350°F (175°C). Line two baking sheets with parchment paper or silicone mats—this makes cleanup a breeze and helps cookies bake evenly. (5 minutes)
- Mix dry ingredients: In a medium bowl, whisk together 2 ¾ cups flour, 1 teaspoon baking powder, and ½ teaspoon salt. Set aside. This step ensures your leavening agent and salt are evenly distributed. (3 minutes)
- Cream butter and sugar: Using a stand mixer or hand mixer, beat 1 cup softened unsalted butter with 1 ½ cups granulated sugar on medium-high speed until light and fluffy—about 3-4 minutes. You want it pale and airy; don’t rush this or the cookies may turn dense. (5 minutes)
- Add egg and vanilla: Beat in 1 large egg, 2 teaspoons vanilla extract, and ½ teaspoon lemon zest until combined. The mixture might look a little curdled at first, but keep mixing until smooth. (2 minutes)
- Combine wet and dry: Gradually add the dry ingredients to the wet mixture on low speed, just until incorporated. Overmixing develops gluten, making cookies tough—so stop as soon as flour disappears. (3 minutes)
- Chill dough: Divide dough into two discs, wrap in plastic wrap, and chill for at least 1 hour. This makes rolling easier and prevents cookies from spreading too much during baking. (1 hour)
- Roll and cut: On a lightly floured surface, roll out one dough disc to about ¼ inch (6 mm) thickness. Use star-shaped cookie cutters (or your choice) to cut cookies and transfer to baking sheets about 1 inch (2.5 cm) apart. If the dough softens while cutting, pop it back in the fridge for 10 minutes. (15 minutes)
- Bake: Bake cookies in the preheated oven for 8-10 minutes or until the edges just start to turn golden. The centers should still look a bit soft. Remove from oven and let cookies sit on the baking sheet for 5 minutes before transferring to a cooling rack. (10-15 minutes)
- Prepare icing: While cookies cool, whisk together 3 cups powdered sugar, 2 tablespoons milk, 2 tablespoons corn syrup, and 1 teaspoon vanilla extract until smooth. Divide into three bowls. Leave one white, tint one with red gel, and one with blue gel. Adjust consistency with a bit more milk or sugar to get a thick but spreadable icing. (10 minutes)
- Decorate: Use small spoons, piping bags, or zip-top bags with snipped corners to apply icing in stripes or patterns that mimic firecrackers or patriotic designs. Let icing set at room temperature for at least 2 hours before stacking or packaging. (20-30 minutes plus drying)
Quick tip: If you notice your cookies puffing too much in the oven, chill the cut shapes for 10 minutes before baking. It helps keep those crisp edges. Also, don’t skip the chilling step on the dough—that’s really the difference between a cookie that spreads into a blob and one that holds its shape perfectly.
Cooking Tips & Techniques
Making the perfect sugar cookie can be a bit tricky, but with a few tricks up your sleeve, you’ll nail it every time. Here are some tips I’ve learned through trial, error, and way too many batches:
- Butter temperature is key: Softened, not melted. If your butter is too warm, the dough gets greasy and cookies spread too much. I keep mine on the counter about an hour before baking.
- Don’t overmix the dough: Once you add flour, mix just until combined. Overworking the dough develops gluten, making cookies tough instead of tender.
- Chill for control: Chilling the dough at least an hour makes rolling easier and keeps cookies from flattening. If your kitchen is warm, chill the dough between batches too.
- Roll evenly: Aim for uniform thickness—about ¼ inch (6 mm). Too thick, and cookies won’t bake evenly; too thin, and they’ll crisp up too much.
- Watch baking time closely: Pull cookies out when edges are just golden but centers still soft. They firm up as they cool. Overbaking leads to dry, crumbly results.
- Use gel colors for icing: They provide vibrant hues without watering down your icing.
- Practice patience with icing: Let the icing fully set at room temperature. If you rush it, colors can smear and the glossy finish won’t develop.
One time I accidentally grabbed salted butter instead of unsalted. The cookies were surprisingly good but a bit saltier than expected. Lesson learned: it’s okay to experiment, but measuring and ingredient choices do matter with sugar cookies!
Variations & Adaptations
This recipe is a great canvas for creativity. Here are some ideas to customize it:
- Flavor twists: Add a teaspoon of almond extract for a nutty note or swap lemon zest for orange zest for a different citrus vibe.
- Dietary adaptations: Use gluten-free flour blend to make them safe for gluten-sensitive friends. Dairy-free butter and milk make these vegan-friendly with no compromise on taste.
- Different decorating styles: Try ombre icing effects or sprinkle edible glitter for extra sparkle. You can also add small edible stars or silver dragees for a festive touch.
- Cooking methods: If you’re short on oven space during summer cookouts, try baking smaller, bite-size cookies to reduce baking time and increase crispiness.
- Personal favorite: Once, I mixed crushed freeze-dried strawberries into the red icing for a natural flavor boost. It was delicious and looked stunning!
Serving & Storage Suggestions
Serve your Perfect 4th of July Firecracker Sugar Cookies at room temperature to enjoy the full flavor and crisp-soft texture contrast. They make a great centerpiece on dessert tables or packed up as patriotic party favors.
Pair these treats with classic summer drinks like iced tea, lemonade, or even a sparkling berry mocktail to complete your celebration spread. For a fun twist, serve alongside a bowl of fresh mixed berries or a simple vanilla bean ice cream.
To store, place cookies in an airtight container at room temperature for up to 4 days. If you want to keep them longer, freeze the un-iced cookies wrapped tightly in plastic wrap and foil for up to 3 months. Thaw completely before icing.
If your cookies soften a bit in storage, a quick 5-minute bake at 300°F (150°C) revitalizes the crunch. Just watch carefully so they don’t brown too much.
Flavors tend to deepen and meld after a day, so if you can resist them, letting the cookies rest overnight is worth it. You’ll find the icing sets perfectly and the lemon zest note comes through nicely.
Nutritional Information & Benefits
Each sugar cookie (without icing) contains approximately 150-170 calories, 7 grams of fat, 22 grams of carbohydrates, and 2 grams of protein. The butter provides a good source of fat-soluble vitamins like A and E, while the lemon zest adds a small antioxidant boost.
This recipe is naturally free from nuts and can be adapted for gluten-free and dairy-free diets, making it a versatile choice for many. Just be mindful of the powdered sugar in the icing if you’re watching sugar intake.
From a wellness perspective, these cookies are a treat meant to be enjoyed in moderation. The joy of sharing festive, homemade cookies with friends and family is part of their true nourishment—and honestly, that’s what makes them special.
Conclusion
If you’re looking for a festive, easy-to-make treat that captures the spirit of the 4th of July, these Perfect Firecracker Sugar Cookies with Red White Blue Icing are a winner every time. I love how they bring a little sparkle and sweetness to summer celebrations without fuss or fancy ingredients. Plus, the recipe is flexible enough to fit your taste and dietary needs.
Give them a try, and don’t be shy about adding your own personal touch to the icing or flavor. I’d love to hear how you make them your own—drop me a comment or share your photos! Baking together, even virtually, makes these holiday moments even sweeter.
So, grab your rolling pin, get that icing ready, and let’s make some memories—one patriotic bite at a time.
FAQs
How long do the sugar cookies last once iced?
When stored in an airtight container at room temperature, they stay fresh for up to 4 days. After that, they might start to lose their crispness.
Can I make the dough ahead of time?
Absolutely! The dough can be refrigerated for up to 3 days or frozen for up to 3 months. Just thaw before rolling and cutting.
Why is my icing too runny?
If your icing is runny, add more powdered sugar a little at a time until it thickens. Gel food coloring helps avoid thinning the icing.
Can I use liquid food coloring?
It’s best to use gel food coloring because liquid colors can make the icing too thin and affect the texture.
What’s the best way to prevent cookies from spreading too much?
Chilling the dough before rolling, and chilling cut cookies before baking, helps maintain their shape and prevents spreading.
Pin This Recipe!
Perfect 4th of July Firecracker Sugar Cookies Easy Red White Blue Icing Recipe

Festive sugar cookies with red, white, and blue icing perfect for 4th of July celebrations. These cookies feature crisp edges, soft centers, and a smooth glossy icing finish.
- Prep Time: 30 minutes
- Cook Time: 10 minutes
- Total Time: 1 hour 40 minutes
- Yield: 24 servings 1x
- Category: Dessert
- Cuisine: American
Ingredients
- 2 ¾ cups (345g) all-purpose flour
- 1 teaspoon baking powder
- ½ teaspoon salt
- 1 cup (226g) unsalted butter, softened
- 1 ½ cups (300g) granulated sugar
- 1 large egg, room temperature
- 2 teaspoons pure vanilla extract
- ½ teaspoon lemon zest (optional)
- 3 cups (360g) powdered sugar, sifted
- 2 tablespoons whole milk
- 2 tablespoons light corn syrup
- 1 teaspoon vanilla extract
- Gel food coloring in red and blue
Instructions
- Preheat oven to 350°F (175°C). Line two baking sheets with parchment paper or silicone mats.
- In a medium bowl, whisk together flour, baking powder, and salt. Set aside.
- Using a mixer, beat softened butter and granulated sugar on medium-high speed until light and fluffy, about 3-4 minutes.
- Beat in egg, vanilla extract, and lemon zest until combined.
- Gradually add dry ingredients to wet mixture on low speed until just incorporated.
- Divide dough into two discs, wrap in plastic wrap, and chill for at least 1 hour.
- Roll out one dough disc on a lightly floured surface to ¼ inch thickness. Cut shapes with cookie cutters and place 1 inch apart on baking sheets. Chill dough if it softens.
- Bake for 8-10 minutes until edges start to turn golden but centers remain soft. Let cookies sit on baking sheet for 5 minutes, then transfer to cooling rack.
- While cookies cool, whisk powdered sugar, milk, corn syrup, and vanilla extract until smooth. Divide into three bowls and tint with red and blue gel colors, leaving one white.
- Decorate cookies with icing using spoons, piping bags, or zip-top bags. Let icing set at room temperature for at least 2 hours before stacking or packaging.
Notes
Use softened, not melted butter for best texture. Chill dough for at least 1 hour to prevent spreading. Use gel food coloring to avoid thinning icing. Let icing set fully at room temperature for a smooth glossy finish. Dough can be refrigerated up to 3 days or frozen up to 3 months. For gluten-free or dairy-free versions, substitute flour and dairy accordingly.
Nutrition
- Serving Size: 1 cookie
- Calories: 160
- Sugar: 14
- Sodium: 90
- Fat: 7
- Saturated Fat: 4
- Carbohydrates: 22
- Protein: 2
Keywords: 4th of July, sugar cookies, patriotic cookies, red white blue icing, holiday dessert, easy sugar cookies, summer party treats