Love this? Save it for later!
Share the inspiration with your friends
“I wasn’t planning to bake anything for the school’s teacher appreciation day,” I confessed to my friend Lisa one crisp October morning. The week had been a whirlwind, and honestly, I was running on fumes. But then, as we chatted over coffee at the local café, she casually mentioned her go-to recipe for class parties: cozy, chewy cookie bars that somehow managed to feel like a warm hug in dessert form. Intrigued, I scribbled the recipe down on the back of a napkin, the ink smudging slightly as the café’s door chimed with incoming families.
That afternoon, I found myself in the kitchen, mixing ingredients with one eye on the clock and the other on my scattered to-do list. The bars came together faster than I expected—no fancy gadgets, just simple ingredients and a bit of cozy magic. When I brought them to the school potluck, the smiles on the teachers’ faces told me everything I needed to know: these cookie bars were a winner.
Maybe you’ve been there too—scrambling to find something sweet and heartfelt that’s quick enough to pull off between work and errands. These Cozy Teacher Appreciation Cookie Bars are exactly that kind of recipe. They’re straightforward, comforting, and perfect for sharing with the amazing educators who do so much every day. Let me tell you, once you try these, they might just become your secret weapon for every school event.
Why You’ll Love This Recipe
- Quick & Easy: Comes together in under 30 minutes, perfect for busy mornings or last-minute class parties.
- Simple Ingredients: No need for specialty stores; you probably have everything in your pantry right now.
- Perfect for Class Parties: Easy to portion and share, making them the ideal sweet treat for a classroom crowd.
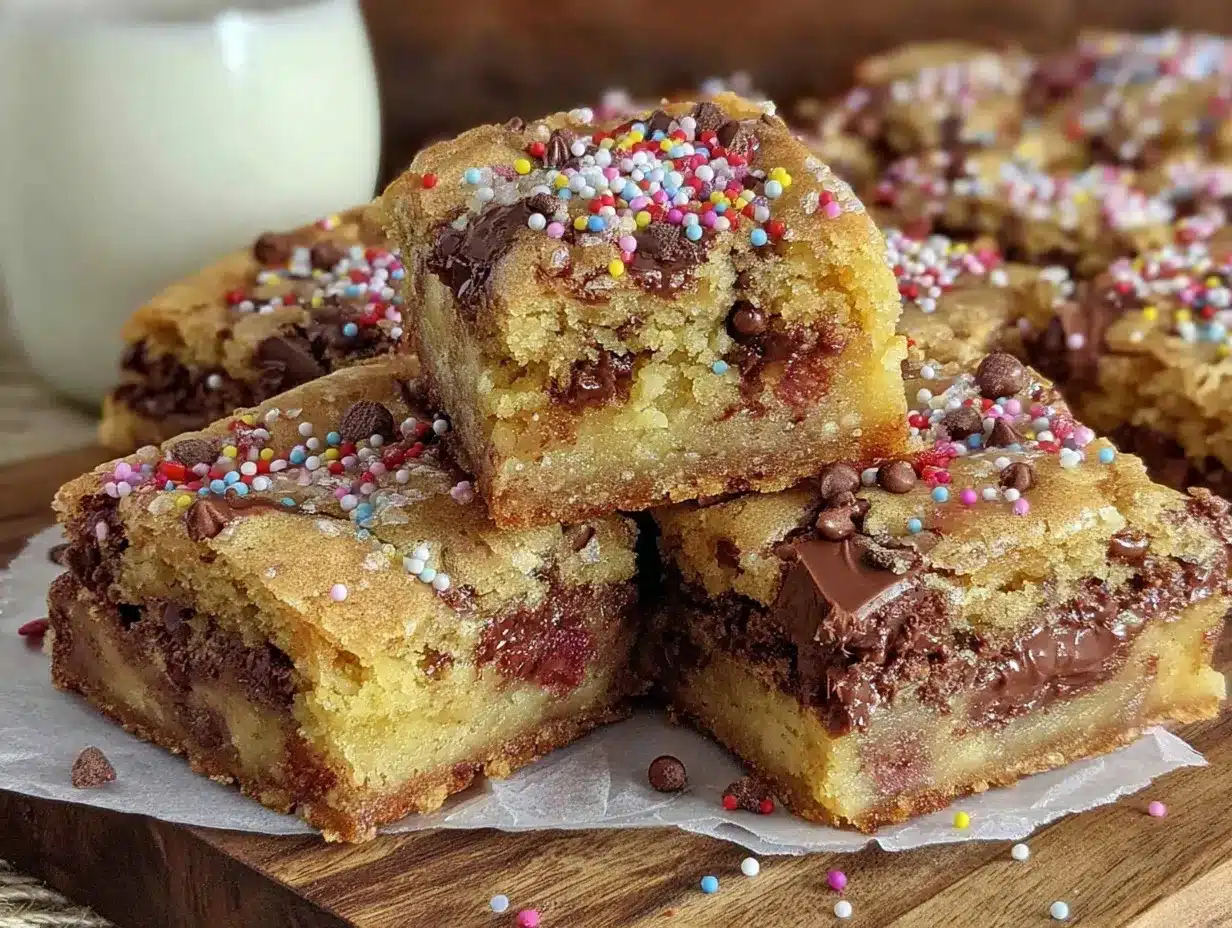
- Crowd-Pleaser: Soft, chewy, and loaded with chocolate chips—teachers and kids alike go back for seconds.
- Unbelievably Delicious: The blend of brown sugar and butter creates a rich, cozy flavor that feels homemade and heartfelt.
This isn’t just another cookie bar recipe. After testing dozens of versions, I found that using melted butter and a sprinkle of cinnamon gives these bars that extra cozy touch you won’t find elsewhere. Plus, the texture strikes a perfect balance—soft but sturdy enough to handle little hands without turning to crumbs. Honestly, it’s the kind of recipe that makes you close your eyes after the first bite and say, “Yep, this is exactly what I needed.” If you want a sweet gesture that feels effortless but says so much, this is it.
What Ingredients You Will Need
This recipe uses simple, wholesome ingredients to deliver a soft, chewy texture and cozy flavor without any fuss. Most are pantry staples, with easy swaps if needed.
- Unsalted butter, 1 cup (227g), melted (adds richness and chewiness)
- Brown sugar, 1 cup (200g), packed (for that warm, caramel flavor)
- Granulated sugar, 1/2 cup (100g) (balances sweetness and texture)
- Large eggs, 2, room temperature (helps bind the bars)
- Vanilla extract, 2 teaspoons (pure vanilla is best for depth)
- All-purpose flour, 1 3/4 cups (220g), sifted (for structure)
- Baking soda, 1/2 teaspoon (aids in rising)
- Salt, 1/2 teaspoon (enhances flavor)
- Cinnamon, 1 teaspoon (optional but adds a cozy warmth)
- Chocolate chips, 1 cup (170g) (semisweet or milk chocolate, your choice)
- Chopped walnuts or pecans, 1/2 cup (optional, for crunch and nuttiness)
If you want a gluten-free version, substitute the flour with a 1-to-1 gluten-free baking blend. For dairy-free, swap butter with coconut oil or dairy-free margarine—though the flavor will shift slightly. I often recommend King Arthur flour for consistent results, and Ghirardelli chips for that rich chocolate touch.
Equipment Needed
- 9×13-inch baking pan: Essential for shaping the cookie bars. I prefer a heavy-duty metal pan for even heat distribution.
- Mixing bowls: One medium and one large bowl to keep things tidy.
- Measuring cups and spoons: For accuracy, especially with the baking soda and salt.
- Whisk and spatula: A whisk for mixing wet ingredients and a rubber spatula to fold in dry ingredients and chocolate chips gently.
- Parchment paper: For lining the pan to make removal and cleanup a breeze.
No fancy mixers needed here—just a sturdy hand and some patience. If you don’t have parchment paper, lightly grease the pan, but trust me, parchment makes life easier. I’ve tried silicone baking mats too, but for this recipe, parchment gives the best texture on the bottom crust.
Preparation Method
- Preheat your oven: Set it to 350°F (175°C). Line your 9×13-inch pan with parchment paper, letting the edges hang over for easy lifting later. This step saves you from sticky fingers.
- Mix wet ingredients: In a large bowl, combine the melted unsalted butter with both sugars. Whisk until smooth and glossy, about 1-2 minutes. Add the two eggs one at a time, whisking well after each addition. Stir in the vanilla extract.
- Combine dry ingredients: In a separate bowl, sift together the flour, baking soda, salt, and cinnamon (if using). This helps avoid clumps and ensures even rising.
- Bring it together: Gradually add the dry mix into the wet ingredients. Use a rubber spatula to fold until just combined—don’t overmix, or the bars risk turning tough. Stir in the chocolate chips and nuts (if using).
- Transfer to pan: Scrape the batter into your prepared pan and spread evenly with the spatula. The batter will be thick and sticky—don’t worry, that’s perfect.
- Bake: Place in the oven and bake for 25-30 minutes. You want the edges golden brown and the center set but still soft. A toothpick inserted into the middle should come out with just a few moist crumbs.
- Cool completely: Let the bars cool in the pan on a wire rack for at least 30 minutes. This step is crucial—cutting too soon can lead to crumbly pieces. Use the parchment edges to lift the whole slab out, then slice into bars.
If you’re in a rush, a quick chill in the fridge for 15 minutes helps firm them up before cutting. I learned that the hard way after one messy attempt where the bars just wouldn’t hold shape!
Cooking Tips & Techniques
For the softest cookie bars, melted butter is your best friend. It coats the flour differently than cold butter, giving you that chewy texture you’re craving. Don’t skip sifting the dry ingredients—that little step makes the batter easier to fold and gives a lighter crumb.
One common mistake is overbaking. The bars will firm up as they cool, so pulling them out a minute or two before you think they’re done is a safer bet. I usually set my timer for 25 minutes and start checking. If the edges are golden and the center looks slightly underdone, that’s the sweet spot.
When folding in chocolate chips, be gentle. Overmixing breaks them down and can turn your batter runny. Also, if you’re adding nuts, lightly toasting them beforehand adds a deeper flavor and crunch.
Multi-tasking tip: while the bars bake, clean up your mixing bowls and prep the serving tray. I find that staying organized helps keep the kitchen less chaotic, especially when juggling school runs and work.
Variations & Adaptations
- Peanut Butter Swirl: Drop spoonfuls of peanut butter over the batter and swirl gently with a knife before baking for a nutty twist.
- Seasonal Fruit Addition: In spring or summer, add 1/2 cup of fresh or frozen berries for a burst of tartness—blueberries work beautifully.
- Vegan Version: Replace butter with coconut oil, eggs with flax eggs (2 tablespoons ground flax + 6 tablespoons water), and use dairy-free chocolate chips.
- Spiced Up: Add 1/2 teaspoon ground ginger or nutmeg with the cinnamon for a warm spice profile that pairs well with autumn gatherings.
Personally, I tried the peanut butter swirl once when the kids were craving something extra. It was a hit—rich, gooey, and a little unexpected in a cookie bar. Feel free to experiment with your favorite nuts or mix-ins; they make these bars your own little cozy creation.
Serving & Storage Suggestions
These cookie bars are best served at room temperature, where the flavors shine and texture is just right. If you want a warm treat, a quick 10-second zap in the microwave softens them beautifully.
Pair them with a glass of cold milk or a cozy cup of chai tea for the perfect teacher appreciation snack. They also hold up well on a dessert platter, so they’re great for potlucks and classroom celebrations.
Store leftover bars in an airtight container at room temperature for up to 3 days. For longer storage, freeze them in a sealed bag or container for up to 3 months. Thaw overnight in the fridge or at room temperature. The flavors mellow and deepen over time, making them even better the next day.
Nutritional Information & Benefits
Each cookie bar (based on 12 servings) roughly contains:
| Calories | 220 |
|---|---|
| Fat | 12g |
| Carbohydrates | 28g |
| Protein | 3g |
| Fiber | 1g |
The recipe includes wholesome ingredients like real butter and eggs for healthy fats and protein, plus cinnamon, which has antioxidant properties. It’s not a health food per se—but for a sweet treat shared with teachers, it’s a thoughtful balance of comfort and simple nourishment. For gluten-free or vegan needs, the substitutions keep this recipe inclusive without losing that cozy feel.
Conclusion
Cozy Teacher Appreciation Cookie Bars are exactly the kind of recipe that stays with you. They’re easy enough for hectic days, yet heartfelt enough to show some sweet gratitude to the amazing educators in your life. I love how they bring everyone together—kids sneaking a crumb or two, teachers savoring a rare moment of indulgence. Honestly, this recipe’s simplicity and warm flavors make it my go-to for any school event.
Feel free to tweak these bars to match your style—add nuts, swap in different chips, or sprinkle some sea salt on top. I’d love to hear how you make them your own, so please share your versions and stories in the comments below. Here’s to sweet moments and cozy kitchens!
FAQs About Cozy Teacher Appreciation Cookie Bars
Can I make these cookie bars ahead of time?
Absolutely! You can bake them a day or two in advance. Store them in an airtight container at room temperature or in the fridge. Just bring to room temp or warm slightly before serving.
How can I make these bars gluten-free?
Simply swap the all-purpose flour for a 1-to-1 gluten-free baking blend. Make sure your blend contains xanthan gum for best texture.
Can I freeze these cookie bars?
Yes! After baking and cooling completely, freeze the bars in a sealed container or bag for up to 3 months. Thaw in the fridge overnight before slicing.
What’s the best way to get soft but sturdy cookie bars?
Using melted butter and not overmixing the batter helps achieve that perfect chewy texture. Also, avoid overbaking—pull them out when the center still looks slightly underdone.
Can I add other mix-ins besides chocolate chips and nuts?
Definitely! Dried cranberries, shredded coconut, or white chocolate chips all work well. Just keep the total mix-ins around 1 to 1 1/2 cups to maintain the right texture.
Pin This Recipe!
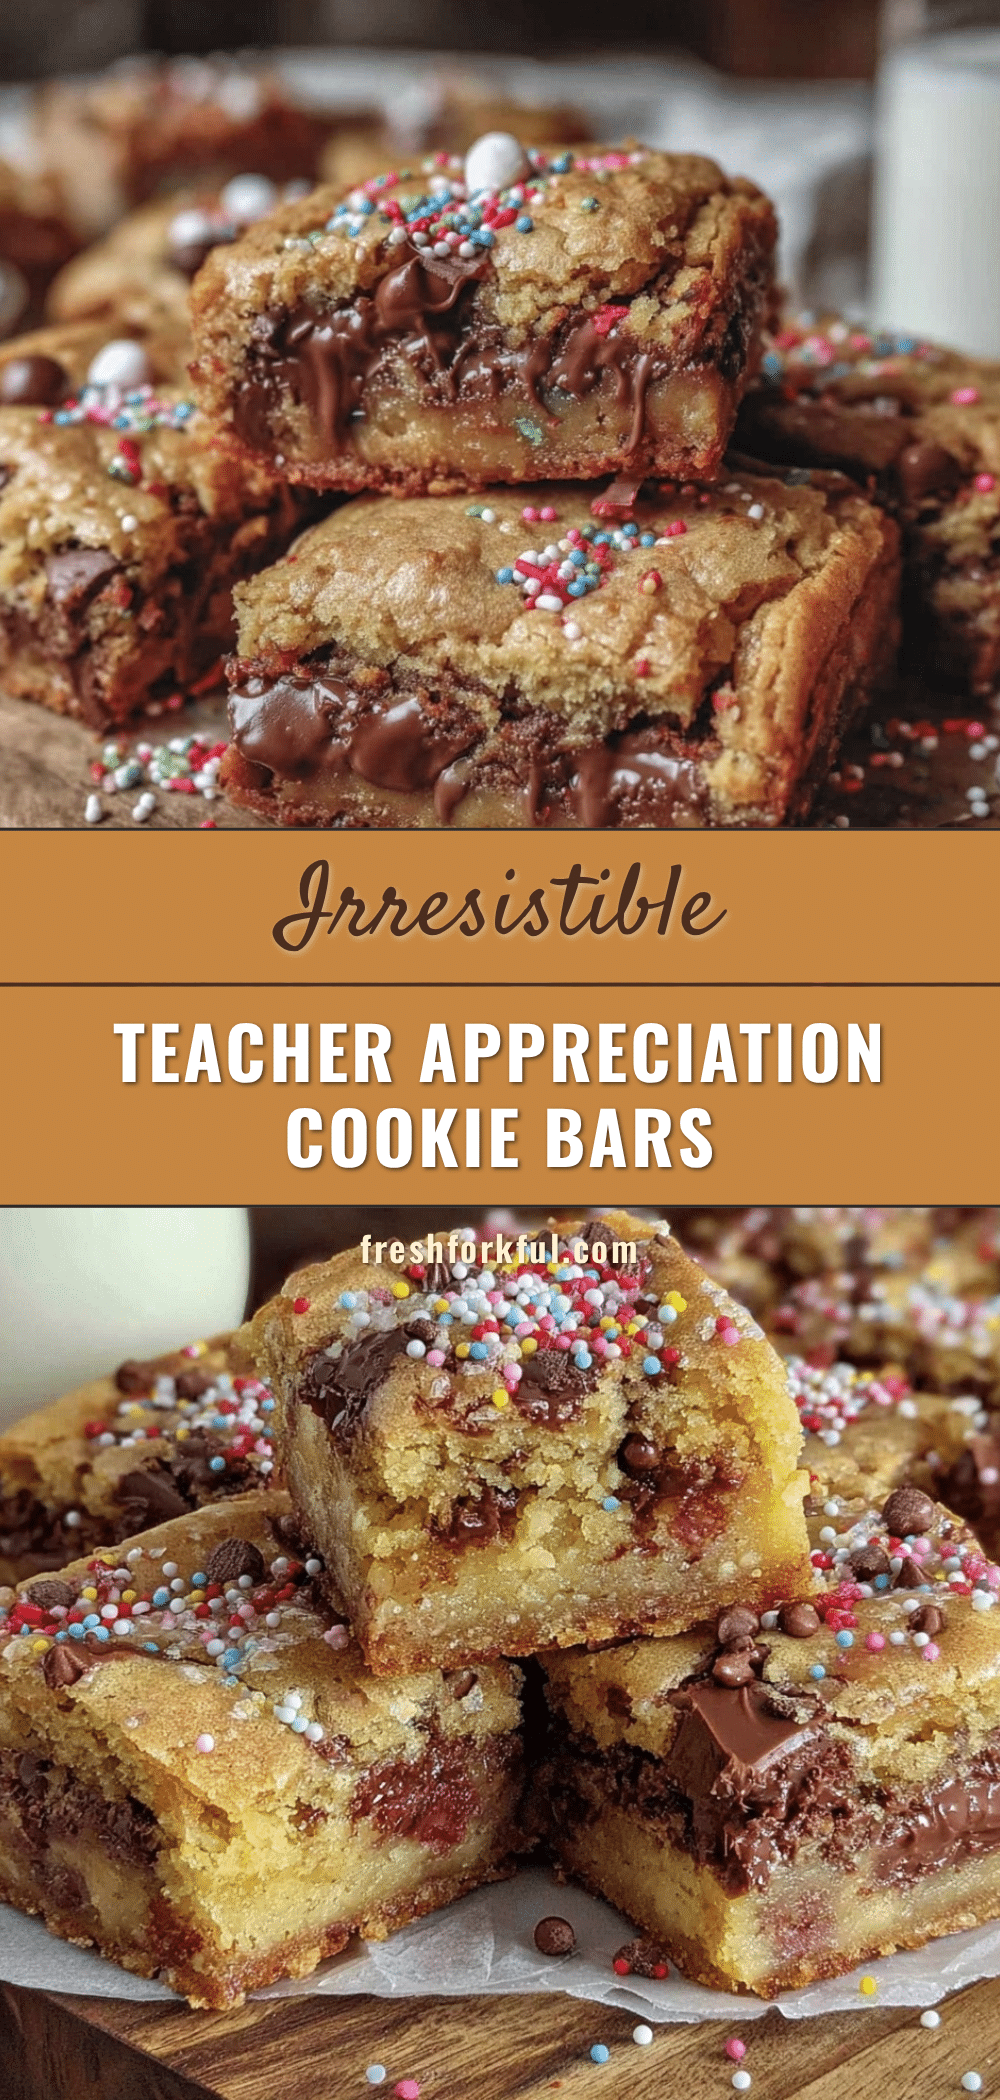
Cozy Teacher Appreciation Cookie Bars

Soft, chewy cookie bars perfect for class parties and teacher appreciation events. Made with simple pantry ingredients, these bars offer a warm, comforting flavor with chocolate chips and a hint of cinnamon.
- Prep Time: 10 minutes
- Cook Time: 25-30 minutes
- Total Time: 40 minutes
- Yield: 12 servings 1x
- Category: Dessert
- Cuisine: American
Ingredients
- 1 cup (2 sticks, 227g) unsalted butter, melted
- 1 cup (200g) packed brown sugar
- 1/2 cup (100g) granulated sugar
- 2 large eggs, room temperature
- 2 teaspoons vanilla extract
- 1 3/4 cups (220g) all-purpose flour, sifted
- 1/2 teaspoon baking soda
- 1/2 teaspoon salt
- 1 teaspoon cinnamon (optional)
- 1 cup (170g) chocolate chips (semisweet or milk chocolate)
- 1/2 cup chopped walnuts or pecans (optional)
Instructions
- Preheat your oven to 350°F (175°C). Line a 9×13-inch baking pan with parchment paper, letting the edges hang over for easy lifting.
- In a large bowl, combine the melted unsalted butter with both sugars. Whisk until smooth and glossy, about 1-2 minutes.
- Add the eggs one at a time, whisking well after each addition. Stir in the vanilla extract.
- In a separate bowl, sift together the flour, baking soda, salt, and cinnamon (if using).
- Gradually add the dry ingredients to the wet ingredients. Fold gently with a rubber spatula until just combined.
- Stir in the chocolate chips and nuts (if using) gently.
- Scrape the batter into the prepared pan and spread evenly with a spatula.
- Bake for 25-30 minutes until edges are golden brown and the center is set but still soft. A toothpick inserted should come out with a few moist crumbs.
- Cool completely in the pan on a wire rack for at least 30 minutes before lifting out using parchment edges and slicing into bars.
Notes
Use melted butter for a chewy texture. Do not overmix the batter to avoid tough bars. Pull bars from oven when center is slightly underdone as they firm up while cooling. Lightly toast nuts before adding for extra flavor. For easier removal and cleanup, line pan with parchment paper. Chill bars for 15 minutes if cutting immediately to prevent crumbling.
Nutrition
- Serving Size: 1 cookie bar (1/12th
- Calories: 220
- Fat: 12
- Carbohydrates: 28
- Fiber: 1
- Protein: 3
Keywords: cookie bars, teacher appreciation, class party dessert, chocolate chip bars, easy cookie bars, chewy cookie bars, quick dessert