Love this? Save it for later!
Share the inspiration with your friends
The fall harvest potluck was in six hours and I’d completely forgotten. Everyone else would be bringing those elaborate, multi-day preparations—the kind that show up in a fancy Dutch oven with a handwritten label. I had one sad bag of honeynut squash from the farmers market, a half-empty bottle of maple syrup, and about forty-five minutes to pull something together before the party started. Honestly, I almost just grabbed a bottle of wine on the way out.
But something stopped me. Maybe it was the stubborn part of my brain that refuses to show up empty-handed. I started roasting those tiny squashes with no real plan, just hoping for the best. The kitchen got smoky, I spilled maple syrup on the counter, and at one point I was literally stirring the soup with one hand while answering texts with the other. It was not graceful. It was not planned. It was the kind of cooking you do when you’re out of time and out of options.
And then something funny happened. The soup turned out incredible. Like, people asking for the recipe before they even finished their first bowl incredible. The guy who always brings the smoked brisket came back for thirds. My neighbor, who I’m pretty sure is a secret food critic, asked if I’d cater her next dinner party. I stood there with my little ladle, completely shocked, trying to explain that I basically threw this together in a panic. Nobody believed me. That’s the thing about this honeynut squash soup—it looks and tastes like you spent all day on it, but the secret is that it practically makes itself.
Maybe you’ve been there, right? The panic of a last-minute hosting situation, the scramble to make something presentable, the fear of being the person who brings store-bought chips. Let me tell you, this soup is your saving grace. It’s been my go-to ever since that frantic potluck, and every time I make it, I remember that sometimes the best recipes come from the most chaotic moments. Keep reading, because I’m about to show you exactly how to pull off this magic trick in your own kitchen.
Why You’ll Love This Recipe
Look, I’ve tested this honeynut squash soup at least a dozen times since that first panicked batch. I’ve made it for Thanksgiving dinner, for casual weeknight dinners, and for neighbors who just had babies. Every single time, it delivers. Here’s why this recipe is different from every other squash soup you’ve tried:
- Quick & Easy: From start to finish, this soup comes together in under 45 minutes. That’s faster than ordering takeout in some neighborhoods. The honeynut squash roasts in about 25 minutes, and the rest is just blending and seasoning.
- Simple Ingredients: No fancy grocery trips needed. You likely already have most of this in your kitchen—onion, garlic, broth, maple syrup. The only special item is the honeynut squash itself, and these little guys are showing up everywhere these days.
- Perfect for Hosting: This is the ultimate dinner party starter or potluck contribution. It scales beautifully for a crowd, looks gorgeous in a bowl, and everyone thinks you worked way harder than you actually did.
- Crowd-Pleaser: I’ve served this to kids, picky eaters, and serious food snobs. It gets rave reviews across the board. The natural sweetness of the maple and roasted squash is universally appealing.
- Unbelievably Delicious: The texture is what gets people. It’s velvety smooth without being heavy, with this deep caramelized flavor from the roasting that you just can’t get from stovetop methods.
What makes this version stand out from all the other squash soup recipes out there? It’s the roasting technique. Most recipes boil the squash, which dilutes the flavor. By roasting the honeynut squash first, you concentrate all that natural sweetness and get those beautiful caramelized edges that add so much depth. Plus, the maple syrup gets brushed on during the last few minutes of roasting, creating this almost candied exterior that blends into the soup for a subtle sweetness that isn’t cloying.
This isn’t just another soup recipe. It’s the kind that makes people close their eyes after the first bite. It’s comfort food reimagined—healthier, faster, but with the same soul-soothing satisfaction. Perfect for impressing guests without stress, or turning a simple meal into something memorable.
What Ingredients You Will Need
This recipe uses simple, wholesome ingredients to deliver bold flavor and satisfying texture without the fuss. Most of these are pantry staples or easy to find at any grocery store during fall and winter.
For the Roasted Squash
- 4 medium honeynut squash (about 2 pounds total) — look for ones that feel heavy for their size with no soft spots. Honeynut squash are smaller and sweeter than butternut, with edible skin after roasting.
- 2 tablespoons olive oil — use a good quality extra virgin for the best flavor, or avocado oil if you prefer a neutral taste
- 1/2 teaspoon salt — I prefer fine sea salt for even seasoning
- 1/4 teaspoon black pepper — freshly ground is always better
- 2 tablespoons pure maple syrup — please don’t use pancake syrup here. Real maple syrup makes all the difference. I like the darker Grade A for its robust flavor.
For the Soup Base
- 1 tablespoon unsalted butter — adds richness and depth. Use vegan butter or coconut oil for a dairy-free option.
- 1 medium yellow onion, diced (about 1 cup) — sweet onions also work well here
- 3 cloves garlic, minced — fresh garlic is non-negotiable for the best flavor
- 1 teaspoon fresh thyme leaves (or 1/2 teaspoon dried) — thyme and squash are a classic pairing
- 1/2 teaspoon ground cinnamon — adds warmth without being overpowering
- 1/4 teaspoon ground nutmeg — freshly grated if you have it, but pre-ground works fine
- 3 cups vegetable broth — use a good quality brand like Pacific Foods or Imagine. Chicken broth also works if you’re not keeping it vegetarian.
- 1/2 cup full-fat coconut milk — this is my secret ingredient for incredible creaminess. Heavy cream works too, but coconut milk adds a subtle sweetness that complements the squash beautifully.
- Salt and pepper to taste
For Garnish (Optional but Recommended)
- Extra coconut milk or cream — for swirling on top
- Toasted pumpkin seeds — adds nice crunch and visual appeal
- A drizzle of maple syrup — because why not?
- Fresh thyme sprigs — for that restaurant presentation
- Crumbled bacon — if you’re serving meat-eaters, this is a game-changer
Ingredient Selection Tips: When choosing honeynut squash, look for ones that are about 4-5 inches long with deep orange skin. They should feel heavy and solid. Avoid any with green patches or soft spots. If you can’t find honeynut squash, butternut squash works as a substitute—just peel and cube it before roasting, and increase the roasting time by about 10 minutes.
Substitution Guidance: For a nut-free version, skip the pumpkin seeds or use sunflower seeds instead. For a lower-carb option, reduce the maple syrup to 1 tablespoon and add a pinch of stevia or monk fruit sweetener. For extra protein, stir in a scoop of unflavored collagen powder after blending.
Equipment Needed
You don’t need a professional kitchen to make this soup, but having the right tools makes the process smoother. Here’s what you’ll need:
- Baking sheet — a rimmed half-sheet pan works best. Line it with parchment paper for easy cleanup.
- Chef’s knife — a sharp 8-inch knife makes cutting the squash much safer and easier. Honeynut squash are small but dense.
- Cutting board — use a sturdy one that won’t slip around
- Large pot or Dutch oven — I use my 5.5-quart Le Creuset for this, but any heavy-bottomed pot works
- Immersion blender — this is my preferred method for blending hot soup directly in the pot. It’s safer and creates less mess. I’ve had my Cuisinart immersion blender for years and it’s still going strong.
- Regular blender — if you don’t have an immersion blender, a standard countertop blender works fine. Just be careful blending hot liquids—work in batches and leave the lid slightly open to release steam.
- Measuring cups and spoons — for accuracy
- Wooden spoon or spatula — for stirring the aromatics
Budget-Friendly Options: If you’re just starting out, skip the immersion blender and use a regular blender. You can also use a potato masher for a chunkier texture, though it won’t be as smooth. A good chef’s knife is worth investing in, but a sharp paring knife will work in a pinch.
Preparation Method
Let’s get cooking. This recipe moves fast, so I recommend reading through the entire method before you start. Trust me, I learned the hard way—the first time I made this, I forgot to preheat the oven and ended up waiting around for fifteen minutes while my squash sat on the counter.
- Preheat your oven to 400°F (200°C). Line a baking sheet with parchment paper for easy cleanup. While the oven heats, prepare your squash.
- Prepare the honeynut squash. Carefully cut each squash in half lengthwise. Use a spoon to scoop out the seeds and stringy pulp. Don’t throw the seeds away—you can roast them separately for a garnish! Place the squash halves cut-side up on the prepared baking sheet.
- Season the squash. Drizzle the olive oil over the cut sides of the squash, using a brush or your fingers to spread it evenly. Sprinkle with salt and pepper. Flip the squash so the cut sides are facing down on the baking sheet—this helps them caramelize better.
- Roast the squash. Place the baking sheet in the preheated oven and roast for 20 minutes. After 20 minutes, remove the sheet from the oven and carefully flip the squash halves back to cut-side up. Brush the maple syrup over the exposed flesh. Return to the oven and roast for another 5-7 minutes, until the squash is fork-tender and the edges are starting to caramelize. The squash should be deep orange and slightly browned at the edges. Your kitchen will smell amazing at this point.
- Start the soup base. While the squash roasts, melt the butter in a large pot or Dutch oven over medium heat. Add the diced onion and cook, stirring occasionally, for 5-6 minutes until the onion is translucent and starting to turn golden at the edges. Add the minced garlic, fresh thyme, cinnamon, and nutmeg. Cook for another minute until the garlic is fragrant—don’t let it burn, or it will taste bitter.
- Add the broth. Pour in the vegetable broth and bring to a simmer. Let it bubble gently while you wait for the squash to finish roasting. This gives the flavors time to meld together.
- Combine everything. When the squash is done roasting, let it cool for just a minute or two—enough that you can handle it without burning your fingers. Scoop the flesh out of the skins using a spoon. The skin should peel away easily at this point. Add all the roasted squash flesh to the pot with the broth mixture. Stir everything together.
- Blend until smooth. If using an immersion blender, blend the soup directly in the pot until completely smooth. This usually takes about 1-2 minutes. If using a regular blender, work in batches—fill the blender no more than halfway, hold the lid firmly with a towel, and blend until smooth. Be very careful with hot liquids! Pour each batch into a clean pot or large bowl as you go.
- Add the coconut milk. Once the soup is completely smooth, stir in the coconut milk. Start with 1/2 cup and add more if you want a thinner consistency. Taste and adjust seasoning with salt and pepper. The soup should be velvety and rich, with a hint of sweetness from the maple and a warm undertone from the spices.
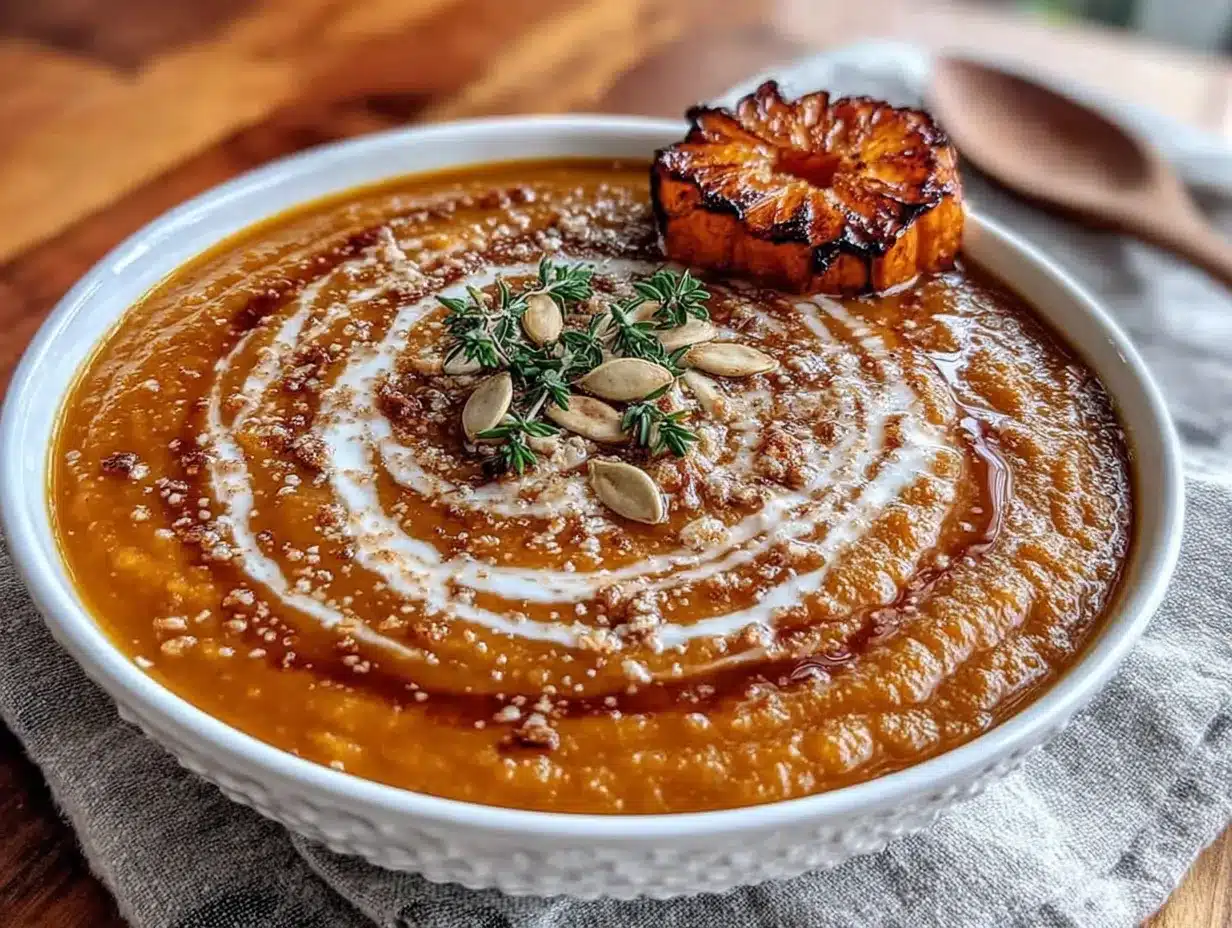
- Serve immediately. Ladle the soup into bowls and garnish as desired. I love a swirl of extra coconut milk on top, a sprinkle of toasted pumpkin seeds, and a few fresh thyme leaves. If you’re feeling fancy, drizzle a tiny bit more maple syrup in a decorative pattern.
Sensory Cues: The squash is done when you can easily pierce it with a fork and the flesh is deep orange with caramelized edges. The soup should be thick enough to coat the back of a spoon but still pourable. When you taste it, you should get sweetness first, then warmth from the spices, then a subtle savory note from the garlic and onion.
Troubleshooting Tip: If your soup is too thick, add more broth or coconut milk a little at a time until it reaches your desired consistency. If it’s too thin, let it simmer uncovered for 5-10 minutes to reduce and concentrate the flavors.
Cooking Tips & Techniques
After making this soup more times than I can count, I’ve picked up a few tricks that make a real difference. Here’s what I wish someone had told me the first time around:
Don’t skip the roasting step. I know it’s tempting to just boil the squash to save time, but roasting is what gives this soup its incredible depth of flavor. The caramelization that happens in the oven is something you simply can’t replicate on the stovetop. That golden-brown color on the edges of the squash? That’s pure flavor.
Season in layers. Add salt at every stage—when you season the squash, when you cook the onions, and when you blend the soup. This builds flavor gradually rather than dumping it all in at the end. I learned this from a chef friend who told me, “Salt is not a finishing ingredient.” She was right.
Toast your spices. Before adding the broth, let the cinnamon and nutmeg cook in the butter for about 30 seconds. This blooms the spices and makes them more aromatic. Just be careful not to burn them—they go from fragrant to bitter very quickly.
Use full-fat coconut milk. I tried making this with light coconut milk once, and the texture was noticeably thinner and less luxurious. The fat content in full-fat coconut milk is what gives the soup that velvety mouthfeel. If you’re watching calories, use less of it rather than switching to a lighter version.
Let the soup rest. If you have time, let the finished soup sit for 10-15 minutes before serving. This allows the flavors to meld together and the texture to settle. The soup actually tastes better the next day, so don’t hesitate to make it ahead.
Common mistake to avoid: Over-blending the soup can make it gummy. Blend just until smooth—about 1-2 minutes with an immersion blender. If you’re using a regular blender, don’t run it on high for more than 30 seconds at a time.
Multitasking strategy: While the squash roasts, prep your onion and garlic. While the onions cook, wash your blender or immersion blender. This way, everything comes together in about 40 minutes with minimal downtime.
Variations & Adaptations
One of the best things about this honeynut squash soup is how adaptable it is. Here are some variations I’ve tried and loved:
Dairy-Free/Vegan Version
This recipe is already dairy-free if you use olive oil instead of butter for the aromatics. The coconut milk adds all the creaminess you need without any dairy. I’ve served this to vegan friends who couldn’t believe there wasn’t heavy cream in it.
Spicy Version
Add 1/2 teaspoon of red pepper flakes or a minced serrano pepper when you cook the onions. The heat cuts through the sweetness of the maple and squash beautifully. I made this version for a game day gathering and it was a hit with the spice lovers.
Roasted Garlic Version
Instead of adding raw garlic to the pot, roast a whole head of garlic alongside the squash. Cut the top off a garlic bulb, drizzle with olive oil, wrap in foil, and roast for the same 25 minutes. Squeeze the roasted cloves into the soup before blending. The result is a mellow, sweet garlic flavor that’s completely different from raw or sautéed garlic.
Apple-Squash Combo
Add one peeled and chopped apple (I like Honeycrisp or Fuji) to the roasting pan with the squash. The apple adds another layer of sweetness and a subtle fruity note. This version is especially good for fall entertaining.
Herb Variations
Swap the thyme for sage or rosemary. Sage is particularly good with squash—just use about 1 teaspoon of dried sage or 1 tablespoon of fresh, chopped. Rosemary is stronger, so start with 1 teaspoon of fresh leaves and adjust from there.
Different Cooking Methods
If you’re short on time, you can cook the squash in an Instant Pot. Place the halved squash in the pot with 1 cup of water and cook on high pressure for 8 minutes. Release the pressure naturally, then proceed with the recipe. The flavor won’t be quite as deep as roasted, but it’s still delicious and takes half the time.
Serving & Storage Suggestions
This soup is incredibly versatile when it comes to serving. Here’s how to make it shine for your guests:
Serving Temperature: Serve this soup hot, but not boiling. I find it’s best at a temperature where you can take a spoonful without burning your tongue—about 160°F if you want to get technical. If you’re serving it at a party, keep it warm in a slow cooker on the “warm” setting.
Presentation Tips: For a dinner party, ladle the soup into shallow bowls and create a swirl pattern with extra coconut milk on top. Use a toothpick or skewer to drag the swirl into a decorative pattern. Sprinkle toasted pumpkin seeds and fresh thyme leaves over the top. A drizzle of maple syrup in a zigzag pattern adds that extra touch.
What to Serve Alongside: This soup pairs beautifully with crusty bread or garlic bread for dipping. A simple green salad with a tangy vinaigrette balances the richness. For a heartier meal, serve it alongside a roasted chicken or a grilled cheese sandwich. I once served it as a starter for a Thanksgiving dinner and it set the tone perfectly.
Beverage Pairings: A crisp white wine like Sauvignon Blanc or a dry Riesling complements the sweetness of the soup. For non-alcoholic options, sparkling water with a splash of apple cider is refreshing and seasonal.
Storage Instructions: Store leftover soup in an airtight container in the refrigerator for up to 5 days. The flavors actually deepen and improve over the first day or two. For longer storage, freeze the soup in freezer-safe containers for up to 3 months. Leave a little room at the top of the container for expansion.
Reheating Methods: Reheat the soup on the stovetop over medium-low heat, stirring occasionally. If the soup has thickened in the refrigerator, add a splash of broth or water to thin it out. You can also microwave individual portions in 30-second intervals, stirring between each. The texture remains smooth and creamy even after freezing and reheating.
Make-Ahead Tip: This soup is perfect for making a day ahead of a party. Prepare the soup completely, let it cool, and refrigerate overnight. Reheat gently before serving. The flavors will be even better, and you’ll have one less thing to worry about on the day of your event.
Nutritional Information & Benefits
This honeynut squash soup isn’t just delicious—it’s packed with nutrients that make you feel good about eating it. Here’s a rough breakdown per serving (based on 6 servings):
| Nutrient | Amount Per Serving |
|---|---|
| Calories | 195 |
| Total Fat | 11g |
| Saturated Fat | 6g |
| Carbohydrates | 24g |
| Fiber | 4g |
| Sugar | 12g |
| Protein | 3g |
| Vitamin A | 280% DV |
| Vitamin C | 25% DV |
| Potassium | 450mg |
Health Benefits: Honeynut squash is a nutritional powerhouse. It’s loaded with beta-carotene, which your body converts to vitamin A for healthy vision and immune function. The fiber content supports digestive health and helps keep you full. Coconut milk provides healthy medium-chain triglycerides (MCTs) that can support brain function and energy metabolism.
Dietary Considerations: This soup is naturally gluten-free, dairy-free (if using olive oil instead of butter), and vegan. It’s also relatively low in calories for such a satisfying dish. The main allergens to note are coconut (from the coconut milk) and potential tree nuts if you use certain garnishes.
My Personal Take: I love that this soup feels indulgent but is actually pretty good for you. It’s the kind of meal that satisfies both your taste buds and your body. When I’m feeling run down or fighting off a cold, this soup is my go-to comfort food.
Conclusion
There you have it—my panic-induced, potluck-winning, crowd-pleasing honeynut squash soup that has saved me more times than I can count. This recipe is proof that you don’t need hours in the kitchen or a list of fancy ingredients to create something truly memorable. Sometimes the best dishes come from the most chaotic moments, and that’s okay.
I hope you give this soup a try, whether you’re hosting a dinner party, bringing something to a potluck, or just craving a warm bowl of comfort on a chilly evening. Don’t be afraid to make it your own—swap in different herbs, adjust the spices, or try one of the variations I mentioned. Cooking should be fun, not stressful.
If you make this soup, I’d love to hear about it. Drop a comment below and let me know how it turned out, what variations you tried, or if it saved you from a last-minute hosting panic like it did for me. Share this recipe with a friend who loves to cook—or with someone who needs a little confidence boost in the kitchen. We all deserve to feel like kitchen rockstars sometimes.
Now go forth and make some soup. Your guests will thank you.
Frequently Asked Questions
Can I use butternut squash instead of honeynut squash?
Absolutely. Butternut squash is the closest substitute in terms of flavor and texture. Just peel and cube it before roasting, and increase the roasting time by about 10 minutes since butternut pieces are denser. The soup will be slightly less sweet, so you might want to add an extra tablespoon of maple syrup.
How do I make this soup thicker or thinner?
For a thicker soup, reduce the amount of broth to 2 1/2 cups or let the finished soup simmer uncovered for 5-10 minutes to evaporate some liquid. For a thinner soup, add more broth or coconut milk a little at a time until you reach your desired consistency. Remember that the soup will thicken slightly as it cools.
Can I freeze this soup?
Yes, this soup freezes beautifully. Let it cool completely, then transfer to freezer-safe containers or zip-top bags. Leave about an inch of headspace for expansion. Freeze for up to 3 months. Thaw overnight in the refrigerator and reheat gently on the stovetop. The texture remains smooth and creamy after freezing.
What can I use instead of coconut milk?
Heavy cream is the best substitute for a rich, creamy texture. For a lighter option, use half-and-half or whole milk. If you need to keep it dairy-free, try cashew cream (soaked cashews blended with water) or oat milk. Each will give a slightly different texture, but all work well.
Is this soup suitable for meal prep?
Definitely. This soup is perfect for meal prep because the flavors actually improve after a day or two in the refrigerator. Make a big batch on Sunday, portion it into individual containers, and enjoy it for lunches throughout the week. Just reheat and add your garnishes fresh when you’re ready to eat.
Pin This Recipe!

Perfect Honeynut Squash Soup with Maple

A velvety, rich soup made from roasted honeynut squash and maple syrup, perfect for fall gatherings and last-minute hosting. This easy recipe comes together in under 45 minutes with simple ingredients.
- Prep Time: 15 minutes
- Cook Time: 30 minutes
- Total Time: 45 minutes
- Yield: 6 servings 1x
- Category: Soup
- Cuisine: American
Ingredients
- 4 medium honeynut squash (about 2 pounds total)
- 2 tablespoons olive oil
- 1/2 teaspoon salt
- 1/4 teaspoon black pepper
- 2 tablespoons pure maple syrup
- 1 tablespoon unsalted butter
- 1 medium yellow onion, diced (about 1 cup)
- 3 cloves garlic, minced
- 1 teaspoon fresh thyme leaves (or 1/2 teaspoon dried)
- 1/2 teaspoon ground cinnamon
- 1/4 teaspoon ground nutmeg
- 3 cups vegetable broth
- 1/2 cup full-fat coconut milk
- Salt and pepper to taste
- Extra coconut milk or cream (for garnish, optional)
- Toasted pumpkin seeds (for garnish, optional)
- A drizzle of maple syrup (for garnish, optional)
- Fresh thyme sprigs (for garnish, optional)
- Crumbled bacon (for garnish, optional)
Instructions
- Preheat your oven to 400°F (200°C). Line a baking sheet with parchment paper.
- Cut each honeynut squash in half lengthwise. Scoop out seeds and stringy pulp. Place squash halves cut-side up on the prepared baking sheet.
- Drizzle olive oil over the cut sides of the squash, spreading evenly. Sprinkle with salt and pepper. Flip squash so cut sides are facing down.
- Roast for 20 minutes. Remove from oven, flip squash back to cut-side up, and brush with maple syrup. Return to oven and roast for another 5-7 minutes until fork-tender and caramelized.
- While squash roasts, melt butter in a large pot or Dutch oven over medium heat. Add diced onion and cook for 5-6 minutes until translucent and golden. Add minced garlic, thyme, cinnamon, and nutmeg. Cook for 1 minute until fragrant.
- Pour in vegetable broth and bring to a simmer. Let it bubble gently while squash finishes roasting.
- When squash is done, let cool slightly. Scoop flesh out of skins and add to the pot with broth mixture. Stir to combine.
- Blend soup until smooth using an immersion blender directly in the pot, or in batches in a regular blender (be careful with hot liquids).
- Stir in coconut milk. Taste and adjust seasoning with salt and pepper.
- Serve immediately, garnished as desired with extra coconut milk, toasted pumpkin seeds, maple syrup, fresh thyme, or crumbled bacon.
Notes
Don’t skip the roasting step—it concentrates the squash’s natural sweetness and adds depth. Season in layers for best flavor. Toast spices briefly in butter to bloom them. Use full-fat coconut milk for a velvety texture. Let soup rest 10-15 minutes before serving for flavors to meld. Over-blending can make soup gummy; blend just until smooth. Soup tastes even better the next day.
Nutrition
- Serving Size: 1 bowl (about 1.5 cu
- Calories: 195
- Sugar: 12
- Sodium: 450
- Fat: 11
- Saturated Fat: 6
- Carbohydrates: 24
- Fiber: 4
- Protein: 3
Keywords: honeynut squash soup, maple syrup, fall soup, easy soup, vegetarian soup, gluten-free soup, dairy-free soup, vegan soup, potluck recipe, dinner party starter


