Love this? Save it for later!
Share the inspiration with your friends
This was supposed to be a batch of classic sugar cookies for my neighbor’s annual Halloween block party. I had it all planned out—perfectly chilled dough, a simple royal icing, and those cute little pumpkin sprinkles I’d found at the grocery store. But then the power flickered at 3 PM on a Thursday, right as I was creaming the butter and sugar. The mixer stopped mid-spin, the kitchen went dark, and I was already running late because I’d promised to bring two dozen treats by 6. I sat there in the dim light, staring at a half-mixed bowl of butter goo, and honestly, I almost cried. I grabbed the wrong bag of powdered sugar from the pantry—turns out it was confectioners’ sugar mixed with a bit of cocoa powder from a baking mishap last week—and I just kept going. The dough came out a weird grayish-brown, and I thought, well, this is a disaster. I rolled it out anyway, cut it into rounds, and baked them in the flickering oven light. When they came out, they looked like sad, muddy cookies. But then I had this ridiculous idea—what if I used the leftover chocolate icing to draw webs on top? I mean, it was Halloween. Maybe nobody would notice they were supposed to be something else. Let me tell you, those spider web cookies were the first thing to disappear from the dessert table. My neighbor Karen actually asked for the recipe, and I had to admit it was a total accident. That’s how this recipe was born—out of a power outage, a wrong ingredient, and a moment of pure desperation. And honestly, I’ve never gone back to the original plan.
Why You’ll Love This Recipe
These spider web cookies are the kind of thing that makes you look like a Halloween hero without actually trying that hard. I’ve tested this recipe about six times now—once with my niece who insisted on “helping” (read: eating raw dough), and once for a friend’s costume party where I accidentally burned the first batch. So trust me, I’ve worked out all the kinks.
- Quick & Easy: Comes together in under 45 minutes, including chilling time. Perfect for last-minute Halloween prep when you realize the party is tomorrow and you have nothing.
- Simple Ingredients: You probably have everything in your pantry right now. Flour, sugar, butter, cocoa powder, and a little vanilla. No weird specialty items.
- Perfect for Halloween Parties: These are designed to impress a crowd. They look spooky and fun, but they’re actually just really good chocolate sugar cookies with a simple icing web on top.
- Crowd-Pleaser: Kids love the spider web design, adults love the rich chocolate flavor, and everyone loves that they’re not too sweet. I’ve watched grown men eat three in a row at a party.
- Unbelievably Delicious: The texture is this perfect balance—crispy edges with a soft, almost fudgy center. The cocoa powder gives them a deep, dark flavor that pairs beautifully with the sweet white icing.
What makes these different from every other Halloween cookie recipe out there? It’s the texture, honestly. Most spider web cookies use royal icing that hardens like a rock, but mine uses a simple powdered sugar glaze that stays just a little soft. So you get this beautiful contrast—crunchy cookie, creamy icing. Plus, the “web” design is way easier than it looks. I’m not an artist, and I can do it in about 10 seconds per cookie. You just make a few concentric circles with the icing, then drag a toothpick through them. That’s it. No piping skills required.
These cookies are the ones that make people close their eyes on the first bite. I’ve seen it happen at every party I’ve brought them to. It’s comfort food with a Halloween twist—familiar, cozy, but just spooky enough to feel special.
What Ingredients You Will Need
This recipe uses simple, everyday ingredients to create cookies that taste like you spent hours in the kitchen. Most of these are probably already in your pantry, which is exactly how I like it. Here’s what you’ll need:
For the Cookies
- 2 1/4 cups all-purpose flour (I use Gold Medal, but any brand works fine—just spoon and level it, don’t scoop straight from the bag)
- 1/2 cup unsweetened cocoa powder (I prefer Hershey’s Special Dark for a richer color, but regular works too)
- 1 teaspoon baking powder (make sure it’s not expired—check the date!)
- 1/2 teaspoon salt (just regular table salt, nothing fancy)
- 1 cup unsalted butter, softened to room temperature (if you forget to take it out, microwave it for 10 seconds—no more, or it’ll melt)
- 1 cup granulated sugar (plus a little extra for sprinkling if you want a sparkly edge)
- 1 large egg, room temperature (crack it into a small bowl first to avoid shell pieces)
- 1 teaspoon vanilla extract (the real stuff, not imitation—trust me on this)
For the Spider Web Icing

- 1 cup powdered sugar (sift it if you have time—lumps are annoying)
- 2 tablespoons milk (whole milk works best, but any kind will do)
- 1/2 teaspoon vanilla extract (yes, more vanilla—it makes everything better)
- Food coloring (optional—I use black gel coloring for a spooky look, but white icing on dark cookies is already pretty dramatic)
For Decoration
- Small candy spiders (I found mine at Target in the Halloween section, but Amazon has them too)
- Edible glitter (optional, but my niece insists it makes them “magical”)
One thing I learned the hard way—don’t skip the chilling step. I tried to rush it once and the cookies spread into weird flat blobs that looked more like spilled coffee than spider webs. The dough needs that 20 minutes in the fridge to hold its shape. Also, if you’re using a different cocoa powder, the color might vary. Dutch-processed cocoa gives a darker, more dramatic look, while regular cocoa is a bit lighter. Both taste great, but for Halloween, go dark.
Equipment Needed
You don’t need a lot of fancy tools for these cookies. Here’s what I use:
- Mixing bowls (one large, one medium—I use glass because it doesn’t retain smells)
- Electric mixer (handheld or stand mixer works—I’ve used both, and honestly, a handheld is easier for cleanup)
- Rolling pin (if you don’t have one, a wine bottle works in a pinch—I’ve done it)
- Round cookie cutters (I use a 3-inch cutter, but any size works—just adjust baking time slightly)
- Baking sheets (I prefer light-colored metal ones—dark pans can over-brown the bottoms)
- Parchment paper (non-negotiable—it prevents sticking and makes cleanup a breeze)
- Piping bag or zip-top bag (for the icing—I use a small zip-top bag with the corner snipped off)
- Toothpicks (for creating the spider web design)
- Cooling rack (wire rack works best, but a clean cutting board will do)
If you’re making these for a big party, I recommend having two baking sheets so you can rotate them. My first batch I only had one sheet, and it took forever because I had to wait for it to cool between rounds. Also, a silicone baking mat is nice but not necessary—parchment paper is cheaper and works just as well.
Preparation Method
Alright, let’s get to the fun part. Here’s how to make these spider web cookies step by step. I’ve included all the little tricks I’ve learned from my many, many batches.
-
Mix the dry ingredients. In a medium bowl, whisk together the flour, cocoa powder, baking powder, and salt. Make sure there are no lumps—cocoa powder loves to clump up. I use a fork to break up any stubborn bits. Set this aside.
-
Cream the butter and sugar. In a large bowl, beat the softened butter and granulated sugar together until light and fluffy. This takes about 3 minutes with an electric mixer on medium speed. You’ll know it’s ready when it looks pale and almost creamy. Don’t rush this step—it’s what gives the cookies their tender texture.
-
Add the egg and vanilla. Crack the egg into a small bowl first (just in case of shells), then add it to the butter mixture along with the vanilla. Beat until combined. It might look a little curdled at this point—that’s normal, don’t panic.
-
Combine wet and dry ingredients. Gradually add the flour mixture to the wet ingredients, mixing on low speed. I add it in three batches, scraping down the sides of the bowl with a spatula between each addition. Mix just until the dough comes together—overmixing makes tough cookies.
-
Chill the dough. This is crucial. Wrap the dough in plastic wrap and flatten it into a disc. Refrigerate for at least 20 minutes. I usually do 30 because I’m always distracted. The dough needs to be firm enough to roll without sticking. If it’s too soft, the cookies will spread into weird shapes.
-
Preheat and prepare. While the dough chills, preheat your oven to 350°F (175°C). Line two baking sheets with parchment paper. I like to get the oven ready now so I don’t have to wait later.
-
Roll and cut. On a lightly floured surface, roll the dough to about 1/4-inch thickness. I use a little extra flour on my rolling pin to prevent sticking. Cut out rounds using your cookie cutter. Place them about 2 inches apart on the prepared baking sheets. If the dough gets too soft, pop it back in the fridge for 5 minutes.
-
Bake. Bake for 8-10 minutes. The cookies should look set around the edges but still slightly soft in the center. They’ll continue to firm up as they cool. My oven runs hot, so I check at 8 minutes. Let them cool on the baking sheet for 5 minutes, then transfer to a wire rack to cool completely.
-
Make the icing. While the cookies cool, whisk together the powdered sugar, milk, and vanilla until smooth. It should be thick but pourable—like honey. If it’s too thick, add a drop more milk. If too thin, add a little more powdered sugar. I usually add the milk a teaspoon at a time to get the right consistency.
-
Create the spider web design. Transfer the icing to a piping bag or a small zip-top bag with a tiny corner snipped off. Pipe a small dot in the center of each cookie. Then pipe 3-4 concentric circles around it, spacing them about 1/4 inch apart. Before the icing sets, drag a toothpick from the center outward through all the circles. Repeat this 4-6 times around the cookie, spacing the lines evenly. You’ll see the web pattern emerge immediately. It’s almost magical.
-
Add the spider. While the icing is still wet, place a candy spider on each cookie. Press gently so it sticks. If you’re using edible glitter, sprinkle it on now before the icing dries.
-
Let the icing set. Allow the cookies to sit at room temperature for about 15 minutes until the icing is firm. Then they’re ready to serve or store.
One thing I always tell people—don’t stress about the web design. My first attempt looked like a tangled mess, but I actually liked it better. Imperfect webs look more authentic, like a real spider made them. So if yours aren’t perfect, lean into it.
Cooking Tips & Techniques
I’ve made these cookies at least a dozen times now, and I’ve learned a few things the hard way. Here are my best tips for getting them right every time.
Chill the dough thoroughly. I cannot stress this enough. The first time I made these, I was in a hurry and only chilled the dough for 10 minutes. The cookies spread into flat, misshapen blobs that looked nothing like spider webs. Now I always chill for at least 20 minutes, and if the dough gets soft while I’m rolling, I pop it back in the fridge for a few minutes. It makes a huge difference.
Use a light-colored baking sheet. Dark pans absorb more heat and can over-brown the bottoms of your cookies. I learned this after a batch came out with burnt bottoms and raw centers. If you only have dark pans, reduce the oven temperature by 25°F and check the cookies a minute or two early.
Don’t overmix the dough. Once you add the flour, mix just until it comes together. Overmixing develops the gluten and makes the cookies tough. I’ve done it—I was distracted by my phone ringing—and the cookies came out dense and chewy instead of tender and light. You want them to be soft, not like hockey pucks.
Test your icing consistency. Before you pipe the webs, test the icing on a piece of parchment paper. It should flow smoothly but hold its shape. If it’s too runny, it’ll drip off the cookies. If too thick, it won’t spread when you drag the toothpick. I usually adjust with a few drops of milk or a pinch of powdered sugar until it’s just right.
Work in batches. Don’t try to ice all the cookies at once. The icing starts to set after a few minutes, so work in batches of 4-6 cookies. Pipe the circles, drag the toothpick, add the spider, then move to the next batch. I usually do this while watching TV—it’s surprisingly relaxing.
Timing tip: Make the dough the night before. It actually tastes better after resting overnight in the fridge, and it saves you time on party day. Just take it out 10 minutes before rolling to soften slightly.
Variations & Adaptations
These spider web cookies are pretty flexible. Here are some variations I’ve tried and loved:
Gluten-Free Version: Substitute the all-purpose flour with a 1:1 gluten-free baking flour blend. I’ve used Bob’s Red Mill and it worked perfectly—just add an extra tablespoon of milk to the dough since gluten-free flours absorb more moisture. The texture is slightly more tender, but nobody noticed the difference at my Halloween party.
Vegan Adaptation: Use vegan butter (I like Earth Balance) and a flax egg (1 tablespoon ground flaxseed mixed with 3 tablespoons water, let sit for 5 minutes). For the icing, use plant-based milk. The cookies are a bit less rich, but still delicious. My vegan friend Devin ate four of them and asked for the recipe.
Different Shapes: Instead of round cookies, use Halloween-themed cutters—pumpkins, ghosts, bats. The spider web design works on any shape. I did a batch of ghost-shaped ones last year and they were adorable. Just adjust the baking time slightly for smaller or larger shapes.
Flavor Variations: Add 1/2 teaspoon of peppermint extract to the dough for a mint-chocolate twist. Or swap the vanilla in the icing for almond extract—it gives a subtle nutty flavor that pairs beautifully with the chocolate. I once added orange zest to the dough and it tasted like a chocolate orange candy bar.
Spooky Color Options: Tint the icing with gel food coloring for different effects. Orange icing on black cookies is striking. Or use green for a slimy, monster vibe. My kids love making rainbow spider webs—it’s chaotic but fun.
Less Sweet Version: Reduce the sugar in the dough to 3/4 cup and use a darker cocoa powder. The cookies will be more bitter, which balances the sweet icing. I prefer this version for adult parties where people want something less sugary.
Serving & Storage Suggestions
These cookies are best served at room temperature, ideally within a few hours of making them. The icing stays slightly soft, and the cookies have that perfect tender texture. If you’re serving them at a party, arrange them on a platter with some fake spider webs (the kind from the dollar store) for a fun presentation. I like to scatter a few candy spiders around the plate too—it adds to the spooky vibe.
For storage, place the cookies in an airtight container at room temperature. They’ll stay fresh for up to 5 days, though the icing might start to soften after day 3. I usually layer them between sheets of parchment paper to prevent sticking. If you’re stacking them, make sure the icing is fully set first—about 30 minutes after decorating.
You can also freeze these cookies. I do this all the time for parties. Bake and cool the cookies completely, then freeze them in a single layer on a baking sheet. Once frozen, transfer to a zip-top bag. They’ll keep for up to 3 months. When you’re ready to serve, thaw them at room temperature for about 30 minutes, then make the icing and decorate. The cookies taste just as fresh, and it saves you a ton of time on party day.
One thing I’ve noticed—these cookies actually taste better the next day. The flavors meld together, and the cookies get even softer. So don’t worry if you make them a day ahead. Just store them in an airtight container and decorate them the morning of the party for the best presentation.
For reheating, I don’t recommend microwaving—it makes the icing melt. If you want warm cookies, reheat them in a 300°F oven for 3-4 minutes before adding the icing. But honestly, I prefer them at room temperature.
Nutritional Information & Benefits
Here’s the honest truth—these are cookies, not health food. But they’re made with real ingredients, and that counts for something. Here’s the approximate nutritional breakdown per cookie (based on a 3-inch round with icing and one candy spider):
- Calories: 180
- Fat: 9g
- Carbohydrates: 24g
- Sugar: 14g
- Protein: 2g
- Fiber: 1g
The cocoa powder actually has some health benefits—it’s rich in antioxidants called flavonoids, which can help reduce inflammation. Dark chocolate (which is what cocoa powder is, essentially) has been linked to improved heart health. So there’s that.
These cookies are vegetarian, and with the substitutions I mentioned, they can be made vegan and gluten-free. They contain dairy, eggs, and gluten in their standard form, so keep that in mind for guests with allergies. The candy spiders sometimes contain gelatin, so check the label if you’re serving vegetarians.
I’m not a nutritionist, but I believe in balance. These cookies are a treat—something special for a Halloween party. They’re not meant to be an everyday snack. And honestly, the joy they bring to a party is worth the calories. My personal philosophy is that food made with love and shared with people is good for the soul, even if it’s not perfect for the waistline.
Conclusion
These spider web cookies have become my Halloween tradition. Every year, I make at least three batches—one for my family, one for the block party, and one for my kids’ classroom. They never last long. There’s something about that dark chocolate cookie with the delicate white web and the little candy spider that just feels like Halloween. It’s spooky but not scary, impressive but not complicated.
I love that this recipe came from a mistake. It reminds me that sometimes the best things happen when you stop trying to be perfect and just go with it. The power outage, the wrong ingredient, the desperate decision to make spider webs—none of it was planned, and yet it turned into my most requested recipe. I think that’s how cooking should feel. Playful. Experimental. Not afraid to fail.
So go ahead and make these for your Halloween party. Customize them however you want—different colors, different shapes, different spiders. Make them your own. And if they turn out a little messy, that’s fine. Real spider webs aren’t perfect either. That’s what makes them beautiful.
I’d love to hear how yours turn out. Drop a comment below and tell me about your Halloween party, or share a photo of your spider web cookies. Did you try a fun variation? Did your kids help decorate? Did they disappear as fast as mine always do? Let me know—I read every comment, and I love seeing your creations. Happy Halloween, and happy baking!
Frequently Asked Questions
Can I make these spider web cookies ahead of time?
Absolutely! You can bake the cookies up to 3 days in advance and store them in an airtight container at room temperature. Just wait to decorate them until the day you’re serving them. The icing needs about 15 minutes to set, so plan accordingly. I usually bake on Wednesday, decorate on Friday morning, and serve on Friday night.
Why did my cookies spread into flat blobs?
This usually happens when the dough isn’t chilled enough. Make sure you refrigerate it for at least 20 minutes before rolling. Also, if your butter was too soft when you started, that can cause spreading. Next time, use butter that’s softened but still cool to the touch—not melted or greasy.
Can I use a different type of icing?
Sure! Royal icing works great if you want a harder finish, but it takes longer to set. You can also use melted white chocolate for a richer flavor—just thin it with a little coconut oil. My favorite alternative is a cream cheese icing, but it needs to be refrigerated, so it’s better for cookies that will be eaten within a few hours.
How do I get the spider web design to look perfect?
Honestly, practice makes perfect. But here’s a tip—use a toothpick instead of a knife for dragging the lines. Toothpicks create thinner, more delicate lines that look more like real spider webs. Also, work quickly before the icing sets. If you’re nervous, practice on a piece of parchment paper first. And remember, imperfect webs look more authentic!
Can I freeze the decorated cookies?
I don’t recommend freezing them after decorating. The icing can get sticky and the candy spiders might fall off. But you can freeze the undecorated cookies for up to 3 months. Just thaw them at room temperature, then make fresh icing and decorate. They’ll taste just as good as fresh-baked.
Pin This Recipe!

Crowd-Pleasing Spider Web Cookies for Your Halloween Party
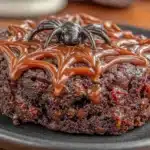
These spider web cookies are a happy accident turned Halloween tradition—rich chocolate sugar cookies topped with a simple white icing web and a candy spider. They’re quick, easy, and always the first to disappear from the dessert table.
- Prep Time: 20 minutes
- Cook Time: 10 minutes
- Total Time: 45 minutes
- Yield: 24 servings 1x
- Category: Dessert
- Cuisine: American
Ingredients
- 2 1/4 cups all-purpose flour
- 1/2 cup unsweetened cocoa powder
- 1 teaspoon baking powder
- 1/2 teaspoon salt
- 1 cup unsalted butter, softened
- 1 cup granulated sugar
- 1 large egg, room temperature
- 1 teaspoon vanilla extract
- 1 cup powdered sugar
- 2 tablespoons milk
- 1/2 teaspoon vanilla extract
- Food coloring (optional)
- Small candy spiders
- Edible glitter (optional)
Instructions
- Mix the dry ingredients: In a medium bowl, whisk together flour, cocoa powder, baking powder, and salt. Set aside.
- Cream the butter and sugar: In a large bowl, beat softened butter and granulated sugar until light and fluffy, about 3 minutes.
- Add the egg and vanilla: Add egg and vanilla to the butter mixture and beat until combined.
- Combine wet and dry ingredients: Gradually add the flour mixture to the wet ingredients, mixing on low speed until just combined.
- Chill the dough: Wrap dough in plastic wrap, flatten into a disc, and refrigerate for at least 20 minutes.
- Preheat and prepare: Preheat oven to 350°F (175°C). Line baking sheets with parchment paper.
- Roll and cut: On a lightly floured surface, roll dough to 1/4-inch thickness. Cut into rounds and place 2 inches apart on prepared sheets.
- Bake: Bake for 8-10 minutes until edges are set. Cool on baking sheet for 5 minutes, then transfer to a wire rack to cool completely.
- Make the icing: Whisk together powdered sugar, milk, and vanilla until smooth and thick but pourable.
- Create the spider web design: Transfer icing to a piping bag or zip-top bag with a tiny corner snipped. Pipe a dot in the center of each cookie, then pipe 3-4 concentric circles around it. Before the icing sets, drag a toothpick from the center outward through all the circles, repeating 4-6 times around the cookie.
- Add the spider: While icing is still wet, place a candy spider on each cookie and press gently. Add edible glitter if desired.
- Let the icing set: Allow cookies to sit at room temperature for about 15 minutes until icing is firm.
Notes
Chill the dough thoroughly to prevent spreading. Use a light-colored baking sheet to avoid over-browning. Don’t overmix the dough. Test icing consistency before piping. Work in batches of 4-6 cookies when decorating. Make dough the night before for better flavor.
Nutrition
- Serving Size: 1 cookie
- Calories: 180
- Sugar: 14
- Sodium: 95
- Fat: 9
- Saturated Fat: 5
- Carbohydrates: 24
- Fiber: 1
- Protein: 2
Keywords: Halloween cookies, spider web cookies, chocolate sugar cookies, easy Halloween dessert, party cookies


