Love this? Save it for later!
Share the inspiration with your friends
My sister swore she hated pumpkin desserts. For years. Like, a solid decade of side-eyeing my pumpkin bread and pushing past the pumpkin pie at Thanksgiving without a second glance. “It’s too musky,” she’d say. “I don’t get the hype.” Then last October, I was testing cookie recipes for a fall roundup and made a batch of these brown butter pumpkin snickerdoodles just for myself. I got distracted by a phone call and walked back into the kitchen to find her standing at the counter, mid-chew, with a guilty look on her face and cookie crumbs on her shirt. “These don’t count,” she mumbled, reaching for another one. Honestly, I didn’t even say a word—I just slid the plate closer to her. That moment, right there, is when I knew this recipe was something special.
You know that feeling when you stumble onto a recipe that just works? The kind that makes you text your friends before you’ve even finished eating? That’s this cookie. It’s got everything you want in a fall treat—warm spices, that signature snickerdoodle tang from the cream of tartar, and the nutty depth of brown butter—but with a subtle pumpkin flavor that doesn’t overwhelm. Let me tell you, the texture is where it really shines. The pumpkin keeps these cookies incredibly soft and pillowy, almost like a little cloud, while the cinnamon-sugar coating gives them that perfect crackly top. I’ve made these for three different gatherings this season and they disappear every single time. One friend actually asked if she could pay me to make her a batch for her office party. I mean, that’s the kind of feedback you want, right?
What I love most about this recipe is that it came together by accident. I was trying to use up half a can of pumpkin puree and thought, “Why not throw it in a snickerdoodle?” I fully expected it to be a soggy mess. Instead, I got a cookie that’s soft in the middle, slightly chewy at the edges, and coated in that irresistible cinnamon-sugar crunch. It’s the kind of recipe that makes you look like a baking genius with very little actual effort. And honestly, on a busy weeknight when you’re craving something cozy but don’t have two hours to spend in the kitchen? That’s exactly what you need.
Why You’ll Love This Recipe
Look, I know you’re busy. You’ve got dinner to make, kids to wrangle, emails to answer, and somehow you still want a homemade cookie that tastes like fall. I get it. That’s exactly why I developed this recipe the way I did. These cookies come together in under 30 minutes from start to finish, and they use ingredients you probably already have in your pantry. No specialty flours, no obscure extracts, no running to three different stores.
- Quick & Easy: From mixing bowl to cooling rack in about 25 minutes. Yes, really. The dough doesn’t need to chill, which is a game-changer for weeknight baking.
- Simple Ingredients: You’ll find everything at a regular grocery store. Butter, sugar, pumpkin puree, flour, and basic spices—that’s it.
- Perfect for Fall Gatherings: Whether it’s a last-minute potluck, a PTA bake sale, or just a Tuesday night that needs a little warmth, these cookies deliver.
- Crowd-Pleaser: Even pumpkin skeptics (like my sister) can’t resist these. They’re not too pumpkin-y, just perfectly balanced.
- Unbelievably Delicious: The brown butter adds this nutty, almost caramel-like depth that makes these taste way more complicated than they are.
What makes this recipe different from every other pumpkin cookie out there? It’s the combination of brown butter and cream of tartar. The brown butter brings a richness that complements the pumpkin without overpowering it, while the cream of tartar gives that classic snickerdoodle tang and helps the cookies hold their shape. I tested this recipe six times to get the flour-to-pumpkin ratio just right—too much pumpkin and they spread into flat discs, too little and you lose that soft texture. This version? It’s the sweet spot. The cookies come out perfectly puffy, with a slight chew and that beautiful crackled top that makes snickerdoodles so iconic.
These cookies are the kind that make you close your eyes after the first bite. I’m not exaggerating. The warmth from the cinnamon, the nuttiness from the brown butter, the subtle sweetness from the pumpkin—it all comes together in this cozy, comforting package that feels like a hug on a crisp fall day. And the best part? You don’t have to spend all afternoon in the kitchen to get there.
What Ingredients You Will Need
This recipe relies on a handful of simple, wholesome ingredients that work together to create something truly special. Most of these are pantry staples, so you’re probably only a trip to the fridge away from a batch of these cookies. Let me walk you through each one and why it matters.
- Unsalted butter (1 cup, 2 sticks): We’re browning this, so unsalted is key. It lets you control the salt level and gives you a clean, pure nutty flavor. I recommend using a good-quality butter like Kerrygold or Plugrà for the richest taste—trust me, you’ll notice the difference in the final cookie.
- Granulated sugar (1 cup for dough, plus ⅓ cup for rolling): Regular white sugar gives these cookies their structure and helps create that crackly top when combined with the cinnamon coating. The sugar in the dough also helps the brown butter incorporate smoothly.
- Light brown sugar (½ cup, packed): This adds moisture and a hint of molasses flavor that pairs beautifully with the pumpkin and spices. Don’t skip it—the brown sugar is what keeps these cookies soft for days.
- Pumpkin puree (½ cup): Make sure you’re using pure pumpkin puree, not pumpkin pie filling. The pie filling has added sugar and spices that will throw off the balance of the recipe. I usually go with Libby’s—it’s consistent and has the right moisture content. If you have leftover puree, freeze it in ½-cup portions for later.
- Large egg (1): Room temperature is best, but honestly? I’ve used cold eggs straight from the fridge and the cookies still turned out great. The egg binds everything together and adds richness.
- Vanilla extract (1 teaspoon): Pure vanilla is worth the splurge here. It enhances all the warm spices and rounds out the flavor of the brown butter. If you only have imitation vanilla, it’ll work, but the flavor won’t be quite as deep.
- All-purpose flour (2 cups): Regular AP flour gives these cookies the perfect structure—not too cakey, not too dense. I’ve tested this with a 1:1 gluten-free flour blend and it works, but the texture is slightly more crumbly.
- Cream of tartar (2 teaspoons): This is the secret ingredient that makes a snickerdoodle a snickerdoodle. It adds that subtle tangy flavor and helps activate the baking soda for a soft, puffy cookie. Don’t skip it—there’s no good substitute.
- Baking soda (1 teaspoon): Works with the cream of tartar to give the cookies lift. Make sure your baking soda is fresh—if it’s been sitting in your cabinet for over a year, it might not work as well.
- Ground cinnamon (2 teaspoons for dough, plus 2 tablespoons for coating): Cinnamon is the star spice here. I use Saigon cinnamon for its warm, slightly sweet flavor, but regular cinnamon works perfectly too.
- Ground nutmeg (½ teaspoon): Just a pinch adds warmth and depth. Freshly grated nutmeg is amazing if you have it, but pre-ground is totally fine.
- Ground ginger (¼ teaspoon): This is optional, but I love the little kick it adds. It brightens up the pumpkin flavor without being overpowering.
- Salt (½ teaspoon): A flaky sea salt like Maldon is great for finishing, but regular table salt works fine in the dough. Salt balances the sweetness and enhances all the other flavors.
Equipment Needed
You don’t need a fancy kitchen to make these cookies. I’ve made them in a tiny apartment with a hand mixer and a warped baking sheet, and they still turned out beautifully. Here’s what you’ll actually need:
- Light-colored saucepan or skillet: For browning the butter. A light-colored pan helps you see when the butter turns amber so you don’t burn it. I use my stainless steel saucepan, but any light-bottomed pan works.
- Large mixing bowl: For the wet ingredients and dough. Any bowl will do, but a wider bowl makes it easier to mix everything evenly.
- Whisk: For combining the dry ingredients and smoothing out the dough. A sturdy whisk is better than a flimsy one.
- Wooden spoon or silicone spatula: For folding the dry ingredients into the wet. I prefer a silicone spatula because it scrapes the sides of the bowl so nothing goes to waste.
- Measuring cups and spoons: Accurate measurements matter in baking, especially with the flour and pumpkin. Use the spoon-and-level method for flour—scoop it gently into the cup, then level off with a knife.
- Baking sheets (2): Light-colored, rimmed baking sheets work best. Dark sheets absorb more heat and can cause the bottoms of the cookies to brown too quickly. If you only have dark sheets, reduce the oven temperature by 25°F.
- Parchment paper or silicone baking mats: These prevent sticking and make cleanup a breeze. Parchment paper is cheaper and disposable; silicone mats are reusable and eco-friendly.
- Cooling rack: Lets the cookies cool evenly so they don’t get soggy on the bottom. If you don’t have one, you can transfer the cookies to a clean cutting board after a few minutes.
- Small bowl: For the cinnamon-sugar coating. A shallow bowl or plate works too.
- Cookie scoop (about 1.5 tablespoons): This ensures all your cookies are the same size, so they bake evenly. A regular spoon works, but the scoop is faster and more consistent.
If you don’t have a kitchen scale, don’t worry—I’ve given all measurements in cups and spoons. But if you do have one, weighing your flour (240 grams for 2 cups) gives the most accurate results.
Preparation Method
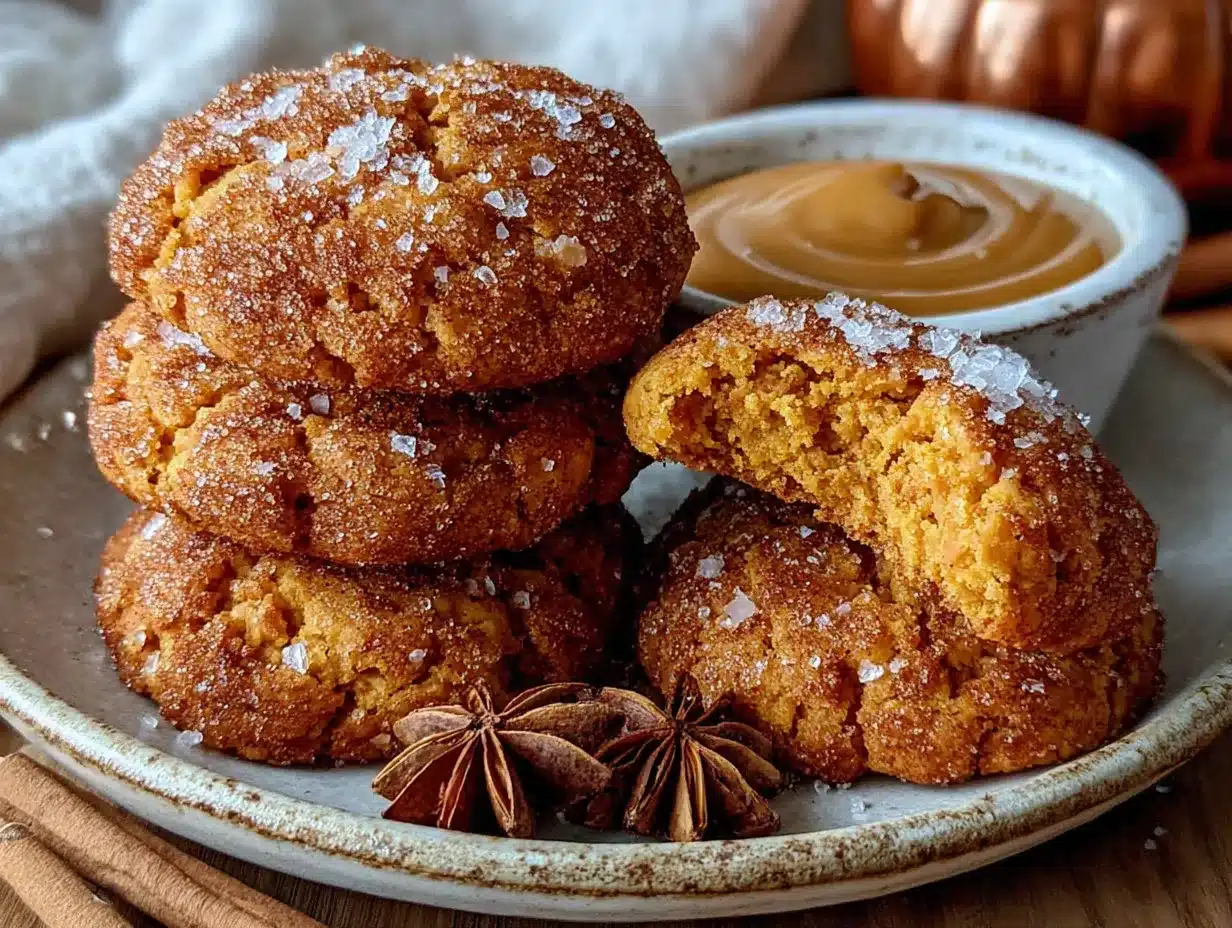
Alright, let’s get baking. I’ve broken this down into clear steps with all the little details I wish someone had told me the first time I made these. Take your time with step one—it’s the most important part.
- Brown the butter: Cut your 1 cup (2 sticks) of unsalted butter into tablespoon-sized pieces and place them in a light-colored saucepan over medium heat. Stir constantly with a whisk or wooden spoon. The butter will melt, then foam, then start to crackle and pop. After about 5-7 minutes, you’ll see golden-brown specks forming at the bottom of the pan and the butter will smell nutty and amazing. As soon as it turns a deep amber color and smells like toasted nuts, remove it from the heat immediately. Pour it into a heatproof bowl and let it cool for 10-15 minutes. Don’t walk away during this process—burnt butter is a one-way street and you can’t un-burn it. I learned this the hard way when I got distracted by a phone call and ended up with black butter that smelled like sadness.
- Preheat the oven: Set your oven to 350°F (175°C). Line two baking sheets with parchment paper or silicone mats. While the oven is heating, the butter will be cooling to the right temperature.
- Mix the wet ingredients: In a large bowl, combine the cooled brown butter (it should be warm but not hot), 1 cup granulated sugar, and ½ cup packed light brown sugar. Whisk vigorously for about 1 minute until the mixture looks smooth and slightly thickened. Add the ½ cup pumpkin puree, 1 large egg, and 1 teaspoon vanilla extract. Whisk until everything is well combined and the mixture is smooth. It might look a little separated at first, but keep whisking—it will come together.
- Combine the dry ingredients: In a separate medium bowl, whisk together 2 cups all-purpose flour, 2 teaspoons cream of tartar, 1 teaspoon baking soda, 2 teaspoons ground cinnamon, ½ teaspoon ground nutmeg, ¼ teaspoon ground ginger (if using), and ½ teaspoon salt. Make sure there are no lumps—the cream of tartar can be clumpy, so break up any bits with your fingers if needed.
- Make the dough: Gradually add the dry ingredients to the wet ingredients, stirring with a wooden spoon or silicone spatula until just combined. Don’t overmix! Stop as soon as you don’t see any more streaks of flour. The dough will be soft and slightly sticky, but it should hold together when you scoop it. If it seems too wet, let it sit for 5 minutes—the flour will absorb some of the moisture and it will firm up.
- Prepare the coating: In a small bowl, mix together ⅓ cup granulated sugar and 2 tablespoons ground cinnamon. Stir until well combined. This is your cookie coating and it’s what makes these snickerdoodles so irresistible.
- Scoop and roll: Using a cookie scoop or a tablespoon, scoop out rounded balls of dough (about 1.5 tablespoons each). Roll each ball between your palms to make it smooth, then roll it in the cinnamon-sugar mixture until fully coated. Place the coated dough balls on the prepared baking sheets, spacing them about 2 inches apart. They will spread slightly, so give them room.
- Bake: Bake one sheet at a time in the preheated oven for 10-12 minutes. The cookies should look puffed up and slightly cracked on top, with the edges just starting to turn golden. The centers will look soft and slightly underdone—that’s exactly what you want. Overbaking will give you dry cookies, so err on the side of underdone. I usually start checking at 10 minutes and pull them out when the edges are set but the middle still looks a little glossy.
- Cool: Let the cookies cool on the baking sheet for 5 minutes. This is important—they’re very delicate when they come out of the oven and need time to set up. After 5 minutes, transfer them to a wire cooling rack to cool completely. If you try to move them too early, they’ll fall apart. Trust me, I’ve been there, and it’s heartbreaking.
- Repeat: Scoop, roll, and bake the remaining dough. If the second batch of dough seems softer, pop it in the fridge for 10 minutes while the first batch bakes—it’ll be easier to handle.
Your kitchen should smell like a fall candle factory right about now. The combination of brown butter, cinnamon, and pumpkin is honestly intoxicating. Don’t be surprised if you find yourself hovering near the cooling rack, waiting impatiently for them to be cool enough to eat.
Cooking Tips & Techniques
I’ve made these cookies more times than I care to count, and I’ve picked up a few tricks along the way that make a real difference. Let me share what I’ve learned so you don’t have to make the same mistakes I did.
Don’t rush the brown butter. I know it’s tempting to crank up the heat and get it done faster, but medium heat is your friend. High heat will burn the butter before the milk solids have a chance to toast properly. You want those little brown specks—that’s where all the flavor lives. When I first started making brown butter, I was impatient and ended up with bitter, burnt butter twice in a row. Now I pour myself a glass of wine and just stand there stirring. It’s meditative, honestly.
Let the brown butter cool properly. If you add the sugar and egg to hot butter, you’ll end up with scrambled eggs in your cookie dough. Not good. Let the butter cool for at least 10 minutes after browning. It should be warm but not hot—think warm bathwater temperature. If you’re in a hurry, you can speed this up by placing the bowl in the fridge for 5 minutes, but keep an eye on it so it doesn’t solidify.
Measure your pumpkin carefully. Too much pumpkin puree will make the cookies spread into flat, sad discs. Use exactly ½ cup and level it off. If your pumpkin puree looks watery, blot it with a paper towel to remove excess moisture. I learned this after one batch turned into pumpkin pancakes—delicious, but not what I was going for.
Chill the dough if needed. The dough should be soft but scoopable. If it feels too sticky to handle, pop it in the fridge for 15-20 minutes. This is especially helpful if your kitchen is warm or if you’re using a particularly moist pumpkin puree. Chilling also helps the cookies hold their shape better during baking.
Use a cookie scoop for even baking. I cannot stress this enough. Cookies that are different sizes will bake at different rates, and nobody wants a batch where half are overdone and half are underdone. A 1.5-tablespoon scoop gives you the perfect size—about 2 inches across after baking.
Rotate your baking sheet halfway through. Most ovens have hot spots, and rotating the sheet halfway through baking ensures even browning. I usually do this at the 5-minute mark. Just be quick about it so the oven doesn’t lose too much heat.
Underbake slightly for soft cookies. The cookies will continue to bake on the hot baking sheet after you pull them out of the oven. If you wait until they look fully done in the oven, they’ll be overdone by the time they cool. Pull them when the edges are set but the centers still look soft and slightly underdone. That 5-minute rest on the sheet is crucial—it finishes the baking process gently.
Variations & Adaptations
One of the things I love about this recipe is how flexible it is. You can tweak it to fit dietary needs, flavor preferences, or whatever you have in your pantry. Here are some variations I’ve tried and loved.
Gluten-free version: Substitute the all-purpose flour with a 1:1 gluten-free baking flour blend that contains xanthan gum. I’ve tested this with King Arthur’s Measure for Measure blend and the cookies turned out slightly more delicate but still delicious. Add an extra tablespoon of flour if the dough seems too wet—gluten-free flours absorb moisture differently.
Dairy-free version: Use vegan butter sticks (not margarine from a tub) for browning. I’ve had good results with Miyoko’s and Country Crock Plant Butter. Keep in mind that vegan butter browns a little differently—it won’t get as dark as dairy butter, and it may not foam as much. Watch it carefully and remove it from the heat as soon as it starts to smell nutty.
Spice it up: If you love a warm, spicy cookie, add ¼ teaspoon of cloves or allspice to the dough. You can also swap the cinnamon in the coating for pumpkin pie spice for a more complex flavor. I did this for a Thanksgiving gathering and everyone raved about them.
Add-ins: Fold in ½ cup of white chocolate chips, chopped pecans, or dried cranberries after mixing the dough. White chocolate and pumpkin is a classic combo that never disappoints. If you’re adding mix-ins, be gentle when folding so you don’t overwork the dough.
Make them sandwich cookies: Once the cookies are completely cool, spread a thin layer of cream cheese frosting or maple buttercream on the flat side of one cookie and top with another. It’s indulgent, but wow—it’s worth it. I made these for a cookie exchange last year and they were the first ones to disappear.
Freeze the dough: Scoop the dough into balls, roll them in the cinnamon-sugar coating, and place them on a baking sheet in the freezer. Once frozen solid, transfer them to a freezer bag. You can bake them directly from frozen—just add 2-3 minutes to the baking time. This is my favorite trick for having fresh cookies on demand with zero effort.
Serving & Storage Suggestions
These cookies are best enjoyed warm, when the edges are still slightly crisp and the center is soft and pillowy. But honestly, they’re pretty amazing at room temperature too—the flavor actually deepens as they cool. Here’s how to serve and store them for the best experience.
Serving suggestions: I love serving these with a cold glass of milk or a warm cup of chai tea. The spices in the cookies complement the chai beautifully. For a more indulgent treat, warm a cookie in the microwave for 10 seconds and top it with a scoop of vanilla ice cream. It’s basically a deconstructed pumpkin pie sundae, and it’s incredible.
Presentation tips: Arrange the cookies on a rustic wooden board or a simple white platter. Dust them with a little extra cinnamon for a pretty finish. If you’re giving them as gifts, stack them in a clear bag tied with a ribbon and a tag that says “brown butter pumpkin snickerdoodles.” People love the personal touch.
Storage instructions: Store the cookies in an airtight container at room temperature for up to 5 days. Place a piece of bread in the container to keep them soft—the bread will absorb excess moisture and release it slowly, keeping the cookies from drying out. Replace the bread every other day if needed.
Freezer instructions: Baked cookies freeze beautifully for up to 3 months. Let them cool completely, then layer them between sheets of parchment paper in a freezer-safe container. Thaw at room temperature for about 30 minutes, or warm them in a 300°F oven for 5 minutes for that fresh-baked taste.
Reheating tips: To revive day-old cookies, pop them in a 300°F oven for 3-4 minutes. The edges will crisp up and the center will get soft again. You can also microwave a cookie for 10-15 seconds, but be careful—too long and it’ll get tough. I’ve definitely microwaved one too long and ended up with a cookie that could double as a hockey puck.
Flavor development: These cookies actually taste better the next day. The spices meld together and the brown butter flavor becomes more pronounced. So if you can resist eating them all right away, you’re in for a treat. I usually try to hide a few from myself just to enjoy them the next morning with my coffee.
Nutritional Information & Benefits
Let’s be real—these are cookies, not health food. But that doesn’t mean they can’t have some redeeming qualities. Here’s a rough breakdown of what you’re getting in each cookie (based on a batch of 24 cookies).
Estimated nutrition per cookie: Calories: 165 | Total Fat: 8g | Saturated Fat: 5g | Cholesterol: 28mg | Sodium: 95mg | Total Carbohydrates: 22g | Dietary Fiber: 1g | Sugars: 14g | Protein: 2g
Health highlights: Pumpkin puree is packed with vitamin A and fiber, which is good for your immune system and digestion. Cinnamon has anti-inflammatory properties and can help regulate blood sugar levels. Brown butter, while indulgent, contains butyrate, a fatty acid that supports gut health. So yeah, there’s some good stuff in there—just don’t eat the whole batch in one sitting. I mean, you could, but your stomach might not thank you.
Dietary considerations: This recipe contains dairy (butter) and gluten (flour) and eggs. For a dairy-free version, use vegan butter as mentioned above. For gluten-free, use a 1:1 gluten-free flour blend. For egg-free, I haven’t tested this with an egg substitute, but a flax egg (1 tablespoon ground flaxseed mixed with 3 tablespoons water) might work—just note that the texture will be slightly denser.
Allergen notes: This recipe contains wheat, dairy, and eggs. If you’re serving these at a gathering where allergies are a concern, make sure to label them clearly. Nobody wants an unexpected allergic reaction ruining their cookie experience.
My personal philosophy? Food should be enjoyed without guilt. These cookies are a treat, and treats are meant to be savored. One cookie with a cup of tea is a lovely way to end a busy day. Five cookies in a row? That’s a story for another time, and I’m not here to judge.
Frequently Asked Questions
Can I use pumpkin pie spice instead of individual spices?
Absolutely! Substitute the cinnamon, nutmeg, and ginger with 2½ teaspoons of pumpkin pie spice. You’ll still want to use the extra cinnamon for the coating, though—that’s what makes it a snickerdoodle.
Why did my cookies spread too much?
This usually happens for one of three reasons: too much pumpkin puree, butter that was too warm, or not enough flour. Make sure you’re measuring your pumpkin carefully and letting the brown butter cool properly. If your dough feels very soft, chill it for 15-20 minutes before baking.
Can I make these cookies without cream of tartar?
Cream of tartar is what gives snickerdoodles their signature tangy flavor and helps with the texture. If you don’t have it, you can substitute with 1 teaspoon of lemon juice or white vinegar mixed with the wet ingredients, but the flavor won’t be quite the same. Honestly, it’s worth buying cream of tartar—it’s cheap and lasts forever.
How do I know when the brown butter is done?
Watch for three signs: the color turns from yellow to deep amber, you see brown specks forming at the bottom of the pan, and it smells nutty and toasty. The whole process takes about 5-7 minutes over medium heat. When you see those specks and smell that nutty aroma, pull it off the heat immediately.
Can I use canned pumpkin pie filling instead of pure pumpkin puree?
No, please don’t. Pumpkin pie filling has added sugar, spices, and thickeners that will throw off the balance of the recipe completely. Stick with 100% pure pumpkin puree. If you accidentally bought pie filling, save it for making a quick microwave mug cake or something else that’s meant to be sweet.
Conclusion
These brown butter pumpkin snickerdoodle cookies are the kind of recipe that becomes a tradition. They’re quick enough for a weeknight craving, special enough for holiday cookie plates, and forgiving enough for beginner bakers. The combination of nutty brown butter, warm spices, and soft pumpkin texture is just unbeatable—especially when you factor in that crackly cinnamon-sugar coating.
I love that this recipe lets me enjoy the flavors of fall without spending hours in the kitchen. It’s the kind of baking that feels like self-care, not a chore. And honestly? Seeing someone take that first bite and close their eyes in happiness never gets old. My sister now asks for these cookies every year when October rolls around, and I’m happy to oblige—even if I do remind her that she used to hate pumpkin desserts. She just rolls her eyes and reaches for another cookie.
I’d love to hear how these turn out for you! Did you try any variations? Did you manage to hide some from your family for the next day? Drop a comment below and let me know. And if you’re looking for more easy fall treats, you might enjoy my cinnamon sugar pumpkin muffins or my no-chill classic snickerdoodle cookies. Happy baking, friends—your kitchen is about to smell amazing.
PrintBest Easy Brown Butter Pumpkin Snickerdoodle Cookies
These brown butter pumpkin snickerdoodle cookies are soft, pillowy, and coated in cinnamon-sugar. They come together in under 30 minutes with simple ingredients, making them the perfect fall treat that even pumpkin skeptics will love.
- Prep Time: 15 minutes
- Cook Time: 12 minutes
- Total Time: 27 minutes
- Yield: 24 cookies 1x
- Category: Dessert
- Cuisine: American
Ingredients
- 1 cup (2 sticks) unsalted butter
- 1 cup granulated sugar (for dough)
- ⅓ cup granulated sugar (for coating)
- ½ cup packed light brown sugar
- ½ cup pumpkin puree (not pumpkin pie filling)
- 1 large egg
- 1 teaspoon vanilla extract
- 2 cups all-purpose flour
- 2 teaspoons cream of tartar
- 1 teaspoon baking soda
- 2 teaspoons ground cinnamon (for dough)
- 2 tablespoons ground cinnamon (for coating)
- ½ teaspoon ground nutmeg
- ¼ teaspoon ground ginger (optional)
- ½ teaspoon salt
Instructions
- Brown the butter: Cut 1 cup (2 sticks) unsalted butter into tablespoon-sized pieces and place in a light-colored saucepan over medium heat. Stir constantly with a whisk or wooden spoon. After about 5-7 minutes, the butter will turn deep amber and smell nutty. Remove from heat immediately and pour into a heatproof bowl. Let cool for 10-15 minutes.
- Preheat oven to 350°F (175°C). Line two baking sheets with parchment paper or silicone mats.
- Mix the wet ingredients: In a large bowl, combine the cooled brown butter, 1 cup granulated sugar, and ½ cup packed light brown sugar. Whisk vigorously for about 1 minute until smooth and slightly thickened. Add ½ cup pumpkin puree, 1 large egg, and 1 teaspoon vanilla extract. Whisk until well combined.
- Combine the dry ingredients: In a separate medium bowl, whisk together 2 cups all-purpose flour, 2 teaspoons cream of tartar, 1 teaspoon baking soda, 2 teaspoons ground cinnamon, ½ teaspoon ground nutmeg, ¼ teaspoon ground ginger (if using), and ½ teaspoon salt.
- Make the dough: Gradually add the dry ingredients to the wet ingredients, stirring with a wooden spoon or silicone spatula until just combined. Do not overmix. The dough will be soft and slightly sticky.
- Prepare the coating: In a small bowl, mix together ⅓ cup granulated sugar and 2 tablespoons ground cinnamon.
- Scoop and roll: Using a cookie scoop or tablespoon, scoop rounded balls of dough (about 1.5 tablespoons each). Roll each ball between your palms to smooth, then roll in the cinnamon-sugar mixture until fully coated. Place on prepared baking sheets, spacing about 2 inches apart.
- Bake: Bake one sheet at a time for 10-12 minutes. Cookies should look puffed and slightly cracked on top, with edges just starting to turn golden. Centers will look soft and slightly underdone.
- Cool: Let cookies cool on the baking sheet for 5 minutes, then transfer to a wire cooling rack to cool completely.
- Repeat: Scoop, roll, and bake remaining dough. If dough becomes too soft, refrigerate for 10 minutes before handling.
Notes
Don’t rush the brown butter—medium heat is key. Let the brown butter cool for at least 10 minutes before adding egg to avoid scrambling. Measure pumpkin carefully; too much will cause spreading. If dough is too sticky, chill for 15-20 minutes. Underbake slightly for soft cookies; they continue to bake on the hot sheet. Cookies taste even better the next day.
Nutrition
- Serving Size: 1 cookie
- Calories: 165
- Sugar: 14
- Sodium: 95
- Fat: 8
- Saturated Fat: 5
- Carbohydrates: 22
- Fiber: 1
- Protein: 2
Keywords: pumpkin cookies, snickerdoodle, brown butter, fall cookies, easy cookie recipe, pumpkin dessert


