Love this? Save it for later!
Share the inspiration with your friends
There used to be a tiny Belgian café tucked away on a side street in the neighborhood where I lived during my first year of graduate school. It was called something unpronounceable—I still can’t say it right—and they made a Biscoff cheesecake that I think about more than I’d like to admit. When they closed suddenly, two winters ago, I actually stood outside the locked door for a solid minute, staring at the empty pastry case. Pathetic? Maybe. But you know that feeling when something just hits right, and you know you’ll never find it again?
After twelve tries—twelve, let me tell you, some of them were real disasters—I finally got it. The first attempt was too dense, like eating a brick of cream cheese with cookie crumbs on top. The third one wouldn’t set at all, and I ate it with a spoon standing over the sink at midnight. But this version? This is the one. It’s the no-bake Biscoff cheesecake that brings back that café feeling, minus the fancy tablecloths and the awkward waitstaff.
Honestly, I almost gave up after attempt number seven. I had forgotten to soften the cream cheese properly, and the whole thing turned out lumpy and sad. My roommate at the time took one bite, made a face, and said, “Maybe just buy one?” But I’m stubborn that way. I kept tweaking—less butter in the crust, more cookie butter in the filling, a longer chill time—until the texture was exactly right. That first bite of the final version? I closed my eyes. It was like walking back into that café, ordering my usual slice, and knowing everything was going to be okay.
Why You’ll Love This Recipe
This no-bake Biscoff cheesecake isn’t just another dessert recipe floating around the internet. It’s the one I’ve tested and retested until every single element works together perfectly. Let me break down why this one is different.
- No Oven Required: This is a true no-bake situation. No water baths, no worrying about cracks, no hovering over the oven door. Just mix, chill, and enjoy.
- Simple Ingredients: You probably already have most of these in your pantry. Cream cheese, heavy cream, Biscoff cookies, butter, sugar, and that magical jar of cookie butter.
- Perfect for Cozy Nights: This is the dessert you make when you’re curled up on the couch, it’s raining outside, and you need something that feels like a hug in food form.
- Crowd-Pleaser: I’ve brought this to three different gatherings now, and every single time, someone asks for the recipe. Kids love it. Adults love it. It’s universal.
- Unbelievably Delicious: The combination of the crunchy cookie crust, the silky smooth cheesecake filling, and that crumble on top? It’s next-level comfort food, I promise you.
What makes this recipe different from the rest is the technique. I blend the cream cheese and cookie butter together until they’re completely smooth before adding anything else. It sounds small, but it makes a huge difference in the final texture. No lumps, no graininess—just pure, velvety goodness. And the ratio of crust to filling? I spent way too long figuring that out, but it’s perfect now.
This is the kind of dessert that makes you close your eyes after the first bite. It’s comfort food reimagined—easier than a traditional cheesecake, but with the same soul-soothing satisfaction. Perfect for impressing guests without stress, or turning a simple evening into something memorable.
What Ingredients You Will Need
This recipe uses simple, wholesome ingredients to deliver bold flavor and satisfying texture without the fuss. Most of these are pantry staples, and the ones that aren’t are worth picking up for how much they transform the final dish.
For the Crust
- 2 cups (about 200g) Biscoff cookies, crushed into fine crumbs (I use the whole cookie, filling included)
- 6 tablespoons (85g) unsalted butter, melted
- 2 tablespoons (25g) granulated sugar (optional, but I find it helps the crust hold together better)
For the Cheesecake Filling
- 16 oz (450g) full-fat cream cheese, softened to room temperature (I recommend Philadelphia for best texture)
- 1 cup (240ml) heavy whipping cream, cold
- 1/2 cup (100g) granulated sugar
- 1 teaspoon vanilla extract
- 1/2 cup (130g) Biscoff cookie butter (the spread, not the cookies)
- 1/4 cup (60ml) sour cream (adds richness and helps with the silky texture)
For the Topping
- 1/2 cup (about 50g) Biscoff cookies, crushed into coarse crumbs
- 2 tablespoons (30g) Biscoff cookie butter, melted (for drizzling)
- Optional: whipped cream for serving
A few notes on ingredients: Make sure your cream cheese is truly at room temperature. I leave mine out for at least an hour before starting. Cold cream cheese will give you lumps, and nobody wants that. For the cookie butter, I’ve tried both the smooth and crunchy versions—smooth works better for the filling, but crunchy is fine if that’s what you have. Just know you might get tiny cookie bits in the filling, which isn’t a bad thing honestly.
If you’re looking for substitutions, you can use a dairy-free cream cheese alternative, but I haven’t tested it personally so I can’t guarantee the texture. For a gluten-free version, use gluten-free Biscoff-style cookies—they do exist, and they work just as well.
Equipment Needed
You don’t need a lot of fancy equipment for this recipe, which is part of why I love it so much. Here’s what you’ll need:
- 9-inch springform pan: This is essential for easy removal. If you don’t have one, you can use a deep pie dish, but the slices won’t be as clean.
- Electric hand mixer or stand mixer: You could technically do this by hand, but your arm will thank you for using a mixer. I’ve done it both ways, and the mixer gives a smoother result.
- Large mixing bowls: One for the crust, one for the filling.
- Food processor or rolling pin: For crushing the cookies. A food processor gives the most consistent crumbs, but a rolling pin and a zip-top bag work in a pinch.
- Rubber spatula: For scraping down the sides of the bowl and spreading the filling evenly.
- Measuring cups and spoons: Precision matters in cheesecake, even no-bake ones.
- Plastic wrap: For covering the cheesecake while it chills.
If you’re on a budget, skip the springform pan and use a regular 9-inch pie dish. The presentation won’t be as tall and elegant, but the taste is exactly the same. I’ve made this in a glass pie dish before, and it worked beautifully.
Preparation Method
Let me walk you through this step by step. I’ve made this recipe so many times that I could do it in my sleep, but I’ll try to include all the little details I’ve learned along the way.
Step 1: Make the Crust
Start by crushing your Biscoff cookies. If you’re using a food processor, pulse them until they become fine crumbs. If you’re doing it by hand, put the cookies in a zip-top bag and go at them with a rolling pin. You want a consistent texture—no big chunks. I once left some bigger pieces in, and the crust didn’t hold together well. Learn from my mistake.
Transfer the crumbs to a medium bowl. Pour in the melted butter and sugar, if using, and stir with a fork until everything is evenly moistened. It should look like wet sand. Press this mixture firmly into the bottom of your springform pan. I use the bottom of a measuring cup to really pack it down. Make sure the edges are even. Pop this in the fridge while you make the filling—at least 15 minutes to let it set.
Step 2: Whip the Cream
In a large mixing bowl, pour in the cold heavy cream. Using your electric mixer, whip the cream on medium-high speed until stiff peaks form. This takes about 3-4 minutes. Be careful not to over-whip, or you’ll end up with butter. Stop when the cream holds its shape and looks billowy. Set this aside in the fridge while you work on the cream cheese mixture.
Step 3: Make the Filling Base
In another large bowl, beat the softened cream cheese with the sugar and vanilla extract until smooth and creamy. This is where patience matters—scrape down the sides of the bowl at least twice to make sure everything is incorporated. Add the cookie butter and sour cream, and beat again until fully combined. The mixture should be completely smooth, with no streaks or lumps.
Step 4: Fold Everything Together
This is the most important step. Take your whipped cream out of the fridge. Using a rubber spatula, gently fold about a third of the whipped cream into the cream cheese mixture. Don’t stir—fold. It’s a gentle motion, like you’re turning over pages in a book. Once that’s incorporated, add the rest of the whipped cream and fold until just combined. Over-mixing at this stage will deflate the cream and make your cheesecake dense instead of light and airy.
Step 5: Assemble and Chill
Take the crust out of the fridge. Pour the filling over the crust and spread it evenly with your spatula. Give the pan a gentle tap on the counter to release any air bubbles. Cover the pan with plastic wrap and refrigerate for at least 6 hours, but overnight is better. I know it’s hard to wait, but the texture really benefits from a full chill. The first time I made this, I only chilled it for 4 hours, and it was still a bit soft in the center.
Step 6: Add the Topping
Once the cheesecake is fully set, it’s time for the fun part. Crush the remaining Biscoff cookies into coarse crumbs—you want some texture here, not fine powder. Sprinkle these evenly over the top of the cheesecake. Melt the extra cookie butter in the microwave for about 20 seconds, then drizzle it over the crumbs. I use a spoon for this, just letting it fall in random patterns. Return the cheesecake to the fridge for another 30 minutes to let the topping set.
Cooking Tips & Techniques
I’ve learned a few things the hard way, so let me save you some trouble. Here are my best tips for getting this no-bake Biscoff cheesecake right every single time.
Temperature matters. Your cream cheese needs to be at room temperature. I cannot stress this enough. I once tried to speed things up by microwaving the cream cheese, and it partially melted, creating a grainy texture that never smoothed out. Just let it sit on the counter for an hour. Trust me.
Don’t skip the sour cream. I know it seems like an extra step, but the sour cream adds a tanginess that balances the sweetness of the cookie butter. It also helps create that silky, melt-in-your-mouth texture. I tried making this without it once, and the filling was noticeably less creamy.
Chill time is non-negotiable. Six hours is the absolute minimum. Eight to twelve hours is ideal. If you try to rush this, you’ll end up with a cheesecake that slides apart when you cut it. I learned this lesson when I had guests coming over and only gave it five hours. The first slice was a mess. Delicious, but a mess.
Use a hot knife for clean slices. When you’re ready to serve, run your knife under hot water, wipe it dry, and then make your cut. Wipe the blade clean between each slice. This gives you those beautiful, Instagram-worthy pieces.
Make it ahead of time. This cheesecake actually tastes better after a day or two in the fridge. The flavors meld together, and the texture becomes even creamier. So if you’re planning a dinner party, make this the day before and thank me later.
Variations & Adaptations
One of the best things about this recipe is how easy it is to adapt. Here are some variations I’ve tried and loved.
Chocolate Biscoff Cheesecake
Add 1/4 cup of melted dark chocolate to the filling mixture along with the cookie butter. The chocolate and Biscoff flavors are surprisingly good together. I tried this on a whim one night when I was craving something extra indulgent, and it’s now my second favorite version.
Vegan Version
Use dairy-free cream cheese and coconut cream instead of heavy cream. The texture won’t be exactly the same, but it’s still delicious. I made this for a friend who’s vegan, and she said it was the best cheesecake she’d had in years. Just make sure your Biscoff cookies are vegan-friendly—most are, but check the label.
Mini Cheesecakes
Instead of using a springform pan, press the crust into a muffin tin lined with cupcake liners. Fill each cup with the cheesecake mixture and chill as directed. These are perfect for parties or when you want individual portions. Plus, they’re easier to serve—no slicing required.
Fall Spice Version
Add 1 teaspoon of pumpkin pie spice to the filling mixture. The warm spices complement the Biscoff flavor beautifully. I made this for Thanksgiving last year, and it was gone before the pumpkin pie even made it to the table.
Serving & Storage Suggestions
This cheesecake is best served cold, straight from the fridge. I like to let it sit at room temperature for about 5 minutes before slicing—just enough to take the chill off without making it soft.
For presentation, I serve each slice with a dollop of whipped cream and an extra drizzle of melted cookie butter. A few whole Biscoff cookies on the side make for a pretty plate, too. If you’re feeling fancy, a sprinkle of flaky sea salt on top adds a lovely contrast to the sweetness.
Storage is simple. Keep the cheesecake covered in the refrigerator for up to 5 days. I use the plastic wrap directly on the surface of the cheesecake to prevent it from drying out. You can also freeze this cheesecake for up to 2 months. Wrap it tightly in plastic wrap, then in aluminum foil. Thaw in the refrigerator overnight before serving. The texture holds up surprisingly well after freezing—I’ve done it twice now, and nobody could tell the difference.
One thing I’ve noticed: the flavors actually deepen after a day in the fridge. So if you can resist the urge to eat it immediately, you’ll be rewarded with an even better cheesecake the next day.
Nutritional Information & Benefits
Let’s be honest—this is not health food. But it’s made with real ingredients, and there are some redeeming qualities if you look closely. Here’s the estimated nutritional breakdown per slice (based on 12 servings):
- Calories: 420
- Fat: 28g
- Carbohydrates: 38g
- Protein: 6g
- Sugar: 24g
The cream cheese provides a good amount of calcium and protein, and the Biscoff cookies contain some fiber from the wheat flour. The cookie butter is made from crushed speculoos cookies, which have warming spices like cinnamon, nutmeg, and cloves—all of which have anti-inflammatory properties. So while this isn’t something you’d eat every day, it’s a treat made with real, recognizable ingredients.
For those with dietary restrictions, this recipe contains gluten, dairy, and eggs (in the cookies). I’ve included substitution suggestions above for vegan and gluten-free versions. As always, check your ingredient labels if you have specific allergies.
Conclusion
This no-bake Biscoff cheesecake has become my go-to dessert for almost every occasion. It’s the recipe I bring to potlucks, the one I make when I need comfort, and the one I turn to when I want to impress someone without spending hours in the kitchen. It’s simple enough for a Tuesday night but special enough for a celebration.
I love that this recipe brings back that café memory every time I make it. And I love that I can share that feeling with others. There’s something special about watching someone take their first bite of this cheesecake—the way their eyes widen a little, the way they pause before taking a second bite. That’s why I keep making it.
Now I want to hear from you. Have you tried making this? Did you add your own twist? Drop a comment below and let me know how it turned out. And if you loved it, share this recipe with someone who needs a little comfort today. Happy baking, friends!
Frequently Asked Questions
Can I use low-fat cream cheese?
You can, but the texture won’t be as rich and creamy. Full-fat cream cheese gives the best results for no-bake cheesecakes because it sets up firmer and has a better mouthfeel. If you do use low-fat, expect a slightly softer final product.
How do I know when the cheesecake is fully set?
The center should feel firm to the touch, not jiggly. If you gently shake the pan, the edges should be solid and the center should have only a slight wobble. After 6 hours in the fridge, it should be ready. After 8-12 hours, it’s perfect.
Can I use a different cookie for the crust?
Absolutely. Graham crackers, digestive biscuits, or even chocolate wafer cookies would work. Just keep in mind that different cookies have different sweetness levels and textures, so you might need to adjust the butter amount slightly. Start with the same ratio and add more butter if the crust seems too dry.
Why did my cheesecake turn out lumpy?
This usually happens when the cream cheese isn’t fully softened before mixing. Cold cream cheese doesn’t blend smoothly, leaving small lumps throughout the filling. Next time, let your cream cheese sit at room temperature for at least an hour before starting. If you’re in a hurry, cut it into small cubes to help it soften faster.
Can I make this without a springform pan?
Yes! Use a deep 9-inch pie dish or a 9×9 square baking dish. The presentation won’t be as tall, and you won’t get those clean edges, but the taste is exactly the same. If using a square dish, you can cut the cheesecake into bars instead of slices.
PrintEasy No-Bake Biscoff Cheesecake with Cookie Crumble
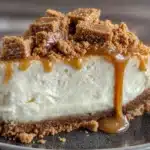
A silky, no-bake cheesecake with a crunchy Biscoff cookie crust, creamy cookie butter filling, and a crumble topping. Perfect for cozy nights and crowd-pleasing gatherings.
- Prep Time: 20 minutes
- Cook Time: 0 minutes
- Total Time: 6 hours 20 minutes (includes chilling)
- Yield: 12 servings 1x
- Category: Dessert
- Cuisine: Belgian-inspired
Ingredients
- 2 cups (about 200g) Biscoff cookies, crushed into fine crumbs
- 6 tablespoons (85g) unsalted butter, melted
- 2 tablespoons (25g) granulated sugar (optional)
- 16 oz (450g) full-fat cream cheese, softened to room temperature
- 1 cup (240ml) heavy whipping cream, cold
- 1/2 cup (100g) granulated sugar
- 1 teaspoon vanilla extract
- 1/2 cup (130g) Biscoff cookie butter (the spread)
- 1/4 cup (60ml) sour cream
- 1/2 cup (about 50g) Biscoff cookies, crushed into coarse crumbs (for topping)
- 2 tablespoons (30g) Biscoff cookie butter, melted (for drizzling)
- Optional: whipped cream for serving
Instructions
- Crush Biscoff cookies into fine crumbs using a food processor or rolling pin. Transfer to a medium bowl, add melted butter and sugar (if using), and stir until moistened like wet sand. Press firmly into the bottom of a 9-inch springform pan. Refrigerate for at least 15 minutes.
- In a large bowl, whip cold heavy cream with an electric mixer on medium-high speed until stiff peaks form (about 3-4 minutes). Refrigerate until needed.
- In another large bowl, beat softened cream cheese with sugar and vanilla extract until smooth and creamy. Scrape down sides. Add cookie butter and sour cream, beat until fully combined and smooth.
- Gently fold about one-third of the whipped cream into the cream cheese mixture using a rubber spatula. Fold in the remaining whipped cream until just combined. Do not over-mix.
- Pour the filling over the chilled crust and spread evenly. Tap the pan gently on the counter to release air bubbles. Cover with plastic wrap and refrigerate for at least 6 hours, preferably overnight.
- Once set, crush remaining Biscoff cookies into coarse crumbs and sprinkle over the cheesecake. Melt extra cookie butter (about 20 seconds in microwave) and drizzle over the crumbs. Return to fridge for 30 minutes to set the topping.
- Serve cold, optionally with whipped cream. For clean slices, use a hot knife wiped clean between cuts.
Notes
Cream cheese must be at room temperature for smooth texture. Chill time is essential—at least 6 hours, preferably overnight. For clean slices, use a hot knife. Cheesecake can be stored in the refrigerator for up to 5 days or frozen for up to 2 months.
Nutrition
- Serving Size: 1 slice
- Calories: 420
- Sugar: 24
- Sodium: 320
- Fat: 28
- Saturated Fat: 16
- Carbohydrates: 38
- Fiber: 1
- Protein: 6
Keywords: no-bake cheesecake, Biscoff cheesecake, cookie butter cheesecake, easy dessert, no-bake dessert, cheesecake recipe


