Love this? Save it for later!
Share the inspiration with your friends
I was standing in the Halloween aisle at Target last October, staring at a display of those little plastic flower pots, when a kid zoomed past me in a costume that was basically just a lot of orange tulle. And honestly? I almost cried. Not because of the costume, though it was something. It was the dirt cups. Those little pudding cups with crushed Oreos on top and gummy worms poking out. They were everywhere when I was in third grade, at every single classroom party and Halloween gathering. My mom used to make them for my brother and me, and she always let me smash the cookies with a rolling pin while she stirred the pudding. She passed away a few years ago, and I hadn’t thought about those dirt cups in maybe twenty years. But there I was, in the middle of a fluorescent-lit aisle, missing her so much I could almost taste the chocolate.
That night, I went home and decided I had to make them. But here’s the thing — I don’t eat like I did in third grade anymore. I mean, my body would stage a full rebellion if I downed a cup of full-sugar pudding and a pile of Oreos. So I started messing around in my kitchen, trying to figure out how to get that same nostalgic, creamy, chocolatey experience without the sugar crash and the heavy feeling afterward. Maybe you’ve been there too — wanting to recreate a childhood favorite but not wanting to undo all your healthy habits. It took me three tries to get it right. The first batch was too runny. The second was okay but the texture was off. The third one though? That was the one. It had that same rich, creamy pudding, the same satisfying crunch on top, and it actually made me feel good after eating it, not like I needed a nap. That’s why I keep making these lighter chocolate dirt cups, and why I think you’re going to love them too.
Why You’ll Love This Recipe
Let me tell you why these lighter chocolate dirt cups are different from every other version you’ve seen floating around Pinterest. I’ve tested this recipe about six times now, tweaking the ratios and trying different ingredient combos until I got it just right. It’s not just another healthy-ish dessert that tastes like cardboard and regret. It’s actually, genuinely, ridiculously good.
- Quick & Easy: These come together in about 15 minutes of active work. The hardest part is waiting for the pudding to chill, and honestly, that’s just a good excuse to put your feet up.
- Simple Ingredients: You probably have most of this stuff in your kitchen right now. No weird superfood powders or expensive specialty items.
- Perfect for Halloween: Obviously, they’re a hit at Halloween parties, but I’ve also made them for summer barbecues and even a book club meeting. They just work.
- Crowd-Pleaser: I brought these to a neighborhood potluck and three different people asked for the recipe. One of them was a guy who told me he “doesn’t do healthy desserts.” He ate two.
- Unbelievably Delicious: The texture is what gets me every time. It’s silky and rich from the avocado (yes, avocado, and no, you cannot taste it), with that perfect crunch on top. It’s comfort food that doesn’t weigh you down.
What makes this version special is the technique. Instead of using heavy cream and loads of sugar, I blend avocado with cocoa powder and a touch of maple syrup. It sounds weird, I know. But the avocado gives it this incredible creamy texture that regular pudding just can’t match. And the flavor? It’s deep, dark, and satisfying. This isn’t just another version of dirt cups. It’s the version that makes you close your eyes after the first bite and forget you’re eating something that’s actually good for you.
What Ingredients You Will Need
This recipe uses simple, wholesome ingredients that work together to create that nostalgic chocolate pudding experience without the junk. Most of these are pantry staples or easy to find at any grocery store.
- Ripe avocados (2 medium): This is the secret to the creamy texture. Make sure they’re really ripe — you want them soft to the touch but not mushy or brown inside. I’ve found that Hass avocados work best for this.
- Unsweetened cocoa powder (1/3 cup): I prefer using Dutch-process cocoa for a richer, smoother flavor, but regular unsweetened cocoa works fine too. My go-to is the Rodelle brand — it’s dark and intense without being bitter.
- Maple syrup (1/4 cup): This adds just the right amount of sweetness. You can use honey or agave instead, but maple syrup gives it a subtle warmth that pairs beautifully with the chocolate.
- Unsweetened almond milk (1/2 cup): Any milk works here — dairy, oat, coconut, whatever you have. I use almond milk because it’s what I always have on hand.
- Vanilla extract (1 teaspoon): Pure vanilla extract makes a difference here. Skip the imitation stuff if you can.
- Pinch of salt: Just a tiny bit to balance the sweetness and bring out the chocolate flavor.
- Chocolate protein powder (2 tablespoons, optional): This is totally optional, but I like to add it for an extra protein boost. It also helps thicken the pudding. If you skip it, the pudding will still be delicious, just slightly thinner.
- For the “dirt” topping:
- Chocolate graham crackers (4 sheets): These have less sugar than regular chocolate sandwich cookies. Crush them up until they look like dirt. You can also use chocolate wafer cookies or even crushed nuts for a low-carb option.
- Optional: crushed freeze-dried raspberries: This is my little twist. It adds a pop of color and a hint of tartness that cuts through the richness. Totally optional but highly recommended.
- For decoration:
- Gummy worms (sugar-free if you prefer): The classic touch. I use the SmartSweets brand gummy worms because they have less sugar and no artificial junk.
- Fresh mint leaves or edible flowers: If you want to get fancy for a party.
Equipment Needed
You don’t need any fancy equipment for this recipe, which is part of why I love it. Here’s what you’ll need:
- Food processor or high-speed blender: This is essential for getting that silky smooth texture. I use my KitchenAid food processor, but a Vitamix or NutriBullet works great too. If you only have a regular blender, just make sure to scrape down the sides a few times.
- Small bowls: For crushing the graham crackers and holding your toppings.
- Measuring cups and spoons: For accuracy. I’ve made this recipe enough times to eyeball it now, but measuring helps when you’re starting out.
- Spatula: A silicone spatula is your best friend for scraping every last bit of pudding out of the food processor.
- Small cups or jars: I use 4-ounce glass jars because they’re cute and reusable, but any small cup works. Shot glasses, mason jars, even paper cups for a party.
- Ziploc bag or rolling pin: For crushing the graham crackers. You can also just use your hands if you’re feeling primal about it.
Preparation Method
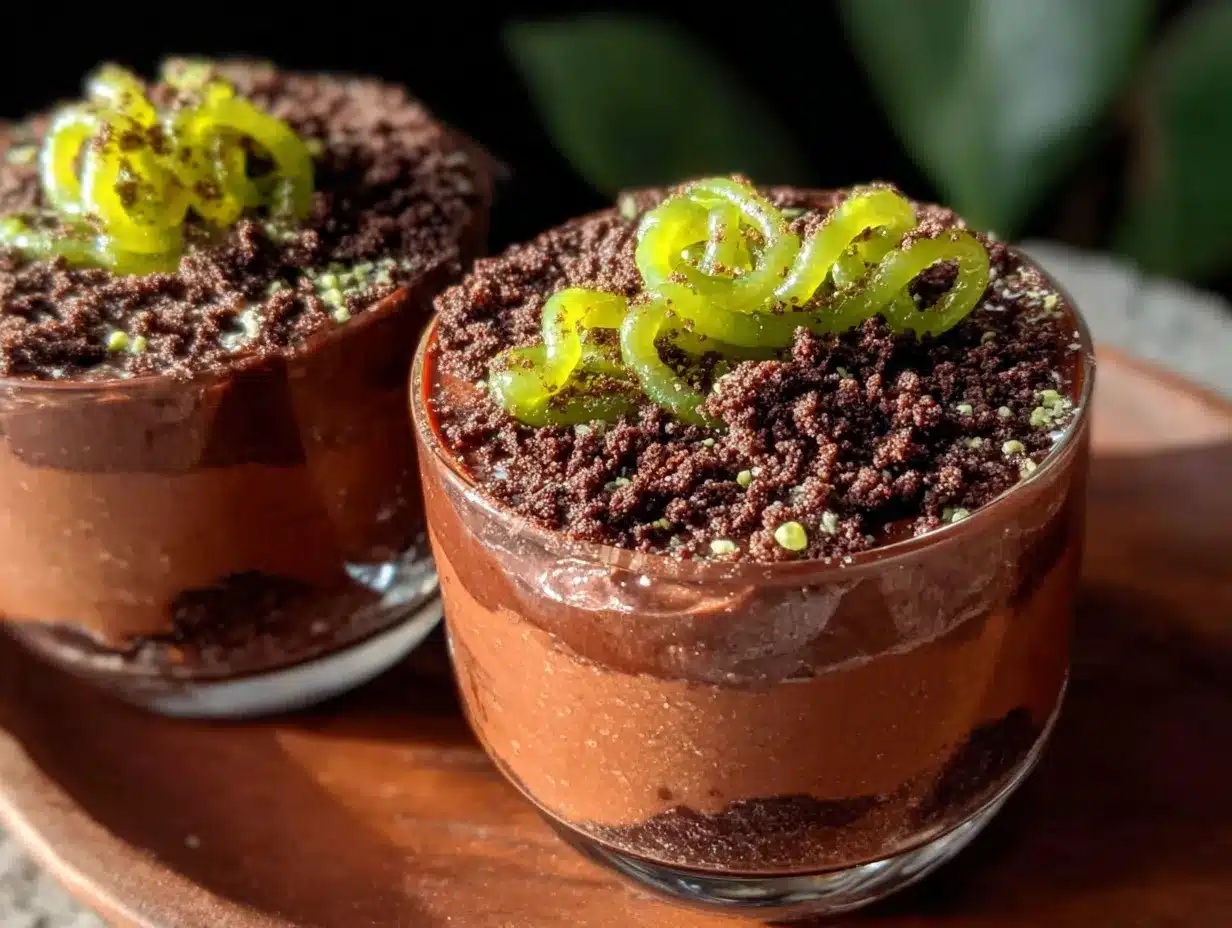
Alright, let’s make these lighter chocolate dirt cups. I’ll walk you through every step so you don’t end up with a mess like I did on my first attempt.
- Start by crushing the graham crackers. Put the chocolate graham crackers in a ziploc bag and seal it up. Use a rolling pin or even a heavy pan to crush them into fine crumbs. You want them to look like actual dirt — some bigger pieces are fine, but mostly you want a consistent texture. Set this aside. If you’re using the freeze-dried raspberries, crush those separately in a small bowl.
- Cut the avocados in half and remove the pits. Scoop the flesh into your food processor or blender. Make sure you get all the green bits — don’t leave any of that dark stuff near the skin. I learned this the hard way when my first batch had weird brown flecks in it.
- Add the cocoa powder, maple syrup, almond milk, vanilla extract, and salt. If you’re using the protein powder, add it now too. Put the lid on and blend until everything is completely smooth. This usually takes about 60 to 90 seconds. Stop and scrape down the sides with your spatula halfway through. The mixture should look like thick, glossy pudding. If it’s too thick, add another tablespoon of almond milk and blend again.
- Taste the pudding. This is the fun part. Dip a clean spoon in and taste it. Is it sweet enough? Add a little more maple syrup if you want. Is the chocolate flavor strong enough? Add another teaspoon of cocoa powder. This is your recipe now, so adjust it to your liking. I usually end up adding an extra splash of vanilla because I’m obsessed with it.
- Divide the pudding among your cups. Use your spatula to scrape every last bit out of the food processor. Fill each cup about three-quarters full. Tap the cups gently on the counter to settle the pudding and get rid of any air bubbles.
- Chill the cups in the refrigerator. This is the hard part — you have to wait. Cover the cups with plastic wrap or a lid and refrigerate for at least 2 hours. The pudding will thicken up as it chills. I know it’s tempting to skip this step, but don’t. The texture really changes and becomes so much better after it’s cold.
- Add the “dirt” topping. Once the pudding is set, sprinkle the crushed graham crackers on top. I like to add a generous layer so every bite has some crunch. If you’re using the crushed raspberries, sprinkle those on top too for a pop of color.
- Add the gummy worms. Poke a couple of gummy worms into each cup so they look like they’re crawling out of the dirt. This is where the fun really happens. I always make sure one worm is fully buried and one is peeking out.
- Serve immediately or keep chilled. These are best served cold. If you’re making them for a party, you can assemble everything up to the topping step a day ahead, then add the dirt and worms right before serving.
One thing I want to mention — the pudding will look a little darker right after blending, and it will lighten slightly as it chills. That’s totally normal. Also, if you notice any small lumps in your pudding, just blend it a little longer. The texture should be completely smooth, like a really good chocolate mousse.
Cooking Tips & Techniques
I’ve made this recipe enough times to learn a few things the hard way. Here are my best tips so you don’t have to make the same mistakes I did.
Use really ripe avocados. This is non-negotiable. If your avocados are even slightly underripe, you’ll end up with a grainy texture and a weird aftertaste. The avocados should yield to gentle pressure when you squeeze them, but they shouldn’t feel mushy. If they have dark spots inside, just scoop those out before blending.
Don’t over-blend. I know I said to blend until smooth, but if you blend for too long, especially in a high-speed blender, the mixture can get warm and the texture can become almost gummy. Blend just until it’s smooth and creamy, then stop. About 60 seconds is usually perfect.
Chill time matters. I made the mistake of serving these after only an hour of chilling once, and the pudding was still too soft. The texture really needs that full 2 hours to set up properly. If you’re in a rush, you can pop them in the freezer for 30 minutes, but watch them carefully so they don’t freeze solid.
Crush the graham crackers just before serving. If you add the “dirt” too early, it will get soggy from the moisture in the pudding. I learned this when I made a batch the night before a party and the topping was basically paste by morning. Keep the crumbs in a sealed bag and sprinkle them on right before you serve.
Make it ahead for parties. This is actually a great make-ahead dessert. Prepare the pudding and fill the cups up to 2 days in advance. Keep them covered in the fridge. Then just add the topping and worms right before serving. It saves so much stress on party day.
Texture troubleshooting. If your pudding turns out too thick, add a splash more almond milk and blend again. If it’s too thin, add another tablespoon of cocoa powder or a little more protein powder. The great thing about this recipe is that it’s very forgiving.
Variations & Adaptations
One of the best things about this recipe is how easy it is to change up. Here are some of my favorite variations.
Vegan Version: This recipe is already vegan if you use maple syrup and plant-based milk. Just make sure your chocolate graham crackers are vegan-friendly. Some brands use honey, so check the label. The Nabisco chocolate graham crackers are accidentally vegan, which is a win.
Nut-Free Option: Use oat milk or coconut milk instead of almond milk. The texture will be slightly different but still delicious. Coconut milk actually adds a nice richness that works really well with the chocolate.
Low-Carb / Keto Version: Swap the maple syrup for a keto-friendly sweetener like monk fruit or allulose. Use crushed pecans or almonds instead of graham crackers for the “dirt.” You can even add a little coconut flour to thicken the pudding if needed.
Extra Protein Version: This is my personal go-to. Add an extra scoop of chocolate protein powder to the pudding. You might need to add a little more almond milk to keep the texture smooth. It makes these feel more like a post-workout treat than a dessert.
Peanut Butter Cup Version: Add a tablespoon of peanut butter to the blender with the other ingredients. Swirl in some extra peanut butter on top before adding the dirt. It’s absolutely decadent.
Seasonal Twist: In the fall, I like to add a pinch of cinnamon and cayenne to the pudding for a Mexican hot chocolate vibe. In the summer, I top them with fresh berries instead of gummy worms. It’s fun to play around with the flavors.
Serving & Storage Suggestions
These lighter chocolate dirt cups are best served cold, straight from the fridge. The contrast between the creamy pudding and the crunchy topping is what makes them so satisfying.
Serving temperature: Cold, always. I’ve tried them at room temperature and they’re just not the same. The pudding gets too soft and loses that mousse-like texture.
Presentation ideas: For Halloween, I serve these in clear plastic cups so you can see the layers. I sometimes add a little plastic spider ring on the side for extra spookiness. For a more grown-up gathering, I use small glass jars with a ribbon tied around them. A sprig of mint on top adds a nice touch of green.
What to serve with them: These are rich enough to stand on their own, but they pair beautifully with a cup of hot coffee or a glass of cold almond milk. If I’m serving them at a party, I put out a bowl of fresh fruit alongside for balance.
Storage instructions: Keep any leftover cups covered in the refrigerator for up to 4 days. The pudding itself holds up really well, but the topping will get softer over time. If you’re storing them for more than a day, keep the topping separate and add it just before eating.
Freezing: You can freeze the pudding (without the topping) for up to a month. Thaw it in the refrigerator overnight, then give it a good stir before serving. The texture might be slightly different after freezing, but it’s still good. I wouldn’t freeze them with the gummy worms though — they get weird and hard.
Flavor development: The chocolate flavor actually deepens after a day in the fridge. I honestly think these taste even better on day two. The avocado flavor completely disappears and all you’re left with is this rich, creamy chocolate experience.
Nutritional Information & Benefits
Here’s the thing — I’m not a nutritionist, but I’ve done some research on the ingredients in this recipe, and I feel really good about eating these.
Estimated nutritional values per serving (makes 4 servings):
- Calories: 210
- Fat: 12g (mostly healthy fats from avocado)
- Carbohydrates: 24g
- Fiber: 7g
- Sugar: 12g (naturally occurring from maple syrup)
- Protein: 6g (more if you add protein powder)
Health benefits of key ingredients: Avocados are packed with heart-healthy monounsaturated fats and fiber, which help keep you full and satisfied. Cocoa powder is rich in antioxidants called flavonoids, which are great for your heart and brain. Maple syrup contains minerals like zinc and manganese, though it’s still sugar, so I use it sparingly.
Dietary considerations: This recipe is naturally vegan, gluten-free (if you use certified gluten-free graham crackers), and dairy-free. It’s also free from refined sugar, which is a big win in my book. The main allergen to watch out for is tree nuts from the almond milk, but that’s easy to swap.
My personal take: I love that I can eat these without feeling like I’ve derailed my healthy eating. They satisfy my chocolate cravings completely, and they actually have some nutritional value. It’s not a health food, but it’s a dessert that works with a balanced lifestyle, not against it.
Conclusion
So there you have it — lighter chocolate dirt cups that actually taste like the real thing. I know it sounds crazy to put avocado in a dessert, but trust me on this one. It works. It really, really works.
These cups have become my go-to Halloween treat, but I make them all year round now. They’re perfect for those nights when you want something sweet but don’t want to undo all your hard work. And honestly? They’re just fun. There’s something about poking gummy worms into a cup of “dirt” that makes you feel like a kid again, no matter how old you are.
I’d love to hear how yours turn out. Did you add any fun toppings? Did you try a different flavor combination? Drop a comment below and let me know. And if you’re looking for another easy Halloween treat, you might want to try these spooky banana pops — they’re just as fun and just as light.
Go ahead, make a batch. Your inner third-grader will thank you.
Frequently Asked Questions
Can I use regular Oreos instead of graham crackers for the dirt topping?
Absolutely. Just scrape off the cream filling first to cut down on sugar. Crush the chocolate wafers into fine crumbs and use them the same way. The flavor will be a little sweeter, but it’s still delicious.
How can I make these nut-free?
Easy. Swap the almond milk for oat milk or coconut milk. Make sure your chocolate graham crackers are nut-free (most are, but check the label). The avocado base is already nut-free, so you’re good to go.
Can I use a different sweetener instead of maple syrup?
Yes! Honey works well, though it will change the flavor slightly. Agave nectar is another good option. For a sugar-free version, use monk fruit syrup or allulose. Just add it to taste since different sweeteners have different levels of sweetness.
How long do these keep in the fridge?
The pudding will stay fresh for up to 4 days in an airtight container. However, I recommend adding the crushed graham cracker topping and gummy worms just before serving to keep them from getting soggy.
Can I make these in advance for a Halloween party?
Definitely. Prepare the pudding and fill the cups up to 2 days ahead. Keep them covered in the fridge. On the day of the party, just add the dirt topping and gummy worms right before serving. It makes party prep so much easier.
PrintLighter Chocolate Dirt Cups: Easy Halloween Treat
A healthier twist on the classic Halloween dirt cups, featuring a creamy avocado-chocolate pudding with a crunchy graham cracker ‘dirt’ topping and gummy worms. This nostalgic treat is rich, satisfying, and made with wholesome ingredients.
- Prep Time: 15 minutes
- Cook Time: 0 minutes
- Total Time: 2 hours 15 minutes (includes chilling time)
- Yield: 4 servings 1x
- Category: Dessert
- Cuisine: American
Ingredients
- 2 medium ripe avocados
- 1/3 cup unsweetened cocoa powder (preferably Dutch-process)
- 1/4 cup maple syrup
- 1/2 cup unsweetened almond milk (or any milk of choice)
- 1 teaspoon vanilla extract
- Pinch of salt
- 2 tablespoons chocolate protein powder (optional)
- 4 sheets chocolate graham crackers (for the ‘dirt’ topping)
- Optional: crushed freeze-dried raspberries (for topping)
- Gummy worms (sugar-free if preferred, for decoration)
- Fresh mint leaves or edible flowers (optional, for decoration)
Instructions
- Crush the chocolate graham crackers in a ziploc bag using a rolling pin or heavy pan until they resemble fine dirt. Set aside. If using freeze-dried raspberries, crush them separately in a small bowl.
- Cut the avocados in half, remove the pits, and scoop the flesh into a food processor or high-speed blender.
- Add the cocoa powder, maple syrup, almond milk, vanilla extract, salt, and optional protein powder to the food processor. Blend until completely smooth, about 60-90 seconds, scraping down the sides halfway through. The mixture should be thick and glossy. If too thick, add another tablespoon of almond milk and blend again.
- Taste the pudding and adjust sweetness or chocolate flavor as desired. Add more maple syrup or cocoa powder if needed.
- Divide the pudding evenly among 4 small cups or jars, filling each about three-quarters full. Tap the cups gently on the counter to settle the pudding and remove air bubbles.
- Cover the cups with plastic wrap or lids and refrigerate for at least 2 hours to allow the pudding to set and thicken.
- Once chilled, sprinkle a generous layer of crushed graham crackers on top of each cup. Add crushed freeze-dried raspberries if using.
- Poke a couple of gummy worms into each cup so they appear to be crawling out of the ‘dirt.’ Serve immediately or keep chilled until ready to serve.
Notes
Use very ripe avocados for the smoothest texture. Chill the pudding for at least 2 hours to allow it to set properly. Add the graham cracker topping just before serving to prevent sogginess. The pudding can be made up to 2 days in advance and stored covered in the fridge. For a keto version, use a keto-friendly sweetener and crushed nuts instead of graham crackers.
Nutrition
- Serving Size: 1 cup (4-ounce servi
- Calories: 210
- Sugar: 12
- Sodium: 80
- Fat: 12
- Saturated Fat: 2
- Carbohydrates: 24
- Fiber: 7
- Protein: 6
Keywords: chocolate dirt cups, healthy Halloween dessert, avocado chocolate pudding, no-bake dessert, gluten-free dessert, vegan dessert, kid-friendly Halloween treat


