Love this? Save it for later!
Share the inspiration with your friends
I was scraping the last bits of pumpkin guts into the compost bin last fall when the neighbor’s kid poked his head over the fence. “Whatcha making?” he asked, all wide-eyed and hopeful. Nothing, I told him, just cleaning up after the jack-o’-lantern massacre. He looked so disappointed that I almost felt guilty — until I remembered the bag of pumpkin seeds sitting on my counter from the night before.
That’s when it hit me. That familiar, almost-forgotten smell of roasting seeds, the kind that used to drift from my Aunt Rita’s kitchen every single October. She’d be standing there, this tiny woman in a flour-dusted apron, shaking a baking sheet like she was conducting an orchestra. The seeds would rattle and pop, and the whole house would smell like autumn and butter. I haven’t thought about that in years, honestly. She passed when I was twelve, and nobody in my family kept up the tradition. But standing there with a sticky counter and a nosy kid watching me, I felt this sudden, aching need to get it right.
The first batch was a disaster — burnt on the edges, soggy in the middle, and about as appealing as cardboard. But the second batch? That one worked. I tweaked it with a little maple syrup because my own kids were being picky about the plain salted ones, and something clicked. The sweetness balanced the earthiness of the seeds, and the crunch was just right. Now it’s our go-to snack for movie nights, lunchboxes, and those after-school hunger attacks that hit like a freight train. Maybe you’ve been there — staring at a pile of pumpkin seeds after Halloween, wondering if it’s even worth the trouble. Trust me, it is.
Why You’ll Love This Recipe
This isn’t just another roasted pumpkin seed recipe that leaves you with a pan of burnt, chewy disappointments. After about six failed attempts (yes, I counted), I figured out exactly what works. Here’s why this one’s a keeper:
- Budget-Friendly: You’re literally using something you’d throw away. The maple syrup and oil cost pennies per batch. This might be the cheapest snack you’ll ever make.
- Kid-Approved: My three kids fought over the last handful last week. The maple sweetness makes it taste like a treat, not a health food sneaking up on them.
- Super Simple: Five ingredients, one bowl, one baking sheet. If you can stir and set a timer, you’ve got this handled.
- Perfect for Meal Prep: Make a big batch on Sunday, and you’ve got snacks for the whole week. They stay crunchy for days if you store them right.
- Picky Eater Friendly: That subtle sweetness wins over even the most skeptical little taste testers. My neighbor’s kid? He ate half the batch before I could bag them up.
What makes this different from every other pumpkin seed recipe out there? It’s the balance. Most recipes either drown the seeds in sugar or leave them so plain that nobody wants a second handful. This one hits that sweet spot — lightly candied on the outside, still nutty and savory on the inside. It’s the kind of snack that makes you close your eyes after the first crunch, honestly. Perfect for when you need something quick that won’t break the bank or send the kids into a sugar spiral.
What Ingredients You Will Need
This recipe uses simple, everyday ingredients to deliver that perfect sweet-and-savory crunch. Most of these are probably already in your pantry, which makes this even better for those “I need a snack right now” moments.
- Fresh pumpkin seeds — about 1 ½ cups (roughly 180g), straight from your pumpkin carving session. Rinse them well in a colander and pick out the biggest stringy bits. Don’t worry about getting every single fiber off — a little pumpkin guts adds character, I swear.
- Maple syrup — 2 tablespoons (30ml). Use the real stuff if you can, not the pancake syrup. The flavor is richer and less artificial. I’ve tried both, and the difference is noticeable. Grade A dark amber works beautifully here.
- Melted coconut oil — 1 tablespoon (15ml). You can use melted butter or vegetable oil in a pinch, but coconut oil gives a subtle sweetness that plays nicely with the maple. I like using Nutiva organic coconut oil for its clean flavor.
- Salt — ½ teaspoon (3g). Flaky sea salt is ideal because it sticks to the seeds better and gives little pops of saltiness. Regular table salt works too, just reduce it slightly since it’s finer and more concentrated.
- Cinnamon — ¼ teaspoon (optional, but highly recommended). Adds warmth and makes the kitchen smell incredible. Skip it if your kids are extra sensitive to spices, but mine love it.
Substitution Notes: If you’re out of maple syrup, honey works beautifully — just reduce the amount to 1 ½ tablespoons since honey is sweeter. For a sugar-free version, try monk fruit syrup or a sugar-free maple alternative, though the texture will be slightly different. No coconut oil? Melted butter adds a lovely richness, and avocado oil keeps it neutral. If you’re feeding little ones under one year old, skip the honey and use maple syrup instead.
Sourcing Tip: Look for pumpkins labeled “sugar pumpkins” or “pie pumpkins” if you’re buying specifically for the seeds — they tend to have plumper, more flavorful seeds than the giant carving pumpkins. But honestly, any pumpkin seeds work. I’ve used seeds from those decorative gourds that sat on my porch for two weeks, and they still turned out great.
Equipment Needed
You don’t need fancy kitchen gear for this one. Here’s what you’ll need:
- Baking sheet — A standard half-sheet pan (about 13×18 inches) works perfectly. Line it with parchment paper for easier cleanup, though it’s not strictly necessary.
- Mixing bowl — Any medium-sized bowl will do. I use a glass Pyrex bowl because it doesn’t hold onto smells.
- Colander — For rinsing the seeds. A fine-mesh strainer works even better because the seeds won’t fall through.
- Paper towels or clean kitchen towel — For drying the seeds. This step matters more than you think.
- Spatula or wooden spoon — For stirring everything together.
- Cooling rack — Optional, but helps the seeds cool evenly without steaming on the pan.
If you don’t have parchment paper, you can grease the baking sheet lightly with cooking spray. I’ve done it both ways, and honestly, the parchment just saves you from scrubbing later. For the budget-conscious, skip the cooling rack and just slide the seeds onto a plate after they’re done — works like a charm.
Preparation Method
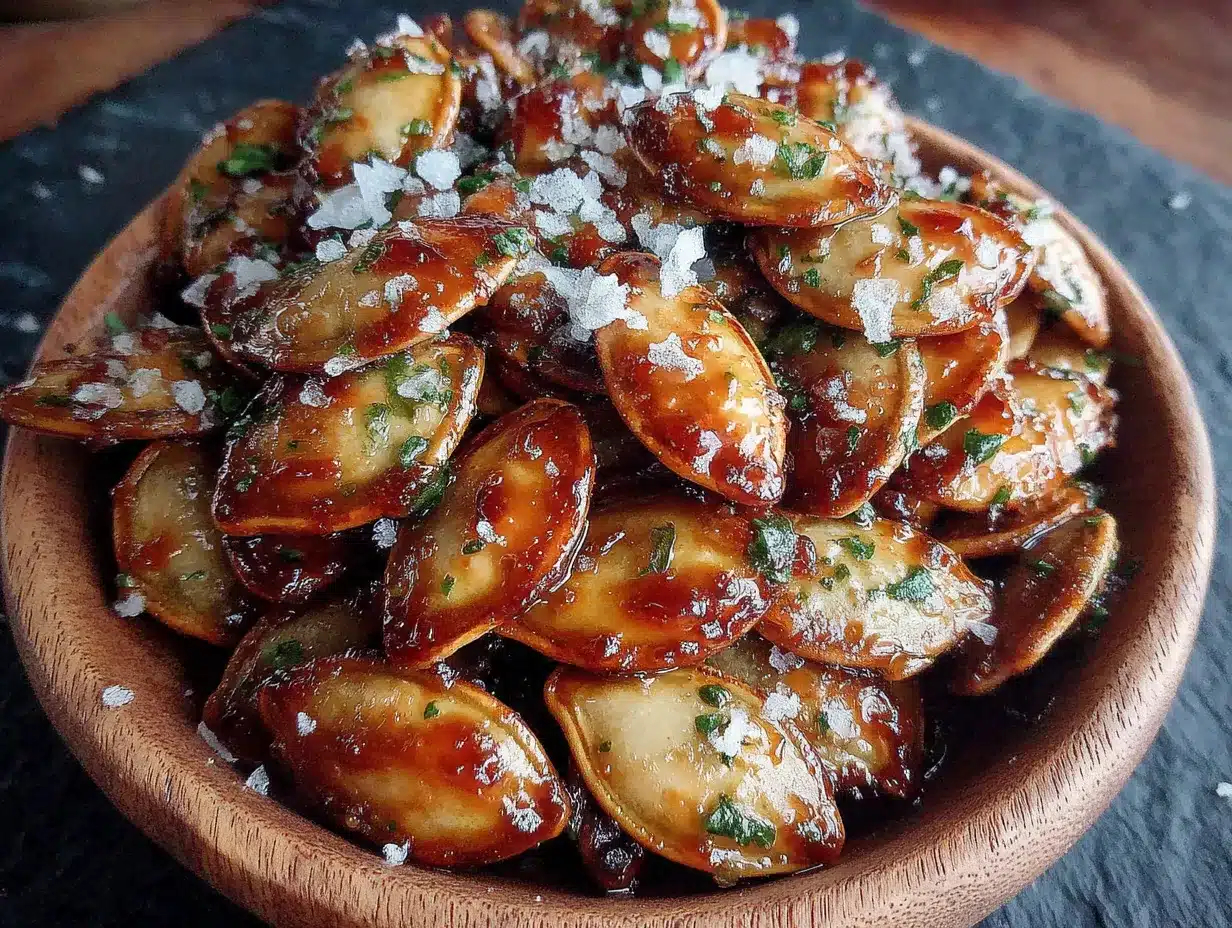
Let’s get those seeds from slimy to sublime. Here’s exactly how to do it:
- Preheat your oven to 325°F (165°C). This lower temperature is the secret to even roasting without burning. I learned this the hard way after cranking it to 400°F and ending up with charcoal-flavored seeds.
- Rinse the pumpkin seeds thoroughly in a colander under cool running water. Use your fingers to gently rub off the biggest chunks of pumpkin flesh. Don’t stress about getting every last string — a little bit adds flavor and fiber.
- Dry the seeds completely. This is the step most people skip, and it makes a huge difference. Spread the rinsed seeds on a clean kitchen towel or paper towels and pat them dry. Let them sit for 10-15 minutes if you have time. Wet seeds steam instead of roast, and you’ll end up with chewy, sad snacks.
- In your mixing bowl, combine the dried seeds, maple syrup, melted coconut oil, salt, and cinnamon if using. Stir well until every seed is coated. The mixture will look a little sticky and clumpy — that’s exactly what you want.
- Spread the coated seeds in a single layer on your parchment-lined baking sheet. Try to get them as even as possible. A few overlapping is fine, but thick piles will roast unevenly.
- Roast for 20 minutes, then stir. Use your spatula to flip and redistribute the seeds. Some will want to stick together — break them apart gently.
- Roast for another 15-20 minutes, checking at the 15-minute mark. You’re looking for a deep golden brown color and that amazing toasty smell filling your kitchen. The seeds will still feel slightly soft when you take them out — they’ll crisp up as they cool.
- Let them cool completely on the baking sheet (about 30 minutes). Don’t rush this! If you transfer them to a container while warm, they’ll trap steam and lose their crunch. I learned this after ruining two batches by being impatient.
Sensory cues: At the 20-minute mark, your kitchen should smell like a fall bakery — warm maple, toasted nuts, and a hint of cinnamon. The seeds will look glossy and golden, and you’ll hear a faint sizzling sound if you listen closely. When they’re done, they should be firm to the touch but not hard. They’ll firm up more as they cool.
Troubleshooting: If your seeds are browning too quickly on the edges but still soft in the middle, your oven might run hot. Drop the temperature to 300°F (150°C) and extend the cooking time by 5-10 minutes. Every oven is a little different, so trust your eyes and nose more than the timer.
Cooking Tips & Techniques
After making this recipe about a dozen times (and messing up plenty along the way), here’s what I’ve learned:
Dry your seeds like your life depends on it. I cannot stress this enough. The first time I made these, I was in a hurry and barely patted them dry. The result? Soggy, steamed seeds that tasted more like boiled pumpkin than roasted goodness. Take the extra five minutes. Spread them on a towel and let them air dry while you preheat the oven. Your future self will thank you.
Don’t crowd the pan. If you’re making a double batch (and you will once you taste these), use two baking sheets instead of piling everything onto one. Overcrowding traps steam and prevents that beautiful caramelization from happening. Rotate the pans halfway through if your oven has hot spots.
Watch the last five minutes like a hawk. Maple syrup has a lot of sugar, and sugar burns fast. That window between perfectly golden and tragically black is about two minutes wide. I’ve ruined more batches than I’d like to admit by walking away to fold laundry. Set a timer and actually stay nearby.
Let them cool completely before tasting. I know, I know — the smell is intoxicating and you want to grab a handful immediately. But warm seeds are deceptive. They taste softer and less crunchy than they actually are. If you judge doneness while they’re hot, you’ll either over-roast the next batch or under-roast this one. Patience, my friend.
Double the recipe. Seriously. These disappear faster than you’d expect. My kids polish off a single batch in about two days. Make a double batch and store half in the freezer — they thaw perfectly and stay crunchy.
Variations & Adaptations
This recipe is wonderfully flexible. Here are some variations I’ve tried and loved:
- Spicy Maple: Add ¼ teaspoon of cayenne pepper or smoked paprika along with the cinnamon. The heat sneaks up on you and plays beautifully with the sweet maple. My husband loves this version, though the kids give it a hard pass.
- Savory Herb: Skip the maple syrup and cinnamon. Toss the seeds with olive oil, garlic powder, rosemary, and a generous pinch of salt. Roast at 325°F for about 25-30 minutes. This version is fantastic on salads or soups.
- Chocolate Drizzle: After the seeds have cooled completely, melt ¼ cup of dark chocolate chips and drizzle them over the seeds. Let the chocolate set before breaking into clusters. Dangerous. Absolutely dangerous.
- Pumpkin Pie Spice: Replace the cinnamon with ½ teaspoon of pumpkin pie spice blend. It gives that classic fall flavor without any extra effort.
- Coconut Maple: Add ¼ cup of unsweetened coconut flakes to the baking sheet during the last 5 minutes of roasting. Toasts beautifully and adds texture.
Dietary Adaptations: For a nut-free version, skip the coconut oil and use sunflower oil instead. For gluten-free (they already are, but worth mentioning), just double-check your spice blends. For low-sugar, use a sugar-free maple syrup alternative and reduce the amount to 1 tablespoon.
Serving & Storage Suggestions
How to serve: These are best at room temperature, straight from the cooling rack if you can manage the self-control. I serve them in a big bowl for movie nights, portion them into small bags for lunchbox treats, or set out a small dish when guests come over. They’re also fantastic crushed up and sprinkled over yogurt, oatmeal, or even ice cream for a crunchy topping.
What pairs well: A warm mug of apple cider on one side and these seeds on the other — that’s my ideal fall afternoon. They also go beautifully with homemade applesauce for an after-school snack that feels special without being complicated. For a savory contrast, serve them alongside a bowl of chili or soup.
Storage instructions: Store completely cooled seeds in an airtight container at room temperature. They’ll stay crunchy for up to two weeks — though in my house, they rarely last that long. If you live in a humid climate, add a silica gel packet (the kind that comes in beef jerky bags) to the container to absorb excess moisture.
Freezer instructions: These freeze beautifully. Spread cooled seeds in a single layer on a baking sheet and freeze for an hour, then transfer to a freezer-safe bag. They’ll keep for up to three months. To serve, just let them thaw at room temperature for about 15 minutes. No need to reheat.
Reheating tip: If your seeds lose their crunch after a few days (it happens, especially in humid weather), spread them on a baking sheet and pop them in a 300°F (150°C) oven for 5 minutes. Let them cool completely, and they’ll be crispy again.
Nutritional Information & Benefits
Here’s the approximate nutritional breakdown for a ¼ cup serving (about 30g):
| Nutrient | Amount |
|---|---|
| Calories | 160 |
| Total Fat | 12g |
| Saturated Fat | 4g |
| Carbohydrates | 10g |
| Fiber | 2g |
| Sugar | 6g |
| Protein | 7g |
| Iron | 15% DV |
| Magnesium | 20% DV |
| Zinc | 15% DV |
Health benefits: Pumpkin seeds are little nutritional powerhouses. They’re packed with magnesium, which supports sleep and muscle function — perfect for growing kids. The zinc content is great for immune health, especially during cold and flu season. And that protein and fiber combo? It keeps everyone full and satisfied between meals, which means fewer “I’m hungry” complaints five minutes after snack time.
Dietary considerations: This recipe is naturally gluten-free, dairy-free (if using coconut oil), and vegetarian. It contains tree nuts if you use coconut oil, but can be made nut-free with a simple swap. Always check your spice blends for hidden gluten or additives.
Conclusion
These maple roasted pumpkin seeds have become a staple in our house for good reason. They’re cheap, easy, and somehow manage to make you feel like you’ve made something special from practically nothing. That’s the kind of cooking I love — turning what most people toss into something the whole family fights over.
I’d love for you to try this recipe and make it your own. Maybe your kids love extra cinnamon, or maybe your family prefers them spicy. That’s the beauty of a simple recipe like this — it’s a starting point, not a rulebook. Tweak it, taste it, and tell me how it goes.
Drop a comment below if you give these a try, or tag me in your photos if you share them online. I genuinely love seeing your versions. And if your kids end up fighting over the last handful like mine do? You’re doing it right. Happy snacking, friends!
Frequently Asked Questions
Can I use seeds from any type of pumpkin?
Absolutely! Sugar pumpkins and pie pumpkins tend to have plumper, more flavorful seeds, but the big carving pumpkins work just fine. Even seeds from butternut squash or acorn squash can be used — just adjust the roasting time slightly since they’re usually smaller.
Why are my roasted pumpkin seeds chewy instead of crunchy?
This usually happens for one of two reasons: either you didn’t dry the seeds thoroughly before roasting, or you stored them before they were completely cool. Make sure to pat them bone-dry before coating, and let them cool fully (at least 30 minutes) on the baking sheet before transferring to a container.
Can I make these in an air fryer?
Yes! Air fry at 300°F (150°C) for about 12-15 minutes, shaking the basket halfway through. Keep a close eye on them since air fryers run hot and the sugar can burn quickly. You might need to reduce the maple syrup slightly to prevent sticking.
How long do these stay fresh?
Stored in an airtight container at room temperature, they’ll stay crunchy for up to two weeks. In the freezer, they’ll keep for three months. If they start to soften, just re-crisp them in a 300°F oven for 5 minutes.
Can I use honey instead of maple syrup?
Yes, but reduce the amount to 1 ½ tablespoons since honey is sweeter. Also, honey has a lower smoke point, so watch them closely during the last few minutes of roasting to prevent burning. The flavor will be slightly different — more floral — but still delicious.
PrintKid-Approved Maple Roasted Pumpkin Seeds – Easy Homemade Snack
These maple roasted pumpkin seeds are a budget-friendly, kid-approved snack that turns something you’d normally toss into a crunchy, sweet-and-savory treat. Perfect for movie nights, lunchboxes, or after-school hunger attacks.
- Prep Time: 15 minutes
- Cook Time: 35 minutes
- Total Time: 50 minutes
- Yield: 4 servings 1x
- Category: Snack
- Cuisine: American
Ingredients
- 1 ½ cups fresh pumpkin seeds (about 180g)
- 2 tablespoons maple syrup (30ml)
- 1 tablespoon melted coconut oil (15ml)
- ½ teaspoon salt (3g)
- ¼ teaspoon cinnamon (optional)
Instructions
- Preheat your oven to 325°F (165°C).
- Rinse the pumpkin seeds thoroughly in a colander under cool running water, gently rubbing off the biggest chunks of pumpkin flesh.
- Dry the seeds completely by spreading them on a clean kitchen towel or paper towels and patting them dry. Let them sit for 10-15 minutes if possible.
- In a mixing bowl, combine the dried seeds, maple syrup, melted coconut oil, salt, and cinnamon (if using). Stir well until every seed is coated.
- Spread the coated seeds in a single layer on a parchment-lined baking sheet.
- Roast for 20 minutes, then stir the seeds with a spatula, breaking apart any clumps.
- Roast for another 15-20 minutes, checking at the 15-minute mark, until the seeds are deep golden brown and fragrant.
- Let the seeds cool completely on the baking sheet (about 30 minutes) before serving or storing.
Notes
Dry the seeds thoroughly to avoid chewy texture. Watch the last 5 minutes of roasting closely as the maple syrup can burn quickly. Let seeds cool completely before storing to maintain crunchiness. For a double batch, use two baking sheets and rotate halfway through.
Nutrition
- Serving Size: ¼ cup (about 30g)
- Calories: 160
- Sugar: 6
- Sodium: 150
- Fat: 12
- Saturated Fat: 4
- Carbohydrates: 10
- Fiber: 2
- Protein: 7
Keywords: maple roasted pumpkin seeds, easy pumpkin seed recipe, kid-friendly snack, fall snack, homemade snack, pumpkin seeds


