Love this? Save it for later!
Share the inspiration with your friends
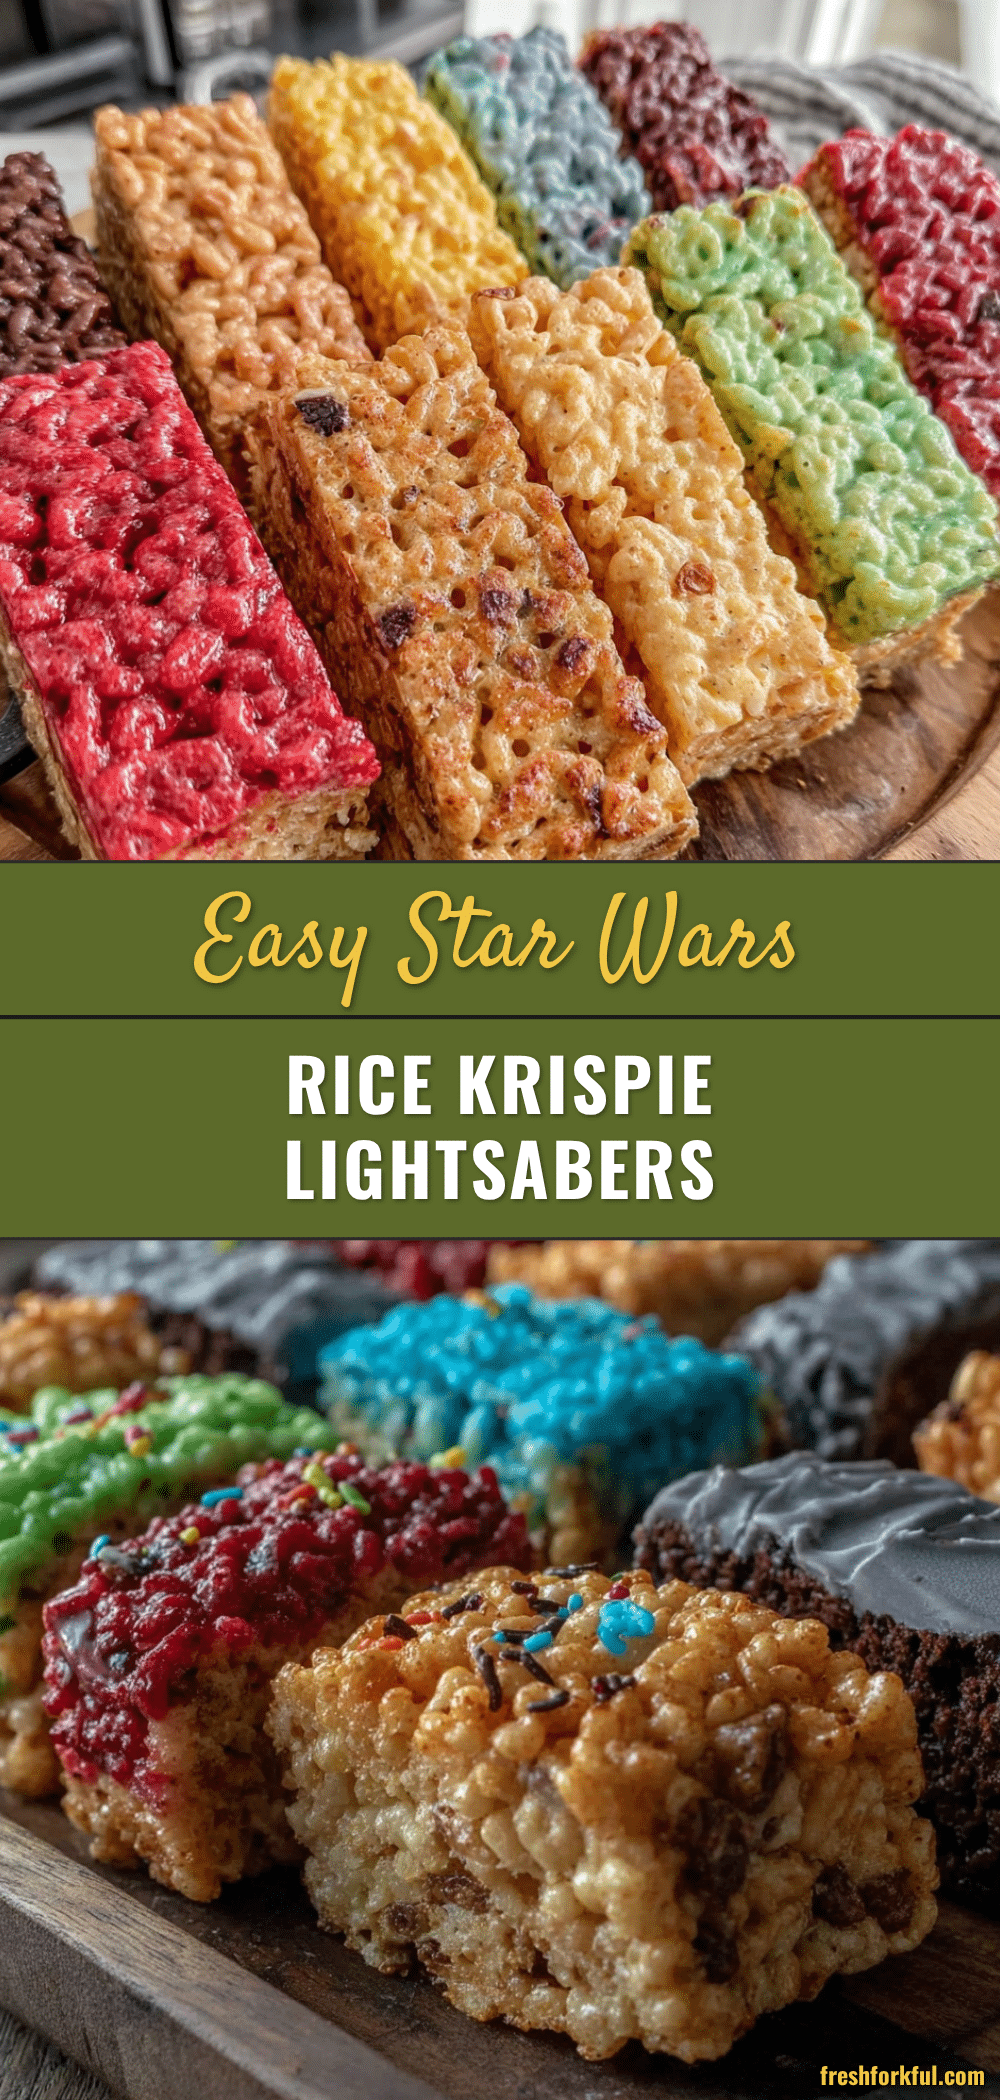
“You won’t believe what I found tucked behind the cereal boxes last Saturday,” my neighbor Jake said as he handed me a crinkled, colorful paper with a recipe scrawled on it. It wasn’t just any recipe—it was for Easy Star Wars Rice Krispie Lightsabers. Honestly, I wasn’t expecting to get roped into making themed treats that morning, but there I was, whisking marshmallows in my kitchen while my cat stared suspiciously at the glowing blue and green sticks on the counter. Maybe you’ve been there—scrambling last minute to whip up something that gets the kids’ eyes as wide as the Death Star.
These Rice Krispie Lightsabers are more than just a fun snack; they’re a playful way to bring a bit of the galaxy far, far away right into your family’s day. The recipe came from Jake’s little cousin, a total Star Wars fanatic who insists that a proper snack must look as epic as a lightsaber duel. I managed to forget the candy sticks once (classic me), but the kids didn’t mind—they just got to lick the bowl instead. Let me tell you, this recipe stuck with me not only because it’s super easy but because it transforms the simple joy of marshmallow treats into a memorable family moment. You’ll want to keep this one handy for birthday parties, movie marathons, or any time the Force needs a little sweet boost.
Why You’ll Love This Recipe
After testing this Easy Star Wars Rice Krispie Lightsabers recipe several times (and yes, occasionally sneaking a few bites before the kids noticed), I can confidently say it’s a winner for families and fans alike. Here’s why this recipe stands out:
- Quick & Easy: Ready in under 30 minutes, perfect for when you need a fun treat without a ton of fuss.
- Simple Ingredients: Uses pantry staples like marshmallows and Rice Krispies—no special grocery runs required!
- Perfect for Themed Parties: Whether it’s a Star Wars birthday bash or a movie night, these lightsabers steal the show.
- Crowd-Pleaser: Kids love the interactive shape and adults appreciate the nostalgic sweet crunch.
- Unbelievably Delicious: The crispy, chewy texture is just right—trust me, I had to hide a few just for myself.
What makes this recipe unique is the combination of easy assembly and the creative flair of turning a classic Rice Krispie treat into a galactic weapon of fun. The colored candy melts add that authentic lightsaber glow without extra sugar overload, and the candy stick handles make it a hands-on snack that feels special. Honestly, it’s not just a treat—it’s a conversation starter and a way to sneak in some smiles on a busy day.
What Ingredients You Will Need
This recipe uses simple, wholesome ingredients to deliver bold flavor and satisfying texture without the fuss. Most of these are pantry staples, and the candy melts bring in that fun Star Wars vibe with color and shine. Here’s what you’ll gather:
- Rice Krispies cereal (6 cups / 180g) – The crispy base for the treats; I prefer Kellogg’s for that classic crunch.
- Marshmallows (10 oz / 280g, mini or regular) – The gooey binder; Campfire brand works great for melt consistency.
- Unsalted butter (3 tablespoons / 42g) – Adds richness and helps melt the marshmallows smoothly.
- Candy melts (about 6 ounces / 170g, assorted colors like blue, green, red) – For the lightsaber blade colors; Wilton brand is reliable.
- Candy sticks or lollipop sticks (12 sticks) – These form the lightsaber handles; look for sturdy ones to hold up the treats.
- Vegetable oil spray or butter – For greasing your pan and hands to prevent sticking.
Substitution tips: Use almond or coconut-based cereal for a gluten-free option, and swap dairy butter with vegan margarine if preferred. If candy melts aren’t available, colored white chocolate chips can work, but they require gentler melting.
Equipment Needed
- Large saucepan – For melting butter and marshmallows; a heavy-bottom pan helps prevent burning.
- Mixing bowl – To combine the cereal and melted marshmallow mixture.
- Wooden spoon or heat-resistant spatula – For stirring the sticky marshmallow mix.
- 9×13-inch (23×33 cm) baking pan – To press the mixture and shape the base treats.
- Parchment paper or silicone baking mat – For easy cleanup and to prevent sticking.
- Microwave-safe bowl – For melting candy melts quickly.
- Knife or cookie cutter – To cut the treats into the lightsaber shape; a butter knife or pizza cutter works well if you don’t have a cutter.
If you don’t have a silicone mat, parchment paper sprayed with a bit of cooking oil will do just fine. Personally, I like using a sturdy wooden spoon over a plastic spatula because it holds up better against sticky marshmallow clumps. Budget-wise, you can find candy sticks in bulk online or at party stores, which makes this even easier for larger groups.
Preparation Method

- Prepare your workspace: Lightly grease a 9×13-inch (23×33 cm) baking pan with butter or spray it with vegetable oil. Line with parchment paper, leaving some overhang for easy lifting. This step helps avoid sticky fingers later. (5 minutes)
- Melt the butter and marshmallows: In a large saucepan over low heat, melt 3 tablespoons (42g) unsalted butter. Once melted, add 10 oz (280g) marshmallows. Stir continuously with a wooden spoon until fully melted and smooth, about 4-5 minutes. Watch carefully to prevent scorching. (7 minutes)
- Mix in the cereal: Remove from heat and quickly add 6 cups (180g) Rice Krispies cereal. Stir gently but thoroughly until the cereal is evenly coated with the marshmallow mixture. Speed is key here before it starts to set. (3 minutes)
- Press into the pan: Transfer the mixture into the prepared pan. Using a buttered spatula or wax paper, press the mixture evenly and firmly into the pan to about 1-inch thickness. Avoid over-pressing or the treats become too dense. Let cool for 10 minutes. (10-15 minutes)
- Cut out lightsaber shapes: Once cooled but still pliable, use a butter knife or a rectangular cookie cutter to cut strips approximately 1.5 inches wide and 6 inches long. These will be your lightsaber blades. (5 minutes)
- Insert candy sticks: Gently push a candy stick about halfway into one end of each Rice Krispie blade. If the treats feel crumbly, chill in the fridge for 5 minutes to firm up before inserting sticks. (5 minutes)
- Melt the candy melts: In a microwave-safe bowl, melt 6 oz (170g) of candy melts in 30-second intervals, stirring after each until smooth. Avoid overheating as candy melts can seize quickly. (3 minutes)
- Dip and decorate: Holding the candy stick, dip the Rice Krispie blade into the melted candy to coat halfway or as desired. Let excess drip off. Place on parchment paper to set. You can add sprinkles before the coating hardens for extra fun. (10 minutes)
- Let set completely: Allow lightsabers to cool and harden at room temperature or speed up by chilling in the fridge for 10 minutes. Once set, they’re ready for epic battles or just snacking! (10-20 minutes)
Pro tip: If the Rice Krispie treats start sticking to your hands while shaping or inserting sticks, lightly grease your palms. Also, don’t skip the parchment paper step—it makes cleanup way easier and your treats come out clean every time.
Cooking Tips & Techniques
Making these Star Wars Rice Krispie Lightsabers is straightforward, but here are some tricks to keep in mind for the best results:
- Low and slow melting: When melting marshmallows and butter, keep the heat low to avoid burning. Marshmallows can scorch quickly, ruining the texture and taste.
- Timing is everything: Mix the cereal into the marshmallow as soon as it’s melted to prevent the mixture from hardening prematurely—trust me, you’ll want to work fast but gently.
- Grease your hands: Sticky fingers are inevitable, but a quick swipe of butter or oil on your palms helps shape and insert candy sticks without crumbling the treats.
- Choose sturdy candy sticks: Thin or flimsy sticks might snap or fall out. I learned this the hard way during a birthday party! Go for thicker, solid lollipop sticks.
- Melting candy melts: Use short bursts in the microwave, stirring often. Overheating leads to thick, unusable candy. If it gets too thick, add a small amount of vegetable oil to loosen it.
- Multitasking tip: While the candy melts set, clean your mixing bowl and utensils quickly to avoid hardened marshmallow messes later.
Variations & Adaptations
Feel free to switch things up to suit your taste or dietary needs:
- Dietary substitutions: Use gluten-free crispy rice cereal to accommodate gluten sensitivities. Swap butter for coconut oil and marshmallows for vegan versions to make this entirely plant-based.
- Flavor twists: Add a teaspoon of vanilla or almond extract to the melted marshmallow mixture for extra flavor depth. Sprinkling edible glitter or colored sugar on the candy coating adds sparkle and fun.
- Seasonal colors: Instead of traditional Star Wars colors, use red and green candy melts for holiday-themed lightsabers, or pastels for a spring celebration.
- Alternative shapes: If you want to mix it up, try cutting the treats into star shapes or little droids using cookie cutters for a full galactic snack spread.
- Personal favorite: I once tried swirling two candy melt colors together for a “double-bladed” look. It was a messy experiment but ended up being the hit of the party!
Serving & Storage Suggestions
These Easy Star Wars Rice Krispie Lightsabers are best served fresh at room temperature when the candy coating is firm but not too hard. They pair beautifully with a cold glass of milk or a fruity punch at kids’ gatherings. For presentation, arrange them on a platter with some Star Wars-themed napkins or cupcake liners for that extra wow factor.
Store any leftovers in an airtight container at room temperature for up to three days. Avoid refrigerating as it can make the treats hard and chewy. If you need longer storage, you can freeze them wrapped tightly in plastic wrap and then placed in a freezer bag for up to a month. When ready to eat, thaw at room temperature for about 30 minutes.
Flavors and textures mellow slightly over time, making them chewy and even more nostalgic. Just don’t expect them to last long once the family finds out they’re around!
Nutritional Information & Benefits
Each Easy Star Wars Rice Krispie Lightsaber treat contains approximately 150-180 calories, depending on the size and candy coating thickness. The main ingredients provide quick energy from carbs and a bit of fat from butter and candy melts.
While these aren’t health food, using real butter and quality marshmallows means no weird additives or preservatives. Plus, the recipe is free from nuts unless you add toppings, which makes it suitable for many allergy-conscious households.
For families looking to balance treats with nutrition, pairing these lightsabers with fruit or a protein-rich snack later in the day works well. Honestly, sometimes it’s about the joy and memories made more than counting every calorie.
Conclusion
This Easy Star Wars Rice Krispie Lightsabers recipe is more than just a sweet snack—it’s a way to bring a little magic and fun to your family’s day. Whether you’re prepping for a themed party or just want a creative treat that’s quick and simple, this recipe delivers. I love how it combines nostalgia with hands-on crafting, making it perfect for kids and adults alike.
Feel free to tweak the colors, shapes, or flavors to fit your family’s vibe. I’d love to hear how you make these lightsabers your own—drop a comment or share your variations! Remember, cooking is about joy and connection, so grab your candy melts and may the Force be with your sweet creations.
FAQs About Easy Star Wars Rice Krispie Lightsabers
Can I make these lightsabers without candy melts?
Yes! You can use colored white chocolate chips or even tinted frosting, but candy melts give the best smooth, hard coating. Just melt gently to avoid burning.
How do I keep the Rice Krispie treats from sticking to my hands?
Lightly grease your hands with butter or vegetable oil before handling the mixture. This keeps things smooth and easier to shape.
Can I prepare these lightsabers ahead of time?
Absolutely. You can make them a day in advance and store in an airtight container at room temperature. Just avoid refrigerating to keep the texture right.
What’s the best way to cut the treats into shapes?
Use a butter knife or a sharp kitchen knife while the treats are still a bit soft but not hot. For precise shapes, cookie cutters work well if you press firmly.
Are these treats gluten-free?
Traditional Rice Krispies cereal contains malt flavoring, which has gluten. For gluten-free, look for certified gluten-free crispy rice cereal brands.
For a fun twist on classic treats, you might enjoy pairing these with savory snacks like crispy garlic chicken or a sweet complement like best chocolate chip cookies to round out your family gathering.
Pin This Recipe!
Easy Star Wars Rice Krispie Lightsabers Recipe for a Fun Family Treat

A quick and fun recipe to make themed Rice Krispie treats shaped like Star Wars lightsabers, perfect for family gatherings and parties.
- Prep Time: 15 minutes
- Cook Time: 15 minutes
- Total Time: 30 minutes
- Yield: 12 servings 1x
- Category: Dessert
- Cuisine: American
Ingredients
- 6 cups Rice Krispies cereal (180g)
- 10 oz marshmallows (280g, mini or regular)
- 3 tablespoons unsalted butter (42g)
- 6 oz candy melts (170g, assorted colors like blue, green, red)
- 12 candy sticks or lollipop sticks
- Vegetable oil spray or butter for greasing
Instructions
- Lightly grease a 9×13-inch baking pan with butter or spray with vegetable oil. Line with parchment paper, leaving some overhang for easy lifting.
- In a large saucepan over low heat, melt 3 tablespoons unsalted butter. Add 10 oz marshmallows and stir continuously until fully melted and smooth, about 4-5 minutes.
- Remove from heat and quickly add 6 cups Rice Krispies cereal. Stir gently but thoroughly until evenly coated.
- Transfer mixture into the prepared pan. Press evenly and firmly to about 1-inch thickness. Let cool for 10 minutes.
- Cut the cooled but pliable mixture into strips approximately 1.5 inches wide and 6 inches long to form lightsaber blades.
- Insert a candy stick about halfway into one end of each Rice Krispie blade. Chill in fridge for 5 minutes if treats feel crumbly.
- Melt 6 oz candy melts in a microwave-safe bowl in 30-second intervals, stirring until smooth.
- Dip the Rice Krispie blades halfway into the melted candy melts. Let excess drip off and place on parchment paper to set. Optionally add sprinkles before coating hardens.
- Allow lightsabers to cool and harden at room temperature or chill in fridge for 10 minutes before serving.
Notes
Keep heat low when melting marshmallows to avoid burning. Grease hands to prevent sticking. Use sturdy candy sticks to avoid breakage. Melt candy melts in short bursts and stir often to prevent seizing. Store leftovers in airtight container at room temperature for up to 3 days or freeze for up to a month.
Nutrition
- Serving Size: 1 lightsaber treat
- Calories: 165
- Sugar: 18
- Sodium: 90
- Fat: 5
- Saturated Fat: 3
- Carbohydrates: 29
- Protein: 1
Keywords: Rice Krispie treats, Star Wars, lightsabers, kids snack, themed party, easy dessert, marshmallow treats