Love this? Save it for later!
Share the inspiration with your friends
“You have to try this,” my neighbor, Linda, said one sunny Saturday as she handed me a Mason jar filled with layers of creamy goodness. I wasn’t expecting much—just a quick summer dessert—but one bite of that easy no-bake banana pudding trifle with fresh strawberries had me hooked. Honestly, I was halfway through the jar before I even realized how simple it was to make. It wasn’t one of those fancy, time-consuming recipes you find in glossy magazines; this one came together in her tiny kitchen, with a few fresh ingredients and zero oven time.
Linda confessed she whipped it up last minute for a potluck, having forgotten to prepare anything ahead of time. The best part? It looked like a dessert you’d find at a high-end café but took under 20 minutes to put together. You know that feeling when a recipe surprises you by tasting way better than it looks? That was this trifle. The sweetness of ripe bananas, the burst of fresh strawberries, and that velvety pudding layered just right—it felt like summer in a glass.
Maybe you’ve been there, staring at a fridge full of ingredients but short on time and energy. This no-bake banana pudding trifle saved her day, and it’s been my go-to ever since. Let me tell you, it’s the kind of dessert you’ll want to make again and again, whether it’s for a last-minute guest or just because you deserve a little treat. Plus, the fresh strawberries add that zing of brightness that keeps it from feeling too heavy—perfect for warm days when the oven is just not an option.
So, if you’re curious about a fuss-free, crowd-pleasing dessert that’s easy to assemble and tastes like a dream, stick around. I’m sharing exactly how I make this easy no-bake banana pudding trifle with fresh strawberries, with plenty of tips and variations to suit your kitchen style.
Why You’ll Love This Easy No-Bake Banana Pudding Trifle with Fresh Strawberries
After testing this recipe more times than I can count, I feel pretty confident saying it’s a winner for a bunch of reasons. From casual family dinners to impromptu summer gatherings, this trifle nails that balance between simple prep and impressive flavor. Here’s why it stands out:
- Quick & Easy: You can get this dessert ready in under 20 minutes, which is perfect when you’re juggling a busy day or just want something sweet without the hassle.
- Simple Ingredients: No need for specialty stores. You’ll likely have most of these in your pantry and fridge already—like vanilla pudding mix, ripe bananas, and fresh strawberries.
- Perfect for Summer: This no-bake recipe is ideal for warm weather when firing up the oven feels like a mistake. It’s refreshingly cool and light.
- Crowd-Pleaser: Kids, adults, even picky eaters usually ask for seconds. The combination of creamy pudding and fresh fruit is a universal hit.
- Unbelievably Delicious: The layers create a texture that’s creamy, fruity, and just a little crunchy from the vanilla wafers. It’s comfort food in a glass with a fresh twist.
What really makes this recipe different? The layering technique. I like to blend a bit of the pudding with mashed bananas to keep the texture silky smooth but still full of banana flavor. Plus, adding fresh strawberries right before serving keeps the fruit bright and juicy, avoiding any sogginess. This trifle isn’t just a quick fix—it’s the kind of dessert that makes you pause and savor every spoonful. Honestly, it’s my secret weapon for those times when I want something homemade but don’t want to spend hours in the kitchen.
What Ingredients You Will Need
This recipe uses simple, wholesome ingredients to deliver bold flavor and satisfying texture without the fuss. Most of these are pantry staples or easy to grab at the market, and you can swap a few out if needed.
- Vanilla Instant Pudding Mix (1 package, about 3.4 oz/96 g) – I recommend Jell-O or a trusted brand for smooth texture.
- Cold Whole Milk (2 cups / 475 ml) – For best creaminess, but you can use 2% if preferred.
- Ripe Bananas (3 medium, peeled and sliced) – Choose bananas with a few brown spots for maximum sweetness.
- Fresh Strawberries (1 cup, hulled and sliced) – In summer, swap in fresh berries like blueberries or raspberries.
- Vanilla Wafers (about 2 cups crushed) – I use Keebler for that classic crunch; gluten-free wafers work well too.
- Heavy Whipping Cream (1 cup / 240 ml) – Whipped to soft peaks for that fluffy topping.
- Powdered Sugar (2 tbsp / 15 g) – To sweeten the whipped cream.
- Vanilla Extract (1 tsp / 5 ml) – Adds depth to the whipped cream.
Substitution tips: Use almond milk or oat milk with a thickener for a dairy-free pudding. Swap heavy cream with coconut cream for a vegan whipped topping. For a gluten-free version, choose gluten-free vanilla wafers or crush gluten-free cookies.
Equipment Needed
- Mixing Bowls: A medium bowl for the pudding and a large one for whipping cream.
- Electric Hand Mixer or Stand Mixer: Essential for whipping the cream to soft peaks effortlessly. If you don’t have one, a whisk works, but it takes some arm power.
- Measuring Cups and Spoons: For accurate liquid and dry ingredient measurements.
- Trifle Bowl or Clear Glass Serving Dish: I love a clear dish so the layers show through—that’s part of the charm. If you don’t have one, individual glasses work perfectly.
- Spatula and Spoon: For folding ingredients gently and layering.
- Knife and Cutting Board: To prep bananas and strawberries.
If you’re on a budget, a simple handheld mixer and a glass bowl will do just fine. For maintaining your mixer, I recommend cleaning the beaters immediately after use to prevent any pudding or cream residue from hardening. This little step saves you some scrubbing later!
Preparation Method
- Make the pudding: In a medium bowl, whisk the vanilla instant pudding mix with 2 cups (475 ml) of cold whole milk. Whisk for about 2 minutes until thickened. Let it sit for 5 minutes to fully set while you prep other ingredients.
- Slice the bananas and strawberries: Peel 3 ripe bananas and slice into about ¼-inch (0.6 cm) thick rounds. Hull and slice 1 cup (about 150 g) fresh strawberries. Keep the fruit refrigerated until assembly.
- Crush the vanilla wafers: Place about 2 cups (about 120 g) of vanilla wafers in a zip-top bag and gently crush with a rolling pin or use your hands for a coarser texture.
- Whip the cream: In a large mixing bowl, combine 1 cup (240 ml) heavy whipping cream, 2 tablespoons (15 g) powdered sugar, and 1 teaspoon (5 ml) vanilla extract. Whip on medium-high speed until soft peaks form. This usually takes about 3-4 minutes. Be careful not to overwhip, or you’ll get butter!
- Combine pudding and bananas: Gently fold half of the sliced bananas into the set pudding mixture, trying not to mash them too much. This creates a creamy, banana-infused base.
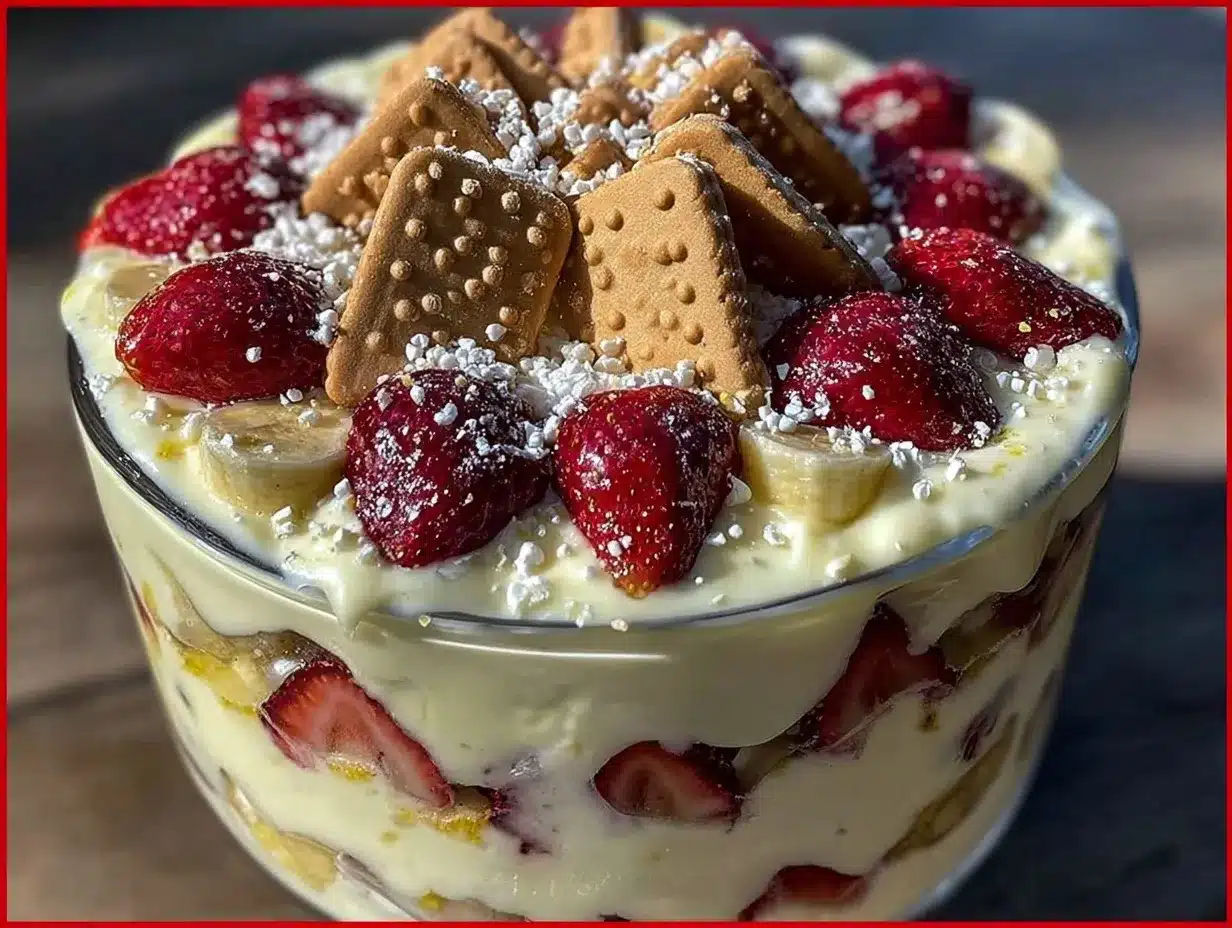
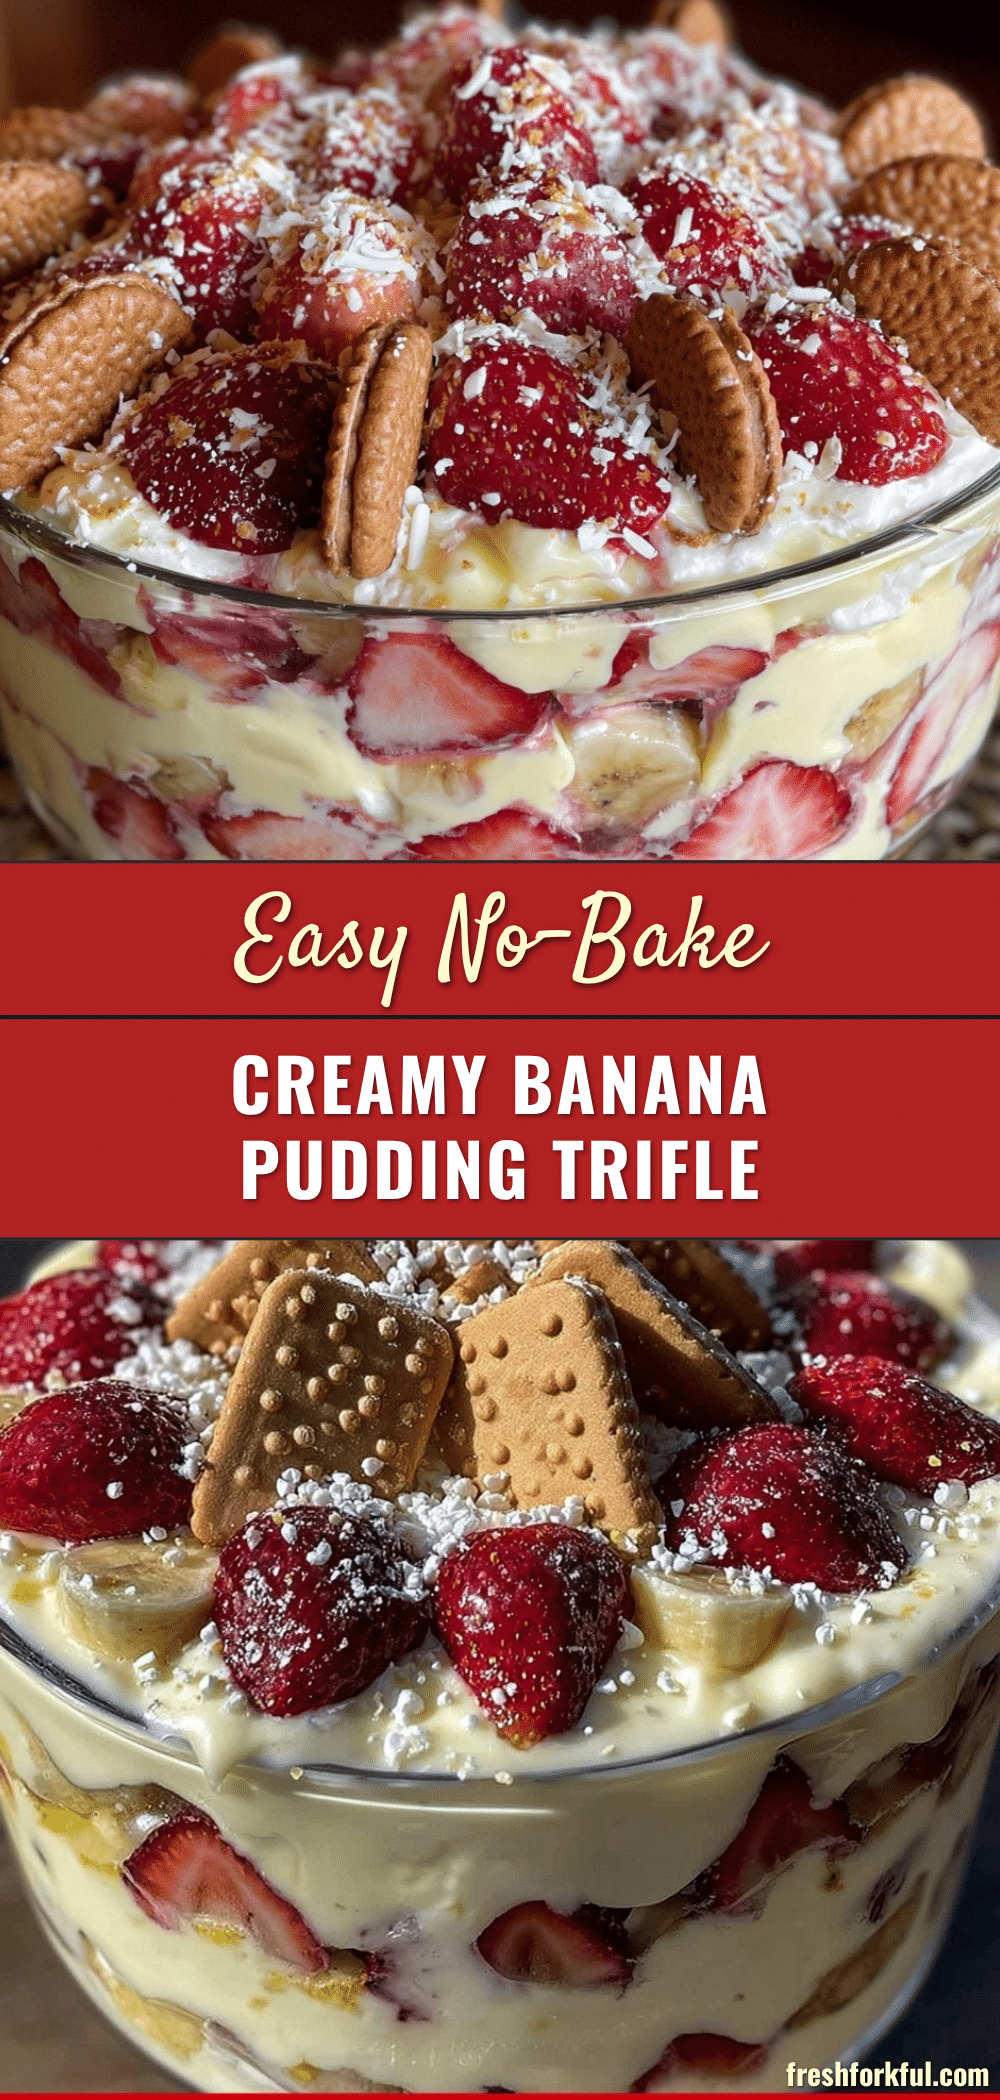
- Layer the trifle: Start with a layer of crushed vanilla wafers at the bottom of your serving dish (about 1 cup / 60 g). Next, spoon half of the pudding-banana mixture over the wafers. Then add a layer of the remaining banana slices and half the strawberries. Follow with a layer of whipped cream (about half). Repeat all layers once more, finishing with whipped cream on top.
- Chill and serve: Refrigerate the assembled trifle for at least 2 hours to let the flavors meld and the wafers soften slightly. Garnish with a few extra fresh strawberries before serving for a pop of color.
Pro tip: If you’re short on time, you can serve it right after assembly, but the chilled version tastes better and has a nicer texture. Also, if you find the pudding too thick, whisk in a splash of milk until it’s just right.
Cooking Tips & Techniques
Layering is the secret sauce for this trifle’s appeal. I’ve learned the hard way that piling everything on top without care makes a mushy mess, so take your time to layer gently and evenly. Use a spatula to spread each layer smoothly, and don’t press down hard on the wafers—let them soak up moisture naturally.
When whipping cream, cold equipment is your friend. I usually pop my bowl and beaters in the fridge for 10-15 minutes before starting. It helps the cream thicken faster and gives better volume.
Resist the urge to overmix the pudding once it sets. Folding in ingredients gently keeps the texture light. Also, fresh fruit can release water over time, so add strawberries right before serving to avoid a soggy dessert.
Multitasking tip: While the pudding is setting, prep your fruit and crush the wafers. It keeps the process smooth and cuts down on overall time.
One mistake I made early on was using underripe bananas—they just don’t have the sweetness or texture needed. Wait for those brown spots, trust me.
Variations & Adaptations
- Dietary Twist: For a gluten-free option, swap vanilla wafers with gluten-free cookies or crushed gf granola.
- Seasonal Fruit Swap: Instead of strawberries, try fresh peaches or mango slices during late summer for a tropical vibe.
- Flavor Boost: Add a tablespoon of cream cheese mixed into the pudding for a tangy richness reminiscent of cheesecake.
- Cooking Method Change: Turn this into parfaits by layering ingredients in small glasses for individual servings—great for parties.
- Personal Favorite: I once stirred in a handful of toasted coconut flakes between layers for an extra crunch and flavor that reminded me of beach vacations.
Serving & Storage Suggestions
This trifle is best served chilled, straight from the fridge. The layers look gorgeous in a clear glass bowl, and the fresh strawberries on top add a nice pop of color that makes it feel special. It pairs wonderfully with a cup of iced tea or a light sparkling wine if you’re celebrating.
Store leftovers covered in the refrigerator for up to 3 days. The texture will soften as the wafers continue to absorb moisture, but that’s part of the charm for many. Reheat? Honestly, this dessert is meant to be cold, so just enjoy it chilled. Give it a gentle stir before serving if it’s been sitting for a while, to redistribute the pudding and fruit.
Flavors actually develop the longer it chills, so if you make it a day ahead, you’ll notice the bananas and strawberries infuse the pudding beautifully.
Nutritional Information & Benefits
Each serving of this easy no-bake banana pudding trifle with fresh strawberries provides a balanced mix of carbohydrates, fats, and proteins. The bananas contribute potassium and dietary fiber, while strawberries add vitamin C and antioxidants.
The pudding and whipped cream bring in some calcium and protein, but keep in mind this is a dessert—so it’s a treat best enjoyed in moderation. For those watching carbs, you can reduce sugar by choosing sugar-free pudding mix or lowering powdered sugar in the whipped cream.
This recipe is naturally vegetarian and can be adapted for gluten-free or dairy-free diets with simple ingredient swaps. For an extra health boost, adding chia seeds between layers or using Greek yogurt instead of heavy cream are tasty options I’ve tried with success.
Conclusion
This easy no-bake banana pudding trifle with fresh strawberries is a fantastic go-to dessert when you want something fuss-free but still show-stopping. I love how it combines familiar flavors with fresh fruit, and how quick it is to put together on a busy day or a warm summer afternoon. You can customize it to your taste or dietary needs, and it’s always a hit wherever I bring it.
Give it a try, and feel free to tweak the layers or fruits to make it yours. If you do, please let me know how it turns out—I’d love to hear your twists or favorite add-ins! Remember, the best recipes are the ones we make our own, with a little mess and a lot of love.
Happy trifle-making!
FAQs About Easy No-Bake Banana Pudding Trifle with Fresh Strawberries
Can I make this trifle ahead of time?
Yes! It actually tastes better after chilling for at least 2 hours or overnight, allowing the flavors to blend and the wafers to soften just enough.
What can I use instead of vanilla wafers?
Gluten-free cookies, graham crackers, or crushed shortbread cookies work well as substitutes depending on your preference or dietary needs.
How do I keep the bananas from browning?
Use ripe bananas just before they get too brown and assemble the trifle shortly before serving. Adding a little lemon juice to the banana slices can also help slow browning.
Can I use homemade pudding instead of instant mix?
Absolutely! Homemade vanilla pudding works great and adds a richer flavor, but the instant mix keeps this recipe quick and easy.
Is there a way to make this dairy-free?
Yes, swap the milk and heavy cream for coconut milk or almond milk alternatives and use a dairy-free pudding mix. Coconut cream whips nicely for the topping.
Pin This Recipe!
Easy No-Bake Banana Pudding Trifle Recipe with Fresh Strawberries

A quick and easy no-bake banana pudding trifle layered with fresh strawberries, vanilla wafers, and whipped cream, perfect for summer desserts and crowd-pleasing occasions.
- Prep Time: 15 minutes
- Cook Time: 0 minutes
- Total Time: 2 hours 15 minutes
- Yield: 8 servings 1x
- Category: Dessert
- Cuisine: American
Ingredients
- 1 package (3.4 oz / 96 g) vanilla instant pudding mix
- 2 cups (475 ml) cold whole milk
- 3 medium ripe bananas, peeled and sliced
- 1 cup (about 150 g) fresh strawberries, hulled and sliced
- About 2 cups (120 g) crushed vanilla wafers
- 1 cup (240 ml) heavy whipping cream
- 2 tablespoons (15 g) powdered sugar
- 1 teaspoon (5 ml) vanilla extract
Instructions
- In a medium bowl, whisk the vanilla instant pudding mix with 2 cups (475 ml) of cold whole milk for about 2 minutes until thickened. Let it sit for 5 minutes to fully set.
- Peel and slice 3 ripe bananas into about 1/4-inch (0.6 cm) thick rounds. Hull and slice 1 cup fresh strawberries. Keep refrigerated until assembly.
- Crush about 2 cups (120 g) of vanilla wafers in a zip-top bag using a rolling pin or hands for a coarser texture.
- In a large mixing bowl, combine 1 cup (240 ml) heavy whipping cream, 2 tablespoons powdered sugar, and 1 teaspoon vanilla extract. Whip on medium-high speed until soft peaks form, about 3-4 minutes. Avoid overwhipping.
- Gently fold half of the sliced bananas into the set pudding mixture, keeping the texture smooth and banana flavor infused.
- Layer the trifle starting with 1 cup (60 g) crushed vanilla wafers at the bottom of the serving dish. Spoon half of the pudding-banana mixture over the wafers, then add the remaining banana slices and half the strawberries. Add half the whipped cream on top.
- Repeat the layers once more, finishing with whipped cream on top.
- Refrigerate the assembled trifle for at least 2 hours to let flavors meld and wafers soften slightly. Garnish with extra fresh strawberries before serving.
Notes
For best results, chill the trifle for at least 2 hours before serving to allow flavors to meld and wafers to soften. Use ripe bananas with brown spots for maximum sweetness. Add strawberries just before serving to avoid sogginess. Cold equipment helps whip cream faster. To keep bananas from browning, add lemon juice or assemble shortly before serving. For dairy-free or gluten-free versions, use appropriate substitutions as noted.
Nutrition
- Serving Size: 1/8 of the trifle
- Calories: 320
- Sugar: 24
- Sodium: 210
- Fat: 18
- Saturated Fat: 11
- Carbohydrates: 36
- Fiber: 3
- Protein: 4
Keywords: banana pudding, no-bake dessert, summer dessert, trifle, fresh strawberries, easy dessert, quick dessert, layered dessert