Love this? Save it for later!
Share the inspiration with your friends
“You won’t believe what I ended up making for my niece’s graduation party,” I said to my friend as I shuffled through a pile of craft supplies one late Saturday afternoon. Honestly, I had no grand plan at first—just a vague idea to whip up something sweet that looked festive and fun. The power flickered briefly, and I almost gave up on the idea of baking altogether. But then, while rummaging through my pantry, I spotted some leftover chocolate bars and a small jar of edible gold dust I’d forgotten I owned.
That’s when the idea hit me: why not create a chocolate bark shaped like graduation caps, sprinkled with gold dust and splashed with her school colors? I mean, it was a last-minute brainstorm born out of a mix of desperation and excitement. I’d never made themed chocolate bark before, and I wasn’t sure how it would turn out, but the thought of turning simple chocolate into a celebratory treat felt right.
The next few hours were a whirlwind of melting chocolate, imperfectly piped tassels, and a tiny mess involving a cracked bowl (don’t ask). Maybe you’ve been there—trying to multitask in the kitchen while the clock ticks down to party time. But by the end, I had this gorgeous, shimmering bark that looked way fancier than it was. It wasn’t just a dessert; it was a fun memory in itself.
Since then, the Perfect Graduation Cap Chocolate Bark has become my go-to for celebrating milestones—simple, joyful, and a little bit sparkly. If you’re looking to surprise your grad with something homemade that’s both easy and impressive, stick around. Let me tell you how this recipe came to be a sweet classic in my kitchen.
Why You’ll Love This Recipe
Honestly, this Perfect Graduation Cap Chocolate Bark recipe has been tested and tweaked through several family gatherings and impromptu celebrations. I’m not a professional chocolatier, but I do know what works after a handful of happy accidents and some serious taste testing.
- Quick & Easy: You can have this ready in under an hour, which is perfect when you’re juggling last-minute party prep.
- Simple Ingredients: No fancy or hard-to-find stuff here—just good chocolate, school colors in candy melts or sprinkles, and a touch of edible gold dust.
- Perfect for Graduation Parties: Whether you’re hosting a big bash or an intimate family dinner, this bark fits right in.
- Crowd-Pleaser: Kids, adults, even the pickiest eaters love the mix of creamy chocolate and colorful accents.
- Unbelievably Delicious: The combination of smooth chocolate and that subtle crunch from the toppings makes it downright addictive.
What sets this recipe apart? It’s the careful balance of textures and colors—plus that little sprinkle of gold dust that makes the bark feel extra special without fuss. The method is straightforward but yields a treat that looks like you spent hours on it (I won’t tell if you don’t). You’ll find yourself closing your eyes after the first bite, savoring that perfect mix of sweet and festive.
What Ingredients You Will Need
This recipe calls for simple, wholesome ingredients that deliver bold flavor and a festive look without complicating things. Most are pantry staples, and the colorful touches can be swapped easily depending on your grad’s school colors or personal preferences.
- Chocolate: 12 oz (340 g) high-quality semi-sweet or dark chocolate chips or bars (I recommend Ghirardelli or Lindt for smooth melting)
- Candy Melts: 1 cup (150 g) in your school’s primary color (Wilton brand works great for vibrant colors)
- White Chocolate or Candy Melts: ½ cup (75 g) for contrasting accents or tassels
- Edible Gold Dust: 1 teaspoon (adds a festive shimmer—available at specialty baking stores or online)
- Sprinkles or Nonpareils: ½ cup (75 g) in your school’s secondary color (optional, but adds texture and fun)
- Black Fondant or Black Candy Melts: Small amount to shape the graduation caps (optional; you can also use dark chocolate)
- Vegetable or Coconut Oil: 1 tablespoon (to smooth out melted chocolate if needed)
- Wax Paper or Parchment Paper: For lining your baking sheet
If you’re missing candy melts in your school colors, you can swap with colored sprinkles or edible markers to decorate. For a dairy-free option, try coconut-based chocolate and candy melts. In summer, fresh edible flowers can be a beautiful touch instead of sprinkles.
Equipment Needed
- Baking Sheet: A rimmed sheet lined with parchment or wax paper to create and cool the bark
- Microwave-Safe Bowls: For melting chocolate in short bursts (glass or ceramic preferred)
- Spatula or Silicone Spoon: To spread melted chocolate evenly
- Small Paintbrush or Food-Safe Brush: For applying edible gold dust delicately
- Piping Bags or Zip-Top Bags: For piping candy melts into tassels or decorative shapes (snip the tip as needed)
- Offset Spatula or Butter Knife: Helpful to smooth chocolate or lift delicate pieces
You don’t need fancy tools for this. I’ve successfully used a basic microwave and old mixing bowls, and the results were still stunning. If you’re on a budget, silicone spatulas and plastic piping bags work just fine. Just keep your utensils dry and free of water to avoid chocolate seizing.
Preparation Method
- Prepare Your Workspace (10 minutes): Line a baking sheet with parchment paper and set aside. Gather all your ingredients and equipment so everything’s within reach.
- Melt the Main Chocolate (8-10 minutes): Chop the chocolate bars if needed. Microwave in 30-second intervals, stirring well after each burst until smooth and glossy. Add a tablespoon of oil if the chocolate feels too thick. Avoid overheating or the chocolate will seize.
- Spread the Chocolate (5 minutes): Pour the melted chocolate onto the lined baking sheet. Use a spatula to spread it evenly to about ¼-inch (6 mm) thickness. Don’t worry if the edges aren’t perfect—that’s part of the charm.
- Create the Graduation Caps (15 minutes): Melt black candy melts or use dark chocolate in a separate bowl. Spoon small squares onto the bark to resemble caps. Use white chocolate or contrasting candy melts in a piping bag to add tassels and details. If your piping is messy, just smooth it out gently with a damp finger or spatula.
- Add School Colors and Sprinkles (5 minutes): While the chocolate is still wet, sprinkle your colored candy melts, sprinkles, or edible confetti around and on top of the caps. This will stick as the chocolate sets.
- Apply Edible Gold Dust (5 minutes): Use a small, dry brush to gently dust the bark and caps with edible gold. This step adds a subtle shimmer and makes the whole bark look fancy without extra sugar.
- Let the Bark Set (30-40 minutes): Place the baking sheet in the fridge or a cool room to harden. Try not to move it too much to avoid cracks.
- Break and Serve: Once set, break the bark into irregular pieces. You can arrange them on a platter or package in cellophane bags as party favors.
Quick tip: If your chocolate starts to harden before you finish decorating, pop it briefly back in the microwave for 10 seconds to soften. I learned that the hard way when my first batch got a bit too firm mid-decoration!
Cooking Tips & Techniques
One key to gorgeous bark is patience. When melting chocolate, don’t rush it—slow and steady wins the smoothest texture. I always stir well between microwave bursts, and sometimes I even use a double boiler if I’m feeling fancy.
Another lesson I learned was about temperature: if your kitchen is too warm, the bark can melt or lose its shape quickly. Working in a cooler space or chilling the bark early helps keep those graduation caps crisp and neat.
For piping tassels, don’t stress about perfection. Use a steady hand, but if it looks a bit uneven, that’s charming and homemade. If you’re nervous about piping, a toothpick can help you drag small lines gently.
Lastly, when breaking the bark, press gently but firmly. If you break it too roughly, you risk smashing the delicate decorations. Using your hands instead of a knife gives you more control.
Variations & Adaptations
- Dietary: Swap regular chocolate for vegan or sugar-free options to accommodate dietary needs.
- Seasonal: Instead of school colors, use seasonal colors or themes like autumn leaves or spring pastels for other celebrations.
- Flavor Twists: Add a pinch of sea salt or a dash of chili powder to the chocolate for a rich, unexpected flavor kick.
- Cooking Methods: If you don’t want to use a microwave, melt chocolate gently over a double boiler on the stove.
- Personal Variation: One year, I added crushed peppermint candies into the bark—gave it a festive crunch that everyone raved about.
Serving & Storage Suggestions
Serve the bark at room temperature for the best texture and flavor. It pairs wonderfully with a hot cup of coffee or sparkling cider for celebratory toasts. Arrange pieces on a decorative platter alongside other treats like crispy garlic chicken appetizers or fresh fruit for a festive spread.
Store leftover bark in an airtight container in a cool, dry place or the fridge to prevent melting. It keeps well for up to two weeks, though it rarely lasts that long! For longer storage, freeze the bark wrapped tightly in foil and placed in a freezer-safe bag; thaw at room temperature before serving.
Flavors tend to meld and deepen with time, so if you have the patience, letting the bark sit for a day can make it taste even better. Just keep it away from strong odors in the fridge.
Nutritional Information & Benefits
Each serving of this chocolate bark (about 1 oz or 28 g) contains roughly 150-180 calories, depending on the type of chocolate used. It provides a good source of antioxidants from dark chocolate and a modest amount of fat and sugar.
Using high-quality chocolate ensures you get more cocoa solids and fewer additives. The edible gold dust is purely decorative and non-toxic, adding sparkle without calories.
For those watching allergens, this recipe contains dairy and soy (common in chocolate), but can be adapted with dairy-free and soy-free chocolate alternatives. It’s a sweet treat meant for sharing and celebrating, best enjoyed in moderation.
Conclusion
This Perfect Graduation Cap Chocolate Bark recipe is a wonderful way to add personality and sweetness to your grad’s big day. It’s easy enough for last-minute prep but looks like you put in hours of effort. I love how it brings a bit of sparkle and joy to celebrations, and honestly, it’s just plain fun to make.
Feel free to tweak it to suit your grad’s personality or your pantry stash. The best part? Seeing everyone’s faces light up when you present this unique treat. If you give it a try, I’d love to hear how it turns out—drop a comment or share your own creative twists!
Here’s to sweet celebrations and memories that stick around long after the last piece is gone!
FAQs
Can I use milk chocolate instead of dark or semi-sweet chocolate?
Absolutely! Milk chocolate will make the bark sweeter and creamier. Just watch melting times closely as milk chocolate can scorch more easily.
How do I store the chocolate bark to keep it fresh?
Store in an airtight container at room temperature or in the fridge if your kitchen is warm. Avoid humidity and strong odors to keep the flavors pure.
Is edible gold dust safe to eat?
Yes, edible gold dust is food-grade and safe in small quantities. It’s purely decorative and adds a festive shine to desserts.
Can I prepare this recipe ahead of time?
Yes! Make the bark a day or two before your event and store it properly. It actually tastes better after resting for a day.
What can I use if I don’t have candy melts in school colors?
You can substitute with colored sprinkles, edible markers, or even painted white chocolate using food coloring gels. Get creative!
Pin This Recipe!

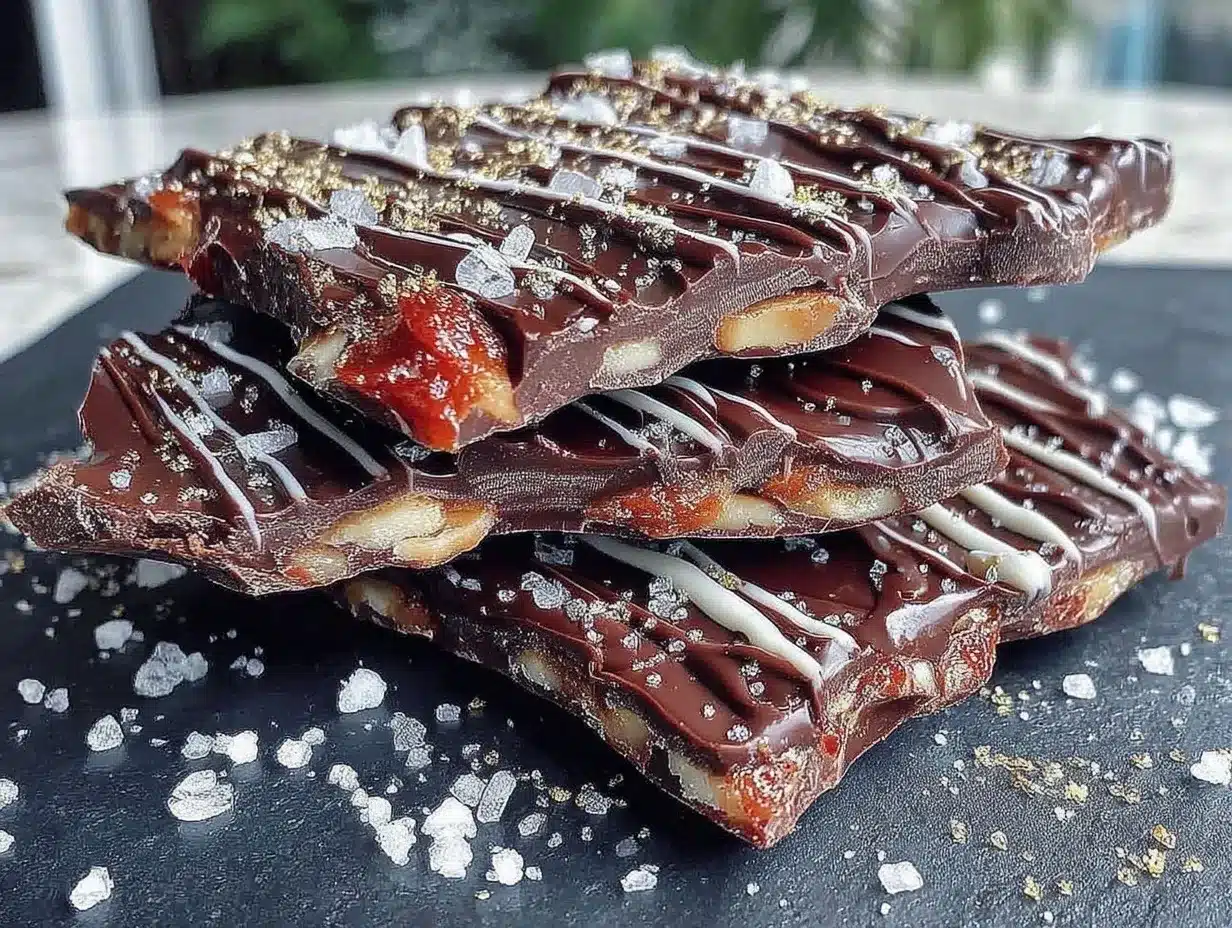
Perfect Graduation Cap Chocolate Bark
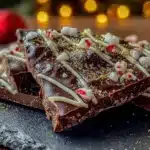
A festive and easy-to-make chocolate bark decorated with graduation caps, school colors, and edible gold dust, perfect for celebrating milestones and graduation parties.
- Prep Time: 10 minutes
- Cook Time: 40 minutes
- Total Time: 50 minutes
- Yield: About 12 servings 1x
- Category: Dessert
- Cuisine: American
Ingredients
- 12 oz (340 g) high-quality semi-sweet or dark chocolate chips or bars
- 1 cup (150 g) candy melts in your school’s primary color
- ½ cup (75 g) white chocolate or candy melts for contrasting accents or tassels
- 1 teaspoon edible gold dust
- ½ cup (75 g) sprinkles or nonpareils in your school’s secondary color (optional)
- Small amount black fondant or black candy melts to shape graduation caps (optional)
- 1 tablespoon vegetable or coconut oil (to smooth out melted chocolate if needed)
- Wax paper or parchment paper for lining baking sheet
Instructions
- Prepare your workspace by lining a baking sheet with parchment paper and gathering all ingredients and equipment (10 minutes).
- Chop the chocolate bars if needed. Melt the main chocolate in microwave-safe bowls in 30-second intervals, stirring well after each until smooth and glossy. Add 1 tablespoon oil if chocolate is too thick. Avoid overheating (8-10 minutes).
- Pour melted chocolate onto the lined baking sheet and spread evenly to about ¼-inch (6 mm) thickness using a spatula (5 minutes).
- Melt black candy melts or use dark chocolate in a separate bowl. Spoon small squares onto the bark to resemble graduation caps. Use white chocolate or contrasting candy melts in a piping bag to add tassels and details. Smooth out any messy piping gently with a damp finger or spatula (15 minutes).
- While chocolate is still wet, sprinkle colored candy melts, sprinkles, or edible confetti around and on top of the caps (5 minutes).
- Use a small, dry brush to gently dust the bark and caps with edible gold dust for a subtle shimmer (5 minutes).
- Place the baking sheet in the fridge or a cool room to let the bark harden without moving it too much (30-40 minutes).
- Once set, break the bark into irregular pieces and arrange on a platter or package as party favors.
Notes
If chocolate hardens before decorating, soften briefly in microwave for 10 seconds. Work in a cool space to keep bark shape. Use a toothpick for piping tassels if needed. Press gently when breaking bark to avoid smashing decorations. Can melt chocolate using double boiler as alternative to microwave.
Nutrition
- Serving Size: 1 oz (28 g) piece
- Calories: 165
- Sugar: 14
- Sodium: 10
- Fat: 11
- Saturated Fat: 6
- Carbohydrates: 17
- Fiber: 2
- Protein: 2
Keywords: graduation, chocolate bark, school colors, edible gold dust, easy dessert, party treat, homemade chocolate